Realizing that I have a tendency to create mostly standard open to one side cards, I asked myself why that was when I so enjoy more interesting structures. I realized that a good share of the reason is that most of the time I'm in a hurry and I don't want to have to spend a bunch of time or create my card bases from card stock myself. So, I've decided to make a list of card structures that I can easily make from standard card blanks! Hopefully this will help me increase the variety of structures that I use, and perhaps will help you as well!
- Aperture Card - For this card, simply cut a hole in the card front (a die is great for this!) so that a feature from the inside of the card shows through.


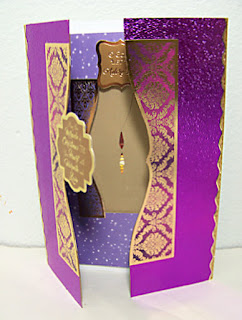
- Aperture with Inside Foldback: - This card is made using two card blanks - one cut 1/4" smaller than the other. The smaller one has the card front scored in half and folded like a fold-back card. The smaller one is then glued centered to the inside of the larger one - with the fold back on the right. An aperture is cut from the larger card front and the cut out piece is glued to the right side only of the inside card so that the cut out aperture piece fills the aperture window. This serves as a mat for whatever you put as a focal.
.JPG)
.JPG)
- Arrow Card: This card looks complicated but really is pretty easy - especially if you have a centering ruler to use for finding the center of something. Simple mark the center of the card front on the right and left sides and on the bottom. Then score the card front from the upper left and upper right corners to the center bottom - and again from the center of the sides to the center of the bottom (again, scoring only the card front). Fold the first two as mountain folds, and the other two as valley folds. Crease firmly and glue in place.
%20-%2020250425.JPG)
You can easily decorate the "background" by using a piece of decorative paper that is 4" x 5 1/4". Simply cut from the upper right corner to the bottom middle, and from the upper left corner to the bottom middle creating 3 triangles. The outer two will go on the inside of the card (see below) and the middle one will go on the outside.
%20-%2020250425.JPG)
- Cut Away - For this type of card, you simply cut away some of the front of the card. This can be done with a straight line, or a more decorative one.


-
Cut Away with Latch - This card is similar to the basic cut away card - except that there is a "latch" (small embellishment on foam tape) that holds the card closed and a couple of score lines near the latch that help make the card easier to open and close. Instructions here.


- Cut Away with Acetate - For this type of card, you cut away some of the front of the card as before, but this time you add acetate to replace what you cut off - overlapping it just a bit so you can attach it to the card front (put a border or something on the inside to hide the join). For more information on this card, check here. While not done here, you could add a piece of the card front back on to the side so you have acetate holding it to the rest of the card front. This gives an effect something like a "Gap Card".


In the picture below, you'll find another version of cut-away acetate card. You can find instructions here.

- Diorama Card - Using the die from Divinity designs, cut the front & back pieces from the front & back of a card.


- Easel - Vertical - same as above, with front scored in half parallel to the fold, but turn it vertically.

- Easel - Twisted - similar to the standard easel, but score card front in half on the diagonal.

-
Easel - Triple Style - Fold on the normal score line. Then score and fold the card front in half (just like for the basic easel). Now, with the card front facing you, draw 2 vertical lines the same distance from the edge and cut on these lines just to the center fold line (see 1st picture below). It's not as easy to see in the picture as I had hoped, but you see a mountain fold in 3 pieces - two narrow ones on the sides and a larger one in the center. This time we're adding 3 panels to the front and 3 things on the inside of the card to hold them in place. Note that this card works best if the two side holders are set a different distance from the center one (example, in this case the flowers holding the side panels are farther out than the sentiment holding the center panel). Instructions for this card are here.


- Easel - Vertical -
- Folded Panel Card - Unopened, this card looks similar to a cut away card, but it's a bit more interesting when opened. Simply score the center of the card front and fold it back forming 2 panels - one on the outside & one on the inside of the card.
 For added interest, you can add an element to serve as a "Latch" to hold it closed - like I did on this card:


OR add a band to to the fold back card like this:
.JPG)
- Gap Card - For this one you slice out the middle of the card front and replace it with something else - like die cut words or decorative pieces. In this case I used a die cut strip to replace it. You can read more about how I did it here.


- Gate Fold & Interlocking Gate Fold - To make a gate fold - don't fold along the center score line. Place the open card blank in front of you horizontally (the center score line is now running vertically). Score each side in half vertically. Fold along these new score lines (only) and you have your basic gate fold card. To make it interlocking, all you need to do is make sure you have a frame of some sort for your focal. Glue the frame ONLY to the right side of the card, and the focal ONLY to the left side. You'll see that these then interlock as you close the card. Make sure an additional elements are added to only one or the other side as well so they don't glue your card closed! More information on this card here.

You can also turn this card on its side like I did here:

- Gate Fold Marquee Card - Now that dimensions have been figured out (see HD Nativity #1), this card really isn't too hard - though certainly more complicated than some. Cutting dies could also make it a lot easier.


- Gate Fold Window Card - No example yet, though the marquee card above is a little like this! Make it like a gate fold, but before you add your background paper, put a die cut side up on the center of the inside of the card (tape in place). Close the card & lay your background paper on top (tape in place - may want it to be slightly smaller than the card itself so there is a bit of a border around it), and send it through your die cutting machine. You now have a decorative window cut out of the front of your gate fold card & your paper (so you can more easily add it to your card front - if you wish you can trace along the edge of the die on your paper & fussy cut to give you a narrow border). Obviously, whatever is in the center of the inside of your card will show through.
- Gate Fold with Diamond Hammock - To make a gate fold - don't fold along the center score line. Place the open card blank in front of you horizontally (the center score line is now running vertically). Score each side in half vertically. Fold along these new score lines (only) and you have your basic gate fold card. To make it a diamond hammock, you will cut another piece of cardstock for the inside that will pop out when opened. This card can be extra bulky because of the diamond hammock, so you might want to create a belly band. This one is fastened in the back using a piece of velcro. More information on this card here.
.JPG)
.JPG)
- Penny Slider Card - This card is actually easier than expected. Simply make a card topper with a slot, use a couple of pennies with a piece of foam tape between them for the slider and attach the topper to the card front - more details here.


- Pop Up Cards - This type of card can easily be made by cutting a piece of card stock the size you want it, plus extra for gluing & "popping up". For example, this first one had a piece of card stock cut to the size of the square greeting, but extended top and bottom by one inch. I then scored at 1/2" and 1" from the top & bottom, folded on the score lines, and glued in place as you see here.
.JPG)
.JPG)
- Shadow Box Card - Surprisingly easy to make, simply cut a card blank at the fold line separating it into two equal pieces. Score both ends at 1/2" and 1" on each card. Cut a hole in one, glue together just between the edge and the 1st scored lines - more information here.

.JPG)
.JPG)

- Shaker Card - Card base is not modified - but a topper is created to hold the shaker pieces - see here.


- Spanner Card - This card looks complicated, but is really QUITE easy!
.JPG)
It starts with a standard fold card. Slice ONLY the card front front at 1 1/4" from each side (see next picture). The gap between them is "spanned" with a strip of acetate. In this case, I glued a gate & fence to it, but you could use a variety of things - including a simple greeting.
.JPG)
For specific details of how I decorated this card, you can check out this post.
.JPG)
- Step Card: Center Step - This card requires 2 cuts with a craft knife and a couple of extra score lines. Instructions can be found here.

Height from bottom of card to score line D & from score line D to score line C are each the same as distance as from score line B (center of card only) to score line A (side only).

- Step Card: Center Step Inverted - This card requires the same 2 cuts with a craft knife or die - but the score lines are "inverted". The one in the center in the standard center step is moved to the sides - and those on the sides are moved to the center (see picture below) and more information here.


- Step Card - Center Step Inverted AND upside down! - The card base is made the exact same way as the Center Step Inverted card - but is then turned upside down to create this unique scene-stealing card! While not required, I added acetate to the front of this card to create a nice 3-D window effect. For more information on how to create this card, check here.

- Step Card: Dual Side - This card also requires 2 cuts with a craft knife and several score lines. Instructions are here. Here's another - this time an A2 sized card.


- Step Card: Side Step - I made this card using a card blank for a 5 x 7 card. Mark a vertical line at the width you want the left side of the card (in this case I made the left side 3" wide). On the right side of the card, score horizontal lines from bottom at: 1", 2", 3.5", 5"(this should be the original score line), and 7.5" - more details here.


- Trifold - Ignore the original score line - instead make 2 score lines dividing card blank into 3 equal parts. More details here.


-
Trifold Flap - Ignore the original score line - except as a reference. Score a line parallel to the original score line a little way in from the right side of the card (the width that you want the flap). Score another parallel line measuring from the left the width you want your card front (making it at least a little shorter than half the remaining width so it will close with no problem). More details here.


- Window Card with Lattice - Basically this type of card has a window cut out of the front with lattice covering it. Usually the lattice is put behind the window (requiring more finishing on the back side of the card) but for this card I put it on the front - and extended it beyond the window. More details here.


- Next Card Type - Information here.
1 comment:
Wow lots of great idea's! Thanks for sharing.
Post a Comment