
Today I started working on another Hunkydory set of Christmas cards. This set once again comes from the kit called A Sparkling Season. This time the set is the one called Let it Snow. The picture above shows the die cut sheet, two "Adorable Scoreable" (AS) coordinating printed card stock sheets, and two additional sheets I got from the coordinating AS set you can buy separately. Then, I also bought the 8 x 8" coordinating paper pack. You can see some of the pages and cutouts from that pack in the picture below.

These are just the ones I thought coordinated well with the Let It Snow set.
I started with the swan elements, and got a total of 8 cards from that. Here's a picture that shows all 8:

And here are pictures of each card up close & personal:
Card #1:

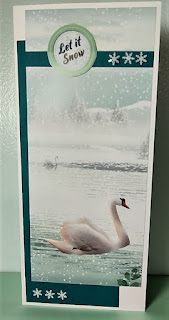
A piece cut from one of the AS pages formed the base of this card. I split the panel & added a strip of teal glitter card stock as you can see. I added sequins, a bit of glitter ribbon, and a couple die cut snowflakes from my stash - along with the greeting and swan cutouts from the set.
Inside:

A scrap of "water" from the AS, a piece of glitter card stock, and another snowflake die cut decorate the inside - along with stamped message (Mom's stamp).
Card #2:
This card is a bit unusual. It started with a piece cut from one of the 8 x 8 pages. I found a teal piece of card stock in my scraps that was also 8". After cutting a couple of strips from the scrap (for the border on the front and on the inside of the card), I glued it offset as you see here. I decided it needed a border to set of the cut out greeting (also from the 8 x 8 paper pack). I added Neuvo drops to both borders, but didn't like the way the looked, so covered them with mini snowflake confetti from my stash.
Inside:

A scrap of "water" from the 8 x 8 page, a cut out swan, the scrap of teal card stock, and more mini snowflakes complete the inside.
Card #3:

A cut-out swan (from set) decorates a background piece cut from the 8 x 8 paper. I added a teal mat, a white and teal ribbon border, and a greeting created with dies (teal - Spellbinders Splendid Circles and Lifestyle Nesting Circles set) and stamp (HOTP bulk Christmas set).
Inside:

More of the same materials are used inside. The stamp is one of Mom's. The snowflake confetti from my stash.
Card #4:

I LOVE the way this first one turned out. It's a center step card with 3/4" borders. The background for the center portion is one of the coordinating AS purchased separately. The focal is a frame saved from a previous set framing a portion of one of the 8 x 8 pages. The side borders were cut from one of the AS sheets that came in the set & the bottom border was a die cut border strip from the set (the leftover piece from this border is on the inside of the card). The die cut greeting, also from the set, completes the outside of the card.
Inside:

Inside is simply a stamped message (one of my Mom's stamps - stamped in silver ink) and the remnant of the border strip from the card front.
Card #5:

This time I have a teal frame (from my stash) around a piece of the 8 x 8 paper. The only other thing I added was the "Let it Snow" die cut (from Moonstone's Splendid Snowflakes).
Inside:

Inside is more of the same - and a stamped message (again one of Mom's stamps).
Card #6:

For this one I started with a piece of AS and embossed around the edges with glittered embossing powder. I added a cut-out tag (from the paper pack) and a bunch of dazzles stickers - mostly "snowflakes" - then backed it all with a narrow border of teal.
Inside:

More of the same materials were used on the inside - also backed the snowflake sticker with teal. The greeting was one of Mom's stamps, heat embossed with Stampendous Denim powder.
Card #7:

This is another favorite. This time I started with a die cut focal & frame. I decided to make an aperture card with it. The starry background is one of the coordinating pieces of AS that was purchased separately. The lower border is a strip cut from one of the coordinating AS pieces that came in the set, backed with white card stock. I cut the background with a larger die than I used for the aperture so there would be a bit of white showing around it. Then I framed the aperture with the frame & glued the focal to the inside of the card (both from a set of circle dies from Lifestyle). I die cut a snowflake from holographic paper (Moonstone Splendid Snowflakes Die set) and a white mat for it (Spellbinders Splendid Circles die set) and added it to the border. A die cut greeting from the set completes the card front.
Inside:

Here you can see the die cut focal on the inside of the card - along with a greeting stamped with silver ink (Mom's stamp).
Card #8:

Here I took a small swan die cut, placed it on the scrap circle I cut when making the aperture card, added ribbon from my stash & a die cut frame to create the focal. The card is made as a fold back card, and is held closed with the die cut greeting that was added with foam squares. The background is holographic paper from my stash. It's hard to photograph that holographic paper - doesn't really show the true color in the picture. Basically it's silver holographic that reflects whatever colors are around it.
Inside:

The only addition inside is the stamped message - from HOTP stamp set called Christmas Cheer.
No comments:
Post a Comment