Please let me hear from you!

This blog is for sharing a love of paper crafting. You can also check out my Pintrest pages. If you find the ideas here to be helpful, I'd love to hear from you. It is what helps make the time I put into this blog feel worthwhile, and always brightens my day. I love hearing your ideas too!

(To leave a comment, scroll to the bottom of the post. You will see how many comments there are for that particular post. Click on the number of comments and the comment window will open. Also, if you want to add a link to something, follow the instructions at the bottom of this post.)

NOTE: If you click a link from the menu (below left) and are told the page does not exist, chances are good that it's a prepared post that will post at some point in the future, so be sure to check back!

You can also click this Pinterest Button to pin pictures in the blog posts.


Monday, December 22, 2014

Joy in Teal & Gold


Materials:
  • Glossy cardstock, alcohol inks, gold embossing powder, embossing ink
  • JustRite stamps: Christmas Miracle Ornaments
  • Spellbinders dies: 5X7 Heirloom Legacy, 2012 Heirloom Ornaments
  • M-bossabilities: Imperial

Sunday, December 21, 2014

Blue & Green Christmas Wishes


Materials List:
  • Glossy cardstock, alcohol inks, embossing ink, silver embossing powder
  • DCWV paper, Silver Sharpie
  • Green glimmer paper, Cheery Lynn French Lattice cutting die
  • Adhesive-backed cardstock, Spellbinders Celtic Motifs
  • Spellbinders 2011 Heirloom Ornaments die, JustRite Deck the Halls Stamps
  • Ribbon

Saturday, December 20, 2014

Pink & Green Ornaments


Materials:
  • White cardstock, alcohol inks, silver embossing powder, ribbon, DCWV paper
  • JustRite Stamps: Christmas Vintage Labels One, Noel Christmas Ornaments
  • Spellbinders Dies: 2012 Heirloom Ornaments

Friday, December 19, 2014

Guide Us To Thy Perfect Light


Materials List:

  • White Glossy Cardstock, Alcohol Inks, Silver embossing Powder
  • JustRite Stamps: Noel Christmas Ornaments, Deck the Halls
  • Spellbinders Dies: 2011 Heirloom Ornaments, Poinsettia, Holly Accents
  • Dazzles

Thursday, December 18, 2014

Wishing You Christmas Ornaments


Materials Used:
  • Glossy Cardstock, Alcohol Inks, Embossing Ink, Red & Gold Embossing Powders
  • Spellbinders Dies: 2010 Heirloom Ornaments, Decorative Labels Eight
  • JustRite Stamps: Noel Christmas Ornaments, Mix and Match Christmas Blessings
  • Gold Liquid Pearls

Wednesday, December 17, 2014

Christmas Memories


Materials Used:
Fiskars Cutter 
Spellbinders Dies - 2010 Heritage Ornaments, A2 Bracket Border One
JustRite Stamps - Deck the Halls
HOTP Dazzles & Paper
Black Enamel Accents
Black Embossing Powder & Embossing Ink


Tuesday, December 16, 2014

Xmas Polar Bears


Rather than taking my crafting time writing up methods that are probably self-explanatory, I'm just going to write a quick materials list.  

Materials List:

  • White Glossy Cardstock, Alcohol Inks, White Embossing Powder, Embossing Ink
  • HOTP Small Stamps - Polar Bears, Winter Wonder
  • Spellbinders Labels Twenty Dies
  • JustRite Vintage Labels & Banners
  • HOTP 3-D Snowflake Dazzles
  • HOTP patterned paper


Monday, December 15, 2014

Christmas Magic Slider

This card magically colors itself as the slider is pulled up to show the message: 


The basics of how to make this card is detailed in the 100 Movable Parts Cards CD from HOTP.  It is called a Magic Window Slider Card, but I modified it with the Snowflake-shaped Window instead of a square one. 

Materials Used:
  • Paper Artist Dies (HOTP) - 6 Layered Labels & Two Swirls
  • Spellbinders Dies - Persian Motifs & Accents
  • HOTP Stamp - Snowflakes Small Stamp
  • JustRite Stamps - Mix and Match Christmas Blessings
  • Darice Embossing Folder - Snowflakes
  • Silver Staze-On
  • Silver Sharpie

Sunday, December 14, 2014

Xmas Cut & Emboss in Gold & Teal


Materials:
  •  White Glossy Card Stock
  • Glimmer paper in gold & teal
  • JustRite Dies & Stamps: Vintage Labels & Banner Dies, Christmas Vintage Labels One, Mix and Match Christmas Blessings
  • MaryAnn Cut & Emboss Folder - Swirls
  • M-Bossabilities Folder - Asian
  • Spellbinders Dies - Fleur De Lis Motifs
  • Alcohol Inks - Stream, Gold Mixative & ? 
  • Gold Embossing Powder
  • Gold Liquid Pearls
  • Gold Ribbon
This card started with a focal made from glossy cardstock as described here.  The background is embossed gold glimmer paper.  The teal glimmer paper was cut and embossed using the MaryAnn cut & embossing folder. The focal was added with foam tape for dimension. Next I added gold liquid pearls. The gold ribbon finishes off the front of the card.

The inside is pretty simple - teal cut with Spellbinder's die, and matted with gold, gold embossed message & gold liquid pearls.


Saturday, December 13, 2014

Birthday Girl


Materials:

Spellbinder's Die Set - "Resplendent Rectangles"
Stamp Sets - "Janie's Girls" by HOTP, "Unlisted" by Inkadinkadoo
Black Stamp Pad
Gel Pens

Method:
Today's card highlights the fun I had playing with my new stamp set from HOTP.  This little girl with the signboard can be used for many messages.  This one just happened to be for a birthday card (message from an Inkadinkadoo mini stamp set "Unlisted").  As you can see I cut her out using one of the Spellbinder's dies and then matted it using a piece cut from pink textured paper using the same die set.  Then I colored her with gel pens, using the Dove blender to soften the edges.

Friday, December 12, 2014

Hidden Window Spinner Card


Cardstock: White, 2 pieces of  Red 12" X 12"  (one side can be a bit shorter, but must be at least 10" wide)
Spellbinders Cutting Dies: "2010 Heirloom Ornaments", "Holly Accents", "5 X 7 Elegant Labels Four"
Embossing Folders: M-bossabilities "Imperial"
JustRite Stamps: "Deck The Halls", "Noel Christmas Ornaments", "Mix and Match Christmas Blessings"
Embossing Powder: Red, White

Card Base:
  1. Place card stock in front of you (if one edge is shorter, the shorter edge should be horizontal).  Measure 7" from the bottom and draw a dotted line dividing the cardstock into two parts - lower part is 7" high & upper part is 5".
  2. Now rotate card stock 1/4" so 7" wide part is to your left and measure 5" from the bottom.  Draw a dotted line the full 12" long at this 5" mark.  
  3. Next, on the side that is 7" wide, draw a solid line that is 5" from the dotted line (10" from the bottom edge). 
  4. On the 5" wide side, draw a solid line that is 6" from the bottom edge or 1" from the dotted line.
  5. Along the original dotted line (now perpendicular) draw it in solid from the 10" line to the dotted 5" line.
  6. In the bottom right corner, draw a solid line from the original dotted line to the 5" dotted line (diagonal line).
  7. Mark the center of this line you just drew (should be 3 1/2") and draw a dotted line from that mark to the corner formed by the crossing point of the original 7" line & the 5" line (another diagonal line).
     8. Cut on all solid lines.  Score on all dotted lines. 

      9. Using the 2nd piece of cardstock, make a mirror image of the above.
    10. Taping the two together - mirror images facing each other - use a die to cut a hole as shown below:

      11.  Line up the two pieces together with the little flaps hiding in between as you see here.

Now comes the fun part - decorating your card!
I made my "spinner" by stamping and embossing two smaller ornaments (red embossing powder on white paper).  Glue them back to back with a thread running through the center lengthwise.  Then attach the thread inside your card before gluing it together.  NOTE: You will want to wrap the thread at least once around a thin strip of card stock on either end and sandwich it between the sheets to ensure it doesn't pull through!

Then I made a couple of larger ornaments embossed in red just like the smaller ones and attached them to the two inner pages of the card. Next I cut some borders using one of the Holly Accents cutting dies (I cut each strip into two pieces. I needed 4 full strips - 8 pieces after I cut them - to decorate top and bottom of all inner pages).

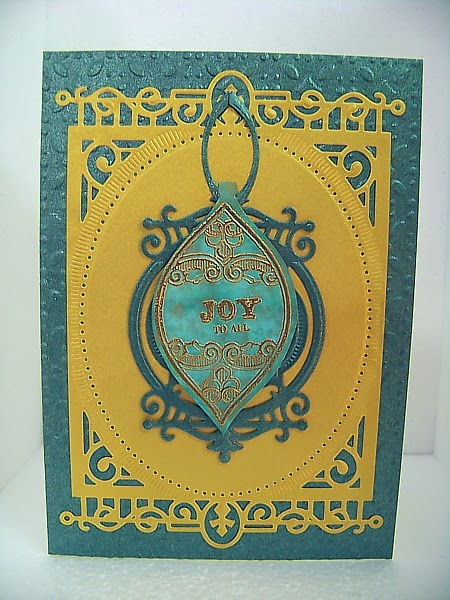
The front was created in layers: - a piece of white embossed with the M-bossabilities folder - a red frame cut out using the two largest dies in the Elegant Labels Four die set - an ornament cut from red and embossed with white.

Now simply twist the "spinner" and close the card so when your recipient opens the card the spinner will start to spin!