
Today I have a REALLY quick scrapbook to show you. I really wanted this scrapbook ready for Christmas this year because it marks 30 years since we first started an important family tradition. I didn't have a lot of time, so could DEFINITELY have decorated the pages more - especially as I moved farther into it and ran out of decorative bits I had on hand. I decided I could always come back and add more to the pages as I have time. At least I have SOMETHING to show the family. The papers are a variety from my stash. The ones that I speak of as "pre-designed" or "pre-made" are from a DCWV stack (but I don't remember the name of it. Other papers are from a HOTP Christmas Sweets paper pack. Still others are from my stash and I have no idea where I got them.
Page #1 (above): Much of this page was pre-designed. I simply cut around the corner of the calendar & journaling block so the picture could slip behind it. I then added a matted title spelling out the year, and a label under the picture. The snowflakes were ones I had on hand - made with Spellbinder's cut fold tuck snowflake dies. The candy cane was something I found in my stash, as was the holly piece. I think they may have been part of a freebie download from HOTP.
Pages 2 & 3:

This dual page layout was made using papers I found in my stash. The letters that I used for the titles were all from a HOTP set. Here you can see them a little closer:


Pages 4 & 5:

Because I was in a hurry, all journaling was done by hand. I'm sure it would have looked better if it had been done on the computer. I used a large circle stencil to cut out the large circular shapes - would have looked better if both sides had been the same dark brownish red paper - but I didn't have two the same.
And close up:


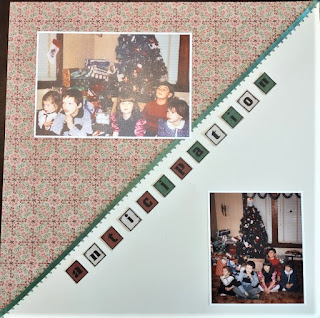
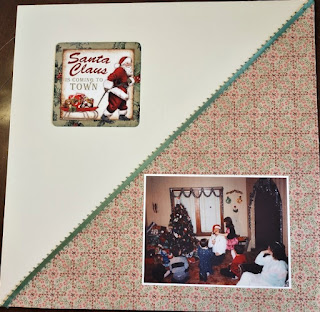
Pages 6 & 7:

This page looks REALLY empty. At some point I'll figure out more to add to it. I cut the patterned paper on the diagonal & added to two sheets of cream colored card stock. The green border is a ribbon. The "Santa Claus is Coming to Town" is from a Debbi Moore freebie.
Close Up:
Pages 8 & 9:

The titles here were die cut using no brand alphabet dies.
Close Ups:


Page 10:

Once again I used a patterned card stock that basically gave me a "pre-made" page. It, too, could benefit from added decoration when I have time to figure something out.
That's it! 10 simple and quick pages to help us celebrate this milestone Christmas in our family.


