Please let me hear from you!

This blog is for sharing a love of paper crafting. You can also check out my Pintrest pages. If you find the ideas here to be helpful, I'd love to hear from you. It is what helps make the time I put into this blog feel worthwhile, and always brightens my day. I love hearing your ideas too!

(To leave a comment, scroll to the bottom of the post. You will see how many comments there are for that particular post. Click on the number of comments and the comment window will open. Also, if you want to add a link to something, follow the instructions at the bottom of this post.)

NOTE: If you click a link from the menu (below left) and are told the page does not exist, chances are good that it's a prepared post that will post at some point in the future, so be sure to check back!

You can also click this Pinterest Button to pin pictures in the blog posts.


Tuesday, February 22, 2022

Winter Wonderland Card Kit Swap

Today's card comes from a "Card Kit Swap" - one of my favorite swaps.  I created this card & then sent identical materials to a friend to see what she came up with from the same materials. 

Materials List:

  • White card base
  • White card stock with two small stamped/embossed images (from Gemini's Winter Wonderland stamp and die set)
  • Silver poster board
  • Aqua glimmer paper
  • One sheet double sided paper from Stampin' Ups "Feels Like Frost" 6 x 6 paper pack
  • An 8" piece of sparkly ribbon
  • 9 Silver Holographic Jewel Dazzles

Here's a picture of the materials:

Card Front (see picture top of page):

I started by cutting the silver piece so it was just a bit smaller than the card front.  This would be my mat, but I didn't want to waste it!  So, using a die from Crafti Potential's set called Stitched Rectangles Dots and Stars, I cut a rectangle from the center and set it aside to use later.  I cut the aqua glimmer paper to slightly smaller than the silver & used the same die to cut out the center.  I layered the silver and aqua and glued them to the card front forming a frame.  Then I once again used that same die to cut a piece from the patterned paper and inset it into the frame - AFTER I wrapped it with a small piece of the glittered lacy ribbon.

Next, after coloring my images using scroll and brush markers & a water brush, I used the dies that came in the set with the stamp.  I cut two pieces from the center of the remaining silver - the winter wonderland circle and the circle that fits inside it.  Then I cut a piece of the aqua with the sun-shaped die.  Finally I cut out the one of the images using the smallest circle die from the set.  I layered these to form the focal you see in the picture above.  To complete the card front, I added 3 Jewel Dazzles in the top left corner & the bottom right corner.

Inside:

For the inside, I used the same cutting dies & materials.  This time I cut a strip of the aqua for a border, then created an embellishment of a aqua circle, and sun-shaped stamped image - both cut with the same die set as used for the focal on the card front.  3 more Jewel Dazzles and I was done.

I'll not post her make here, but instead post the materials she sent me and what I made from them.  We clearly were thinking similarly when we pulled materials!  Here's what she sent:


And here is what I made using this set of papers (the patterned papers are double-sided and I used the backs of them).  It's a Inverted Center Step Card - for instructions on making the card base, check here.

I had to cut my papers carefully to get everything from the single sheets she sent.  As you can see, from the plain card stock I cut the background for the part of the card that set forward, as well as a mat for both center pieces (front & inside) and the greetings.  Then from each of the two patterned pieces I cut two background pieces (for front & inside).  Besides the die cut greetings, the only things I had for decorating it was the snowflake sequins, some silver sequins (which I didn't use) and some ribbon.  You can see that the ribbon went down the sides of the card front & then the snowflake sequins were scattered around on it. 

Inside:


Monday, February 21, 2022

HD A Sparkling Season - Let It Snow Part 1 (Swans)

Today I started working on another Hunkydory set of Christmas cards.  This set once again comes from the kit called A Sparkling Season.  This time the set is the one called Let it Snow.  The picture above shows the die cut sheet, two "Adorable Scoreable" (AS) coordinating printed card stock sheets, and two additional sheets I got from the coordinating AS set you can buy separately.  Then, I also bought the 8 x 8" coordinating paper pack.  You can see some of the pages and cutouts from that pack in the picture below.

These are just the ones I thought coordinated well with the Let It Snow set.

I started with the swan elements, and got a total of 8 cards from that.  Here's a picture that shows all 8:

And here are pictures of each card up close & personal:


Card #1:

A piece cut from one of the AS pages formed the base of this card.  I split the panel & added a strip of teal glitter card stock as you can see. I added sequins, a bit of glitter ribbon, and a couple die cut snowflakes from my stash - along with the greeting and swan cutouts from the set.

Inside: 


A scrap of "water" from the AS, a piece of glitter card stock, and another snowflake die cut decorate the inside - along with stamped message (Mom's stamp).

Card #2:

This card is a bit unusual.  It started with a piece cut from one of the 8 x 8 pages.  I found a teal piece of card stock in my scraps that was also 8". After cutting a couple of strips from the scrap (for the border on the front and on the inside of the card), I glued it offset as you see here.  I decided it needed a border to set of the cut out greeting (also from the 8 x 8 paper pack).  I added Neuvo drops to both borders, but didn't like the way the looked, so covered them with mini snowflake confetti from my stash.

Inside:

A scrap of "water" from the 8 x 8 page, a cut out swan, the scrap of teal card stock, and more mini snowflakes complete the inside.

Card #3:


A cut-out swan (from set) decorates a background piece cut from the 8 x 8 paper.  I added a teal mat, a white and teal ribbon border, and a greeting created with dies (teal - Spellbinders Splendid Circles and Lifestyle Nesting Circles set) and stamp (HOTP bulk Christmas set).

Inside:


More of the same materials are used inside.  The stamp is one of Mom's.  The snowflake confetti from my stash.

Card #4:

I LOVE the way this first one turned out.  It's a center step card with 3/4" borders.  The background for the center portion is one of the coordinating AS purchased separately.  The focal is a frame saved from a previous set framing a portion of one of the 8 x 8 pages.  The side borders were cut from one of the AS sheets that came in the set & the bottom border was a die cut border strip from the set (the leftover piece from this border is on the inside of the card).  The die cut greeting, also from the set, completes the outside of the card.

Inside:

Inside is simply a stamped message (one of my Mom's stamps - stamped in silver ink) and the remnant of the border strip from the card front.

Card #5:

This time I have a teal frame (from my stash) around a piece of the 8 x 8 paper.  The only other thing I added was the "Let it Snow" die cut (from Moonstone's Splendid Snowflakes).

Inside:


Inside is more of the same - and a stamped message (again one of Mom's stamps).

Card #6:

For this one I started with a piece of AS and embossed around the edges with glittered embossing powder.  I added a cut-out tag (from the paper pack) and a bunch of dazzles stickers - mostly "snowflakes" - then backed it all with a narrow border of teal.

Inside:

More of the same materials were used on the inside - also backed the snowflake sticker with teal.  The greeting was one of Mom's stamps, heat embossed with Stampendous Denim powder.

Card #7:

This is another favorite.  This time I started with a die cut focal & frame.  I decided to make an aperture card with it.  The starry background is one of the coordinating pieces of AS that was purchased separately.  The lower border is a strip cut from one of the coordinating AS pieces that came in the set, backed with white card stock.  I cut the background with a larger die than I used for the aperture so there would be a bit of white showing around it.  Then I framed the aperture with the frame & glued the focal to the inside of the card (both from a set of circle dies from Lifestyle).  I die cut a snowflake from holographic paper (Moonstone Splendid Snowflakes Die set) and a white mat for it (Spellbinders Splendid Circles die set) and added it to the border.  A die cut greeting from the set completes the card front.

Inside:

Here you can see the die cut focal on the inside of the card - along with a greeting stamped with silver ink (Mom's stamp).

Card #8:

Here I took a small swan die cut, placed it on the scrap circle I cut when making the aperture card, added ribbon from my stash & a die cut frame to create the focal.  The card is made as a fold back card, and is held closed with the die cut greeting that was added with foam squares.  The background is holographic paper from my stash.  It's hard to photograph that holographic paper - doesn't really show the true color in the picture.  Basically it's silver holographic that reflects whatever colors are around it.

Inside:

The only addition inside is the stamped message - from HOTP stamp set called Christmas Cheer.

Thursday, February 3, 2022

HD A Sparkling Season - Bear Hugs

Today I got to play with what is so far one of my favorite Hunkydory kits.  This one is called A Sparkling Season, and the set I started with is called Bear Hugs.  The kit actually has two of them, but I split the kit with my Mom, so only had one.  You can see it in the picture above - a page of die cuts and two AS sheets (Adorable Scorable printed card stock).  The foiling is actually holographic and REALLY sparkles in the light!  

I also got their coordinating 8 x 8 paper pad (see pics of some of the related pages below).  Since I split it with my Mom I had two of each page (4 of each come in the paper pad).

I also got their coordinating foiled AS that is absolutely gorgeous (no picture, sorry).  

So, using these materials, I got 12 cards (I saved the bunny side of the 8x8 pages for later when I work with the set that has bunnies).  Here are pictures of the first 6 cards:

And pictures of the next 6 cards (not sure why the color is off, but I don't seem to be able to correct it): 


And here are the close-ups.

Card #1:

The focal on this one was made by cutting a piece of the AS to fit one of the die cut frames. The background for the card front (and the borders on the inside) is from some of that coordinating AS.  The sentiment is a cut out from the 8 x 8 paper pad.

Inside:

In addition to the AS borders, I have a stamped greeting (one of Mom's stamps).

Card #2:

This focal scene is from the 8 x 8 paper pad - as is the cut out greeting.  I added a frame to the whole from my stash.

Inside:

Scraps of paper from that paper pad are used for borders on the inside - and the polar bear is a cut-out from the same paper pad.  The greeting is the same stamp as the previous card.

Card #3:

I love these colors and the way the card turned out.  I started with a piece of AS - from which I cut a second border piece & added to the top of the card.  When I was done adding the 2nd border, the piece was larger than my card, so I cut strips off the top & bottom and saved them.  (You'll see them on the next card.)  I added a couple of cut outs from the 8 x 8 paper pad - the greeting & the polar bear cub.

Inside:

Inside is another border piece & a cut out cub.  The stamped used is another of Mom's.

Card #4:

I make my slim line cards 9 inches by 3 3/4 or 4, so the AS is always a bit short.  Adding a second border strip, like I did on the last one, is one way to handle that issue.  Here's another.  By adding my saved strips cut from the border of the last card, I created a border on each side & effectively extended my AS.  Then I added a couple die cuts from the set & called it good.

Inside:

I found some card stock in my stash that was just the right color to form a border on the inside.  Another die cut and another of Mom's stamps completed the inside.

Card #5:

Here, I started with a background of the coordinating AS.  This time, to extend the AS, I cut a piece off one end & moved it over to create the look of a white border.  Before adding the die cut, I cut out a piece behind it (using a Spellbinders Labels Four die) which I reserved for the inside of the card.  Then I simply added a couple of die cuts from the set & the card front was finished.

Inside:

The reserved die cut AS, a polar bear cub cut out (from the 8 x 8 pad) and another of Mom's stamps completed the inside.

Card #6:

Here's another way I extend the AS. I cut it and covered the missing area with ribbon to create a border.  Adding a greeting from the set - using foam tape for dimension - was all that was required to finish the outside of this card.

Inside:

A strip of holographic paper from the dollar store & a die cut from the set complete the inside.
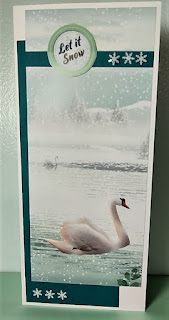
Card #7:

Here I have a slimline card.  The scene, cut from one of the pages in the 8" x 8" paper pack, is matted on a couple of papers from my stash - a glittery silver and a dark blue. The bear is matted on the blue as well, and the sentiment is a cutout from the paper pack.

Inside:

Sometimes I come up with rather unusual ideas for my cards.  In this case I cut a strip from the cover of the 8x8 paper pad to get the bears you see on the inside.  I wish I had cut the mats (same materials as the card front) a bit narrower, and though I wanted the bears offset it would have been better if it wasn't offset quite so much.  But, by the time I realized that, everything was already glued down.  Oh well, you live & learn.

Card #8:

The entire card front was cut from one of the 8x8 papers.  I then inked the edges, stamped the greeting (Mom's stamp), and embossed it with clear embossing powder so it wouldn't smear (since the papers are somewhat glossy).

Inside:


A scrap of the paper and a bear cut-out works with the stamped message to complete the inside of the card.

Card #9:

The background for this beautiful card is a piece of the AS that came in the set.  I made the card as an interlocking gate fold, so the frame is glued to one side and the focal to the other.  I die cut a piece of glitzy paper to create the frame for the sentiment cut out (die from Spellbinders Romantic Rectangles Two set) - once again gluing it just to one side of the gate fold.

Inside:

Inside I chose to just use one of Mom's stamps - but stamped it using 3 different colors of ink to coordinate with the card front.

Card #10:

The card front is again cut from an 8x8 paper.  This time I cut it into two pieces & edge embossed each with silver before adding a die cut glitzy border between (die from Ironwork Accents from Spellbinders).  I changed the "Mum" to "Mama" on the cut out greeting (from the paper pad) using a Sharpie - then added a stamped/embossed greeting below it (Mom's stamp).

Inside:

A cut out tag and a peach scrap - both from the paper pad - were embossed with the same silver powder & glued in place.  A Jewel Dazzle forms the "tack" that holds the tag in place.

Card #11:

The background was again from the paper pad - along with the sentiment & little bear cutouts.  You'll notice that I glued a piece that said "Aunt" over the place that said "Mum".  It's not the cleanest fix in the world, but at least I'll be able to use the card this way.  Narrow strips of silver glitzy paper for the border on either side.  I also added Frosted Lace Stickles to the trees for a bit more sparkle.

Card #12:

This last card once again comes from one of the 8 x 8 papers - it's actually the lower half of the one used on the previous card.  As you can see, I matted it & used border strips of turquoise.  The sentiment is a cutout from the paper pad.

Inside:


A strip of the turquoise, a cutout bear from the paper pad, and one of Mom's stamped sentiments completes the inside of this last card from this set.