Please let me hear from you!

This blog is for sharing a love of paper crafting. You can also check out my Pintrest pages. If you find the ideas here to be helpful, I'd love to hear from you. It is what helps make the time I put into this blog feel worthwhile, and always brightens my day. I love hearing your ideas too!

(To leave a comment, scroll to the bottom of the post. You will see how many comments there are for that particular post. Click on the number of comments and the comment window will open. Also, if you want to add a link to something, follow the instructions at the bottom of this post.)

NOTE: If you click a link from the menu (below left) and are told the page does not exist, chances are good that it's a prepared post that will post at some point in the future, so be sure to check back!

You can also click this Pinterest Button to pin pictures in the blog posts.


Sunday, April 30, 2023

April Challenges

Today I'm focusing on meeting challenges on the message board that I frequent.  This first one meets at least two - 4 or more squares, pastels.

Card #1 (above):  The patterned paper is from a pad I received recently - Parklane Glitz & Glam.  I cut it into two squares and a rectangle.  Then I cut two lacy squares using Tattered Lace dies called Georgette Squares.  After layering, the smaller square was attached on point using foam squares for dimension.  The focal is from the same paper pad.  I trimmed it up into a square before adding it.

Inside:

Inside I simply have borders of the same paper and a sentiment stamped with Picked Raspberry distress ink - stamp from Crafter's Companion Compendium (CCC) - the sheet called Birthday-Female.

Card #2:

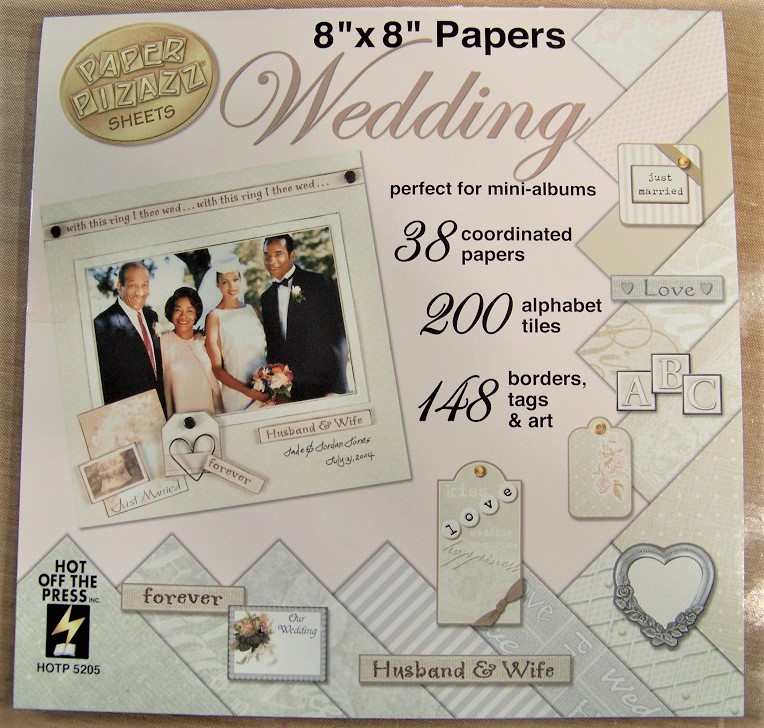
This challenge required that we use papers from an 8 x 8 or 6 x 6 pad.  You can see the one I used in the picture above.  And here's the card I made from one of those papers:

The focal is one a friend gave me from a Hunkydory Picture Perfect paper pad. I cut it to suit, then matted it with a piece of paper from my stash before adding it to the background paper (from the paper pad above).  The greeting was stamped & die cut using stamps and dies my Mom has. I cut a narrow strip of the blue paper and folded it to create a faux ribbon.

Inside:

As you can see, I used more of the papers on the inside to form a border.  The picture is a small one from a calendar that I thought looked similar to the flowers on the card front.

Wednesday, April 26, 2023

HD Topper Cards

Today I have a couple of cards made using toppers from Hunkydory's Book of Toppers called Midnight Garden.

Card #1 (above): I embossed the card front using Cuttlebug's Swiss Dots folder.  I then took some gold ink on a foam applicator to color the raised dots with gold.  The outer part of the topper page forms a bit of a framed background for the focal - which I added with foam tape.  A HD sentiment from a Essential Sentiments Little Book.  

Inside:

A tan scrap was inked around the edges & stamped with brown ink (Walnut Stain distress ink) using stamps from 2 sets - first was Happy Father's Day Retro from Sweet Stamps, and a CCC (Crafter's Companion Compendium) stamp from the page called With Love.  After adding this to the center of the card, I finished by adding the corners I had punched out from the topper page.

Card #2:

This time I decided not to use the frame and to create a gold mat with green embossed background to back the focal instead (Spellbinders Mbossabilities folder called Imperial).  I also added a small gold border.  I didn't use the corner pieces in all 4 corners - just used two in the upper left corner.  The sentiment in the lower right is from a Hunkydory Little Book of Essential Sentiments.  The sentiment in the upper left was a stamped piece from my mother that I inked to a cream color and matted with gold.

Inside:

A smaller green piece was added to the inside.  I inked the edges & stamped a sentiment (same stamp as for the first card).  Then I added the remaining 2 corner pieces as you can see.

Tuesday, April 25, 2023

Calendar Cards

Today's cards all started their lives as calendars, though I added things from my stash as well.

Card #1 (above): This first one adds a purple mat, a ribbon, and a sentiment.

Inside:

Inside I stamped a sentiment using purple ink (Dusty Concord distress ink) and a stamp from CCC (Crafter's Companion Compendium) page called Birthday - Female.

Card #2:

This card front is mostly a piece of a calendar page.  The sentiment is stamped using stamps from two sets - Gingerbread mini stamps, and Gears Wheels Cogs Kit - then double matted.

Inside:

Inside I added a small picture from the same calendar and a couple of border strips in teal.

Card #3:

Here again, the main portion of the card was cut from a calendar page.  The "Happy Father's Day" was stamped with green ink using a rubber stamp (Father's Day Retro - Sweet Stamps).

Inside:

Here I added another piece cut from a calendar for the inside of the card.

Card #4:

Here we have another card based on pieces from a calendar.  This one was fussy cut along the bottom edge.  I narrowly matted it with black - then a bit wider from red - both from my stash.  The sentiment was stamped in red on a piece of cream - then double matted.  The stamp was called Father's Day Retro - from Sweet Stamps.

Inside:

Inside is a border created from another calendar piece that has been double matted.  The sentiment is another CCC stamp - this one from the page called Inspirational.

Card #5:

This last card is an inspirational note card.  It is simply a piece of calendar, double matted with a piece of brown card stock to highlight the text.

Thursday, April 20, 2023

Digi-Scene

Today I have a really quick card.  The main background is a digi-paper I got from somewhere and printed up.  The birds in the scene are all Stampscapes stamps.  The sentiment is from one of my Mom's stamp/die sets.  So quick & easy!   I didn't stamp on the inside of the card yet.  I think I may use this as a sympathy card, and will decide what goes inside when I use the card.

Wednesday, April 19, 2023

Another Card using Word Dies

Today's card started with the beautiful background paper - a digital download I got from somewhere. I also used a die from a bunch my Mom brought over to play with.  As you can probably tell, in addition to the printed pattern paper, I used several plain greens from my stash.  Though I suppose I shouldn't call them "plain" green.  One is a shimmer paper and one (the darkest) is a lovely suede finish - the type you want to just run your fingers over to feel the soft texture.  As you can see, I used the lightest green for mats, the medium and dark for the die cut pieces and to create the border.  I cut two die cut pieces, one from the medium and one from the dark.  I trimmed out part of the dark green, putting the words on top of the medium, and using the leaves for decoration elsewhere on the card (inside & out).

Inside:

Before gluing the light green mat for the card front, I cut the center out to use on the inside.  Scraps of the patterned paper and a couple of remaining pieces I cut from the die cut form the borders.  The stamp is from the Crafter's Companion Compendium (CCC) from the page called "Thank You".

Sunday, April 16, 2023

April Materials Swaps

It's April Swaps already!  The card you see above is made from my materials for the materials swap - theme is flowers this month.  Here are a couple of pictures of the materials I sent to my partner (& used an identical set to make this card).  In the first, I didn't show the greens that were included, in the 2nd, you can't see the flowers & leaves very well.


I used my Gemini die set called "Double Sided Peony" to create the flower & leaves.  Then added bits of all colors used to make those flower/leaves, a white card base, and a flowered card base (flowered is old one from HOTP).  The "bits of all colors" included some glitzy paper, a piece of my grandmother's stationery, a piece of "handmade" paper from Costco years ago, and some suede paper from HOTP.

Here's a closer look at the card I made from these pieces:

You can't tell as well from this picture, but the card front has half of it - cut away, turned sideways, and glued on just the left side of the card.  But, before I did that, I did several things.  First, I cut pieces from the flowered card and glued to the left side of the card front, and the right side of the card inside.  Then I glued a glittery mat (after I cut the sentiment out of it) behind the piece of white I had cut off, and backed that with leftovers from the flowered card.  Finally, I added the flower & leaves for a focal, and my die cut sentiment.

Inside:

I haven't decided if I want to stamp a message on the inside, or write a private message to the recipient.  Since I think I may do the latter, I'm waiting on the stamping.

Here are the materials my partner sent:

Pretty colors - the circlet of gold at the bottom of the picture is a coil of thin gold cord.  It was beautiful and I intended to use it - but for got about it until it was too late.  Anyway, here's what I made from her materials:

It is a Full Panel Easel card (i.e. a full panel is glued to the lower half of the card front, so you see the whole thing when it's set as an easel).

Here's what it looks like set up:


Saturday, April 15, 2023

Germany

There were several pictures that I wanted to include on this page, and decided to make use of a "filmstrip" cutting die that I got from somewhere.  It's hard to see in the picture, but the white border at the bottom was embossed using an A2 folder multiple times.  The pictures and journaling were all printed using Microsoft Word.  The title was from an old set of alphabet stickers that have been in my stash for years.  The "Germany" is a dimensional sticker from my stash.  Here are some more pages from Germany.

Pages 2 & 3:

Here's a dual page layout - While it probably doesn't look like it, the background pages are pieced so that I only needed 2 pages - one of the tan print, and one of the striped print.  The tan was cut in half.  The striped was cut in 4ths.  Then they were taped together with the narrow dark blue border strips covering the join.  As you can see, I also used the blue to mat the one photo and create the title.  Below is a closer look at each page.

Page #2:


Page #3:


Pages 4 & 5:

After posting these, I decided I wanted borders between the patterned card stock and the rest, so I went back and added some blue ribbon:


 We can take a closer look at each page below.

Page 4:


After combining two papers for a background for this page, I added the picture (matted in white), the title (stickers - some of them had to be pieced to get all the letters I needed), and printed journaling (I'm not sure why some of the letters disappeared, but I had to do some "fixing".)

Page 5:

This second page makes use of more of the printed card stock as border mat for some of the pictures, and a plain piece of card stock for the background.

Friday, April 14, 2023

Our National Public Lands Scrapbook - Part 1

The album I showed previously was specifically for National Park Visits.  This album is for all those other National Public Lands - whether National Forest, National Recreation Area, National Historic Site, etc.  The title page (above) is pretty simple - I printed out the words & cut them out - same with the Forest Service emblem.  The other two embellishments are from my stash.  I've labeled this post "Part 1" because we undoubtedly will make other trips & thus have at least a "Part 2".

Page #2:


This is another really simple page - printed table of contents, a few embellishments from my stash.  That's about it.

Page #3:

Here a special printed page forms the backdrop - and title - for the recording of our trip to Muir Woods.  The top two pictures & journaling with them were ours.  The picture & journaling in the lower right corner is purchased stickers.

Page #4:

Everything here is mine except for the two purchased stickers in the lower left corner.  Matting the photos in the darker gray worked well.  The title was printed, but the words were orange - which REALLY didn't go.  SO, I used a black Sharpie to color over the orange.  Much better!

Page #5:

The background paper from HOTP reminded me of the area where the dinosaur bones where.  The darker brown is card stock from my stash. The journaling & picture in the upper left, and the two pictures in the lower right are stickers - the rest are pictures from our trip and my own printed journaling.  Once again, if you note the pull tab at the top of the page, you'll see that I created a pocket behind the page to hold a map and brochures.

Page #6:

I'm not really happy with this page, but didn't know what else to do with it.  I chose it because the printed background scene reminded me of the area, so I didn't want to cover it all up!  Mats are card stock from my stash.  The picture in the upper left is a purchased sticker.  The letters in the title are stickers which I fussy cut around - then matted on the blue card stock - then fussy cut again!  

Page #7:

The background paper is from my stash.  Matting is all done with card stock from my stash - title was cut from it too.  Title was die cut using various alphabet dies in my stash.  The tall thin ones are from Momento - the others are "no name".  The main pictures are mine.  Purchased stickers form the lower outside pieces.  The lower inside piece is cut from the backing of the purchased stickers.

Page #8:


This is the last page for now.  Yellow is from my stash, with die cut letters from parts of the yellow that are hidden behind other parts.  The pictures on the left are mine.  The bookmark & stickers matted in blue were purchased in the gift shop.  As you can see, I hand wrote the journaling this time using a blue marker from my stash.


Wednesday, April 12, 2023

New Word Dies

Mom got some new dies today - word dies from Gemini.  No clue as to their names, but we played with them.  The 2 cards I made use those dies, old printed card blanks from HOTP, and some butterfly stickers from my stash.  

Card #1 (above): A gate fold - as you can see - I split the die cut sentiment putting part on the inside and part on the outside.  The outside part I used the die to make the mat - but since that was for the whole sentiment, I fussy cut it around the bottom to form the shape you see here.  I added 2 butterfly stickers from my stash - and small innies stickers from my stash to create the butterfly trails.

Inside:

Inside I added the remaining words and a couple more butterflies - drawing in the trails and antennae which they had lost when I fussy cut these stickers out.

Card #2:

For this card, I cut the die cut pieces from the background I cut from the original card base.  The background was then matted on black before adding the matted words.  A butterfly & trail - stickers from my stash - complete the outside.

Inside:

The inside sentiment was stamped from CCC (Crafter's Companion Compendium of sentiment stamps - the sheet called "Inspirational".  More of the card & mat form a border - and another butterfly & trail completes the inside.

Tuesday, April 11, 2023

National Parks Part 3

I'm nearing the end of the pages for parks we've visited so far.  Here's one of Mesa Verde - the 13th page in this book.  The page is a mix of my pictures (4 largest ones), my journaling, and purchased pieces (all the rest).  If you look closely, you'll see a tab at the top of the page.  That tab pulls up a set of brochures from this place - all put together in a clear plastic bag which can be pulled out and opened to look through the bounty - see picture below:

Page 14:

This page started with a gorgeous view of Delicate Arch - from a purchased scrapbook set.  The remaining pictures are mine - as is the journaling in the lower right corner.  The title is also from the scrapbook set.  The journaling in the lower center was a purchased sticker that came with a small photo of delicate arch - which I did not use here.

Page 15:

Again, this page is a mix - only the largest two pictures are mine - as is the orange/brown colored journaling piece & the small piece listing the date.  The rest was purchased stickers - some from a scrapbook set, some purchased separately.  If you look near the upper left corner, you'll see an indentation where you can pull out the extra information we got about Canyonlands NP.

Page 16:

The three large pictures and all of the journaling except the far left was also mine.  The background paper was from a scrapbook set - perfect for this area where we saw petroglyphs.  The dark green is a "Shine Design" from HOTP.  The title was stickers from my stash.  

Page #17:

I LOVE the Title on this page - one I purchased.  Most of the pictures and journaling were ones I printed, but the map and word "Hoodoos" were both purchased stickers.  The map was placed over a vellum pocket I made to hold the Bryce Canyon brochure.

Page #18:

The pictures and journaling on this page were all ones I printed - except for the one in the lower right corner.  This one was a 3D photo post card.  The title was created with stickers from my stash.