Please let me hear from you!

This blog is for sharing a love of paper crafting. You can also check out my Pintrest pages. If you find the ideas here to be helpful, I'd love to hear from you. It is what helps make the time I put into this blog feel worthwhile, and always brightens my day. I love hearing your ideas too!

(To leave a comment, scroll to the bottom of the post. You will see how many comments there are for that particular post. Click on the number of comments and the comment window will open. Also, if you want to add a link to something, follow the instructions at the bottom of this post.)

NOTE: If you click a link from the menu (below left) and are told the page does not exist, chances are good that it's a prepared post that will post at some point in the future, so be sure to check back!

You can also click this Pinterest Button to pin pictures in the blog posts.


Thursday, March 31, 2022

Two Swaps & an extra

Today I have 3 rather unrelated cards.  The first is for a materials swap where I gathered materials, made a card from them and sent an identical set of materials to a friend. The card you see above is the card I made - based on a sketch from PageMaps. The stamp used is from Sweet Impressions "Father's Day Retro" - used with a Stampin' Up Punch.

And here's a picture of the materials:

I ended up not using everything, but used much of it.  The printed pieces were freebies from CraftsUPrint, the rest is just misc from my stash.

And here's the inside of the card:

I used a couple of stamps on this one.  "Celebrate" is from a HOTP set called "Birthday Greetings" and the other is from a JustRite set called "Enjoy the Day Vintage Labels Four".

Next up is a card I made from a Hunkydory set given to me by a friend.  It is from Hunkydory's ShabbyChic kit and from a set called "Delightful Dresser":

The plain red is from my stash.  The "Thank You" is from a HOTP book of die cuts, and the stamps are from Grand Sentiments stamps set (JustRite).  After stamping them, I heat embossed with clear powder so they wouldn't smear on the slick background.  Inside was pretty simple:

Dies used for frame are from the 5x7 Matting Basics set from Spellbinders.

Next up is a card I made from materials received in a swap.  Here's what I got - Hunkydory Pop-a-Topper called Gentlemen's Picking die cuts, some red and gold Jewel Dazzles, and misc papers & ribbon.

And here's how I used them: The stamp is from HOTP's Birthday Greetings.

Inside (inside is a pop-up card):


Wednesday, March 30, 2022

HD Perfect Planet - Deep Blue Sea

Today I'm working with one of the sets from Hunkydory's Perfect Planet.  This set is called Deep Blue Sea and you can see the materials that came in it in the picture below.  As you can see from the picture above, I made 4 cards & two tags from these materials - adding a bit from my stash as I worked.

Card #1:

First up is this slimline card.  The background is from the AS (adorable scoreable card stock) that came in the set.  To this I added a focal die cut, a sentiment, and a border piece - all from the set.

Inside:

Inside is a border from the kit and a stamped greeting (stamps were Mom's ).

Card #2:

This card took the most time by far!  I pieced together the "sea floor" from a border strip from the AS and several pieces where the bottom was an oval shape.  All elements came from the set except the light blue background (a HOTP patterned paper) and a dark blue stripe of paper from my stash.

Inside:

For the inside, I simply added a border strip from the set and left the rest blank for my personal message when I get ready to mail it.

Card #3:

Here I have several things from my stash - the dark blue paper mat, the gold oval frame (gold poster board from my stash cut with two nesting stitched oval dies (Creative Dies Designs), and a couple of Dazzles Thin Lines strips.  The sea floor, orcas, sentiment, and decorative corners, are all from the set.

Inside:

Inside I simply have strips of the dark blue paper, the AS, the gold card stock, and a border from the set.  The stamped sentiment is stamped with one of Mom's stamps.

Card #4:

Here I used gold poster board (from around the frame used earlier) to form this frame.  The rest of the materials came from the set, including the piece of AS for the background.

Inside:

A piece of scrap from the die cut sheet forms a border on the inside.  The sentiment is part of the border - with gold scraps taped to each end.

Tags:

With the leftover pieces, I made two tags.  Not knowing for sure what I'll use them for, I decided to wait to stamp a sentiment in the blank spaces. 

Wednesday, March 23, 2022

HD A Sparkling Season - Let It Snow Part 2 - Robins

Today I have the rest of the cards I created from the HD A Sparkling Season set called Let It Snow.  This time I was making cards with the Robins.  As a reminder, here are the elements from the set that I used - along with some of the coordinating AS pack that was designed to coordinate with this set:

And here are some of the pages I used from the coordinating 8 x 8 paper pack:


I got 8 cards from the robins portion of this set:

Let's look at each one a little more closely:

Card #1:

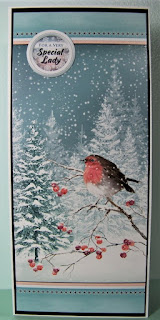
As you can see, this card is a slimline.  As I often do, I took pieces of the AS and glued them together to create this card front with border top & bottom.  I added a sentiment that was fussy cut from the 8 x8 papers.

Inside:

Inside I added more of the AS border - and a stamped greeting (Mom's stamp).

Card #2:

This slimline started with a strip of paper cut from a sheet from the 8 x 8 paper pack to which I added a robin cutout (from the same paper pack).  Then I added scraps to make borders.  I found an appropriate greeting in my HD Christmas Little Book of Greetings and matted it with a scrap of red to complete the outside of the card.

Inside:


Another matted greeting from the little book is matted on red and attached to the large border (created with another piece of paper from the 8 x 8 pack, along with teal paper & silver holographic paper from my stash.

Card #3:


Card #3 is another slimline.  Once again I took a strip from the 8 x 8 paper pack & added a robin cutout from the same pack.  This time I matted it with some silver holographic paper & added strips of teal from my stash to the top and bottom.  A die cut frame from the set highlights the bird, and I die cut 3 snowflakes from the holographic paper to scatter top/middle/bottom.  A couple more scraps of the holographic "hold" the greeting (another from the HD Little Book of Christmas Sentiments).  Finally, I added tiny Jewel Dazzles to the centers of each snowflake.

Inside:

Scraps of paper & a stamped message (one of Mom's stamps) complete the inside.

Card #4:


This card is the only one in this set that is NOT a Christmas card.  It is instead a birthday card.  The main piece is cut from a sheet from the 8 x 8 paper pack with another piece added at the bottom for the border.  I also added scraps of blue and silver border Dazzles stickers to complete the borders.  The sentiment tag is a cutout from the paper pack. 

Inside:


Inside I simply added scraps from the die cut sheet scraps for borders & a couple of stamped messages (from JustRite's Grand Sentiments, and HOTP Poppy stamps).

Card #5:

This card front was created from one of the 8x8 pages - and the sentiment was fussy cut from one of those as well.  The reddish border is paper from my stash.

Inside:

Inside I have a scrap of the reddish paper and a scrap of the AS from the set to form a border beside the stamped sentiment (another one of Mom's stamps).


Card #6:

This card has an overlapping card front & a "latch" to hold it closed.  The background of the main part of the card front is pieced from scraps of the coordinating papers, while the background of the side piece is from the coordinating AS pack.  The focal is from the set, as is the sentiment.  I made sure to only glue one side of the sentiment to the background so that it could work as a latch by slipping the larger front piece over the smaller, but under the sentiment.

Inside showing flap:

Inside fully opened:

Inside I have a strip of scrap from the die cut sheet to form a bit of a border at the bottom.  A fussy cut robin (from the coordinating 8x8 paper) is sitting on this border.

Card #7:


This background was made using a stencil (All Over Swirls by HOTP) & three colors of Distress inks (Broken China, Faded Jeans, and Pine Needles).  Then I painted Sparkle Paint on the white portions.  You can't tell it here, but in real life it is beautifully sparkly.  The focal was made using a die cut frame (from the set) and some of the 8 x 8 paper pack.  Note that I cut around some of the berries so they would overlap the frame.  The tag is also from the paper pack.  A jewel dazzle forms the tack holding the tag in place.

Inside:


Here is another strip of the stenciled card stock - done the same way and matted with silver holographic paper.  I stamped the sentiment (one of Mom's stamps) using the same three colors of Distress ink.

Card #8:


For the last card from this set, I cut a piece of the AS from the set, heat embossed the edges with glittery/kaleidoscope embossing powder, and added die cuts from the set - frame, focal bird, and sentiment.

Inside:

Here I just have another piece of the AS with a stamped sentiment (another of Mom's).

Thursday, March 17, 2022

HD Wild At Heart - Terrific Tiger

Today I have a set of Tiger cards.  They're from the Hunkydory kit called "Wild at Heart" - the set called "Terrific Tiger".  You can see what the set looked like below:

I'm particularly pleased with the cards I got from this set.  Despite the fact that all but the AS (Adorable Scoreable cardstock) in the set had an image with a rounded bottom, I created several flat bottomed focals by cutting the stones of some of the pieces apart and gluing in place.  So, from this one set, I got 5 cards as you can see in the picture below:

Let's look at each of the cards individually:

Card #1:

As you can see, I created this one as a slimline card.  The focal is cut from the AS.  I cut the borders from the AS and added them top and bottom as you see here - creating the height I wanted for the card.  I added the sentiment - once again cut to fit, and a couple of the corner pieces to form a bit of an arch. A narrow black mat completes the card.

Inside:

Inside was created much the same way: black mat, piece of the AS glued together to create the borders as you see here.

Card #2:

This card is one of my more unusual ones in this set.  I used the scraps from the die cut page to create the borders, putting the blue paper from my stash behind it.  I added the tiger cub focal, and sentiment from the set.  Then I added letter stickers from my stash to spell "Happy Birthday".

Inside:

Inside is a bit more straight forward.  I made a border using scraps of papers/AS from the card front, then stamped a sentiment (Mom's stamp).

Card #3:

This is the card you see at the top of the page.  I cut a piece of the AS border to fit just below the fold line of the easel card.  Then I added the focal & sentiment from the set, making sure the focal was only glued on the bottom part of it.

As Easel:

 Here you can see the main element on the inside of the card.  It's simply another border piece from the AS that has been raised with foam tape & has another sentiment from the set added to it.

Card #4:

Most of the remaining AS was used as a background for this one. As mentioned, I took a rounded bottomed piece and added cut rocks from other pieces to create this flat bottomed focal.  Then I inked the edges in black. The border and sentiment are both also from the set.

Inside:

I had very little to work with for the inside of the card, so just took a bit of black paper from my stash & combined it with Dazzles border stickers to form a border inside.

Card #5:

Here's another card where I took a rounded bottomed piece & created a flat bottom using pieces from the set.  The background is vellum - which unfortunately puckered a bit when I blued the die cut greeting onto the card (Spellbinders Joyous Celebrations Sentiments die set).  I added a gold scrap at the bottom edge, and corner pieces from the set at the top.

Inside:

Inside is a border piece from the set that has been backed with a scrap of the vellum.