
Sunday, October 31, 2010
Poetry Fun
My intent with all journaling is simply to tell the story. On this page, putting the poems inside a "book" shape helps to focus the attention on them. The four simple words on the accompanying tags says all that needs to be said to tell the story.

Saturday, October 30, 2010
Paper Inspiration
Where do you get your inspiration? This double-page spread was inspired by the paper itself - from an older book by Hot Off the Press called, BJ's Gold and Handpainted Papers. I looked at the lovely flowers and thought, "I have a stamp that would work with that!" It's a little hard to see in the pictures as the camera doesn't pick up the glimmer very well. I used black Staz-on ink to ink the outlines of the flowers onto the picture frames. Then I colored them in with Marvy markers. The final step was to take a yellow-gold gel pen with glittery ink and go over the flower petals. They really sparkle on the page!


If you look closely, you'll see that I did something that I often do with background papers that have pretty images on them. I cut around the image itself so it could overlap my picture frames. I love that look!
I discovered another neat trick when I did these pages. The challenge was attaching them to both the frame and the page without getting adhesive on the pictures themselves (since they are vintage photos, I'm trying to ensure they're easy to remove if needed for some reason). I discovered I could easily manage with TWO of the clear photo corners for each corner of the pictures (except where they overlapped another picture). I put one on the corner with the adhesive side facing down, then the other on the same corner, over the top of the last one with with the adhesive facing up. Since the front and back of the clear photo corners are different sizes, and since they are slightly offset, this gives me a sticky part on both the front and the back of the corners of the photo. The front attaches to the frame, the back attaches to the page. Works great!
Friday, October 29, 2010
Stacked Dazzles
I LOVE the outline stickers called "Stacked Dazzles" for making great focals for cards that look like you spent a lot of time, but actually go together quite quickly. They can be used individually or stacked to create pretty designs. Here is a graduation card that I made for my niece. Her school colors were black and red.

For this card, I alternated mounting the Dazzles on red or black paper and then cut around them close to the Dazzle and attached them to the card front. If I hadn't been wanting to keep it flat for mailing, I would have given each layer a bit more dimension by attaching them with foam dots. The greeting was cut out using my Silhouette.
Thursday, October 28, 2010
Halloween
With Halloween nearing, I suppose I should address this theme. However, I must admit that Halloween isn't a holiday I care much about. The devilish themes and all the extra candy - I can easily do without those!
I DO have some darling pictures of my daughter and her cousin dressed for Halloween and some day I will get those scrapped. However, one doesn't actually have to scrap about Halloween to evoke these themes. In this page, I was struck by how many of the thermal areas at Wai-o-Tapu (in New Zealand) had been given devilish names. This brings in a rather understated undercurrent of a Halloween theme to my page:

I DO have some darling pictures of my daughter and her cousin dressed for Halloween and some day I will get those scrapped. However, one doesn't actually have to scrap about Halloween to evoke these themes. In this page, I was struck by how many of the thermal areas at Wai-o-Tapu (in New Zealand) had been given devilish names. This brings in a rather understated undercurrent of a Halloween theme to my page:

- The font for the title is one that reinforces the "devilish" part of the title and the colors support this -- especially the color of the "Devil's Bath" that is repeated in the striped paper.
- The embellishments reinforce the Halloween time of year, but you can still see my reluctance to fully embrace the Halloween theme, with my choice of leaves for embellishments rather than something more sinister.
Wednesday, October 27, 2010
Nestabilities are NOT just for cardmaking!
Here is another trick I've done with my Nestabilities. I wanted to use them to frame my heritage photos. This presented two challenges. First, my 8 1/2 x 11 paper was too wide to go through my Big Shot machine. Second, I wanted to mount my photos so they could be removed without damage.

As you can see, I decided to cut my cardstock so that it would be narrow enough to go through my machine. Then, to mount the photos, I used transparent photo corners REVERSED on the BACK of the frame - in other words, the photo corners were placed onto the photo with the sticky part facing UP so they attached easily to the BACK of the frame.
Before mounting my photos, I embellished my frames by drawing around the holes cut by the Nestability with a gold pen.
I also used my Nestabilities to cut and emboss several layers to mat my title.
Tuesday, October 26, 2010
Storing your Little Embellishments
Here's a tip for storing little embellishments -- brads, eyelets, etc. I used to use containers that were flat trays divided into little tiny spaces. This was great until I bumped the tray and my sorted embellishments all needed to be sorted again! After too many times like that, I got smart and went looking for something better. I got these containers at my local craft store.

They were designed for storing beads, but I found them to be just right for all my little embellishments. The box has a bunch of little containers inside of it - each of which is a closed container, so no more escaping brads unless I WANT them to escape! I now have boxes for different colors -- obviously this one has my gold- and copper-colored embellishments in it.

They were designed for storing beads, but I found them to be just right for all my little embellishments. The box has a bunch of little containers inside of it - each of which is a closed container, so no more escaping brads unless I WANT them to escape! I now have boxes for different colors -- obviously this one has my gold- and copper-colored embellishments in it.
Monday, October 25, 2010
Photo Printing Tip

- Usually I plan out several scrapbook pages at once.
- Then, using my photo editing program, I lay out the pictures on an 8.5 x 11 page, fitting as many pictures onto the page as my size constraints allow.
- Once I've fit as many pictures onto the page as I can, there is usually space left over. This space does NOT go to waste! In it I place items I will print to use for card focals or small embellishments!
 |
Sunday, October 24, 2010
A Fun Title
You may have seen this focal picture before! It's the one I used for all the projects I showed you yesterday.


Today, however, what I want to talk about is the title.
The colors seem appropriate for this time of year - nearly Halloween
- but that's not what I want to talk about.
Most of the time I like my titles to be informative, not just eye-catching.
This particular title came from the brochure about the place we visited.
I LOVED it and thought it gave a good feel of the place.
SOOOO,
I scanned it in,
used selection tools in my photo editor to break it into its component parts,
resized them to better fit my scrapbook page
printed the pieces I wanted,
and then cut them out.
Voila'! A very eye-catching title.
Saturday, October 23, 2010
Photo Inspiration
Do you have a photo that you absolutely love? I have one that I took of a koala. I have used it in SO many different ways! Here are a few samples!
And of course, I used it on a scrapbook page -- I'll show you that one tomorrow when I talk about the way I did the title.
 |
| Thinking of You Card - love the texture in this one. |
 |
| Little Gift Enclosure Card - I wish the embossing showed up better in the photo! |
 | |
| "Never Ending" Card - I was experimenting one day with this type of card. I liked the way the photo worked out for it. |
 | ||||
| This one turned into a bookmark. |
And of course, I used it on a scrapbook page -- I'll show you that one tomorrow when I talk about the way I did the title.
Friday, October 22, 2010
Focals from anywhere!
 |
| Outside |
 |
| Inside |
In this Thank You card, the fallen leaves are very appropriate for the season. It's a fairly simple card that highlights the idea that focals for cards can be found anywhere. For this focal, I used a small embossed leaf I was given in a scrapbooking store as a "thank you" for my purchase. Since it was a bit small, I matted it on this wonderful suede paper - love the added texture! I surrounded that with a mat edged with the Martha Stewart "Doily" punch - one of my favorites. Finishing touches are outline stickers. Quick & easy! Most of the paper is from Hot off the Press.
Thursday, October 21, 2010
ABC Christmas

Wednesday, October 20, 2010
I found the software to be relatively easy to use. You can save files in PDF format that show all the dimensions of your items, the basic room layout, and a 3-D picture of it, and of course you can print stuff. Not bad for a freebie program!
Tuesday, October 19, 2010
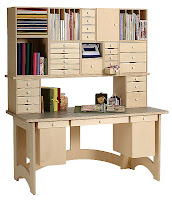
Organizing the Craft Room
Lately I have been drooling over furniture for holding my scrapbooking supplies. In particular, I've been looking at furniture from three companies:
Do any of you have experience with any of them? I love the look of the furniture from "The Scrapbox" but I wonder how well the totes and plastic pouches hold up. I have a similar concern with the furniture from "Best Scrapbook Shelf." I love the idea of so many drawers - but their drawers are molded plastic. How will they hold up? Furniture from "ScrapNCube" looks very sturdy - but it comes unfinished (they say most people leave it that way). The whole modular idea is very appealing, however. As your needs change, you can easily rearrange things. And you don't have to get it all at once. You can add to it as you have need or finances to do so.
So, today I don't have answers -- I have questions! I am working with to-scale drawings to try to figure out which of these products might best meet my needs, and would love hearing from anyone who has experience with these products.
 |
| ScrapNCube |
 |
| Best Scrapbook Shelf |
 |
| The Scrapbox |
Do any of you have experience with any of them? I love the look of the furniture from "The Scrapbox" but I wonder how well the totes and plastic pouches hold up. I have a similar concern with the furniture from "Best Scrapbook Shelf." I love the idea of so many drawers - but their drawers are molded plastic. How will they hold up? Furniture from "ScrapNCube" looks very sturdy - but it comes unfinished (they say most people leave it that way). The whole modular idea is very appealing, however. As your needs change, you can easily rearrange things. And you don't have to get it all at once. You can add to it as you have need or finances to do so.
So, today I don't have answers -- I have questions! I am working with to-scale drawings to try to figure out which of these products might best meet my needs, and would love hearing from anyone who has experience with these products.
Monday, October 18, 2010
Embossing - Simple Elegance

Sunday, October 17, 2010
Happy Little Accidents

A similar thing happend with the journaling block. I thought I had everything lined up so it would cut to the right size -- but it didn't! When I slid it behind the cut-out window, there was 1/2" of empty space at the top! So - I found a scrap that I could match up to the journaling block at the top, and taped the two pieces together on the back. Now I didn't have an empty space, but I still could see the join line. A couple strips from the coordinating paper solved that. Some floral embellishments from the same coordinating paper finished the look.
I might have put a page border anyway, but without my "mistake" in cutting, I never would have thought to put the mini-borders above and below the journaling -- and it really adds a nice touch.
Saturday, October 16, 2010
Take Time to Play!

- It was my first time playing with "Perfect Pearls" as a paint, and I loved that! They are nice and sparkly! I love using them with outline stickers.
- The white background was done with a spellbinders nestability. I wanted the oval to be a bit "rounder" than it naturally was, so I cut out two of the nestability shapes, lined them up so they overlapped, cut through both down the middle and taped them together on the back. I then used the ribbon to hide the line. Though I don't like the specific application here so well, I DO like the basic concept and will do it again.
- I have often hand-drawn a border along embossed edge of a nestability, but this one was done differently - a regular oval rather than scalloped. Since it was an afterthought after the ribbon & focal had already been glued down, it didn't turn out as well as I would have liked, but I like the look and will do this again.
- And I really like the look of the squiggled lines in the center of the oval. These were done free-hand with a silver metallic pen - inspired by my cake-making days - and I love them. Will definitely want to do this again, too!

So, there you have it -- allowing myself to play and be less critical of the outcome, gave me several new ideas to use on future cards, even if the specific examples were a little like diamonds in the rough!
Friday, October 15, 2010
Glitzy Christmas Card

- Place an outline sticker on white cardstock.
- Create a "paint" using a SMALL bit of Perfect Pearls powder and a little water and paint inside the outline sticker. Here I used three colors of perfect pearls, Forever Violet, Forever Green, and Forever Blue - from the Jewels Perfect Pearls package.
- While your focal is drying, cut an 8 1/2 x 11 piece of silver cardstock in half, score it down the middle, and fold it for your card base.
- Cut and emboss a piece of red foil paper using a nestabilities die. Glue it to the center of the card as shown.
- Add a Greeting - mine is an outline sticker.
- When "paint" has dried on the focal outline sticker, cut around it. Attach it to the center of red oval with foam dots. Stick a star in the center (mine was from the greetings outline sticker sheet)
- Outline the embossed edge of the oval with a silver metallic pen.
Thursday, October 14, 2010
Get Well

This card brings together many of my favorite things: outline stickers, perfect pearls, suede paper, fibrous paper, and alcohol inks. Unfortunately the picture doesn't do it justice. It looks much better in real life with all the glittery shine and different textures. To make it:
- Make focal first so it has time to dry -- Place an outline sticker on a plain piece of white cardstock and paint it with "Perfect Pearls" (mix a little perfect pearls powder with a little water to form the "paint" - I used "Forever Violet" and "Forever Green" from the "Jewels" collection). Let dry.
- Cut, score and fold a piece of silver cardstock to form the base card
- Dab it all over with alcohol ink (I used Lettuce, Eggplant, and Silver Mixative). Let it dry.
- Tear a rectangular piece of the fibrous paper for a mat and glue it down.
- Cut and emboss the green suede using a nestabilities die as shown.
- Cut out the focal and add it to the green suede oval along with the "Get Well Soon" outline stickers.
- Take a small "ribbon" of green suede paper (about 3/8" wide), top it with narrow silver ribbon (1/4" wide), and glue in place.
- Glue the green suede oval in place and then outline the embossed edge on the green suede with a silver metallic pen.
- Finish with a small silver bow.
Wednesday, October 13, 2010
Corners from Nestabilities!

I decided that since the focal part of the picture didn't go clear to the corners, I wanted to make large enough photo corners to hold it. I started looking around for ideas of how to do this as I wanted a nicely decorated front edge on the corners. I saw my Spellbinder's Nestabilities - Labels Four to be exact. A little experimenting with some white paper showed me what I needed to do to make it work. Here's what I did:
 | |
| Cut & emboss nestability, then mark dotted lines on the back as shown. |
 | |
| Fold along dotted lines |
 | |
| Cut small piece of paper or cardstock and attach to the folded flaps as shown. This forms the back of the photo corner. |
 |
| Finished photo corner from the front. Note the nice embossed edge! |
I can't wait to play with more of my Nestabilities and see what other corner designs I come up with!
Tuesday, October 12, 2010
I Would LOVE to Win One of These!

I just came across this chance to win "The Paper Tower". Wouldn't that be great! I could store a lot of stuff in a small space with that - paper, embellishments, supplies of various kinds.
There are several places where you can enter the drawing:
Update 10/16/2010 - this contest is over, so I've removed the links for entering the drawing. Unfortunately, I didn't win.
Organize your Ideas

SCRAPBOOKING: I do something similar for scrapbook pages. These I store 2 ways. The first is the pictures of scrapbooks I've made - all the pages in separate folders per scrapbook. The second is a series of "layouts" folders. I organize these based on how many pictures are on the page. Thus, I have a folder for 1 picture layouts, 2 picture layouts, 3 picture layouts, etc. I also have a folder for "dual-page layouts". Once again, I can add pictures or sketches that I've gotten other places, so I can easily find ideas if I have 4 pictures to go on a page and can't figure out what to do with them.
Monday, October 11, 2010
Fun with Alcohol Inks!


I love playing with alcohol inks! Here's another way I've used them. I made envelopes out of ink-covered vellum! They really look nice and can hold something special tucked into a card or on a scrapbook page.
For the green envelope I covered the vellum with "Lettuce" and "Gold Mixative" by applying several drops of each to the applicator, along with a bit of blending solution, and dabbing it around the page. After cutting and folding it into the envelope, I added the gold outline sticker and colored it in with marvy marker to set it apart a little more. The brown ribbon sets it off nicely and keeps the flap loosely closed.
For the purple one I used "Eggplant" and "Silver Mixative". The outline sticker was placed on a darker purple paper and then glued to the envelope flap.
Sunday, October 10, 2010
Several Small Pictures?

In this case, I cut out the ovals with my Silhouette (and cut corresponding yellow frames for them with it as well). If you don't have a digital craft cutter (Cricuit, Wishblade, etc.), you can draw the holes and cut them by hand, or if the mat is small enough, run it through a die cutting machine several times, moving the die each time.
Another trick you see here is that rather than cutting and gluing individual yellow letters for the title, I cut the letters out of the blue cardstock and then backed it with the yellow paper - similar effect with less work. I DID have to keep and glue the centers of the nines, but that was a lot less work.
Saturday, October 9, 2010
Inspiration

- The setting - a formal tea - can suggest the use of Victorian-style papers and embellishments
- The function can suggest the use of cup and tea pot themes
- The table setting can inspire color choices
- The clothing can suggest color choices - for instance, the tan, white, black, and turquoise in that skirt would make a fabulous card!
- The people can suggest a relationship theme
- You might be inspired to express gratitude for the blessings in your life
- The light shining in the window might inspire you to journal about what "lights up your life"
Friday, October 8, 2010
Dry Embossing and Color Core

You can create a great card focal using dry embossing and Color Core card stock! You will need:
- Stencil to use for dry embossing
- Color Core Card stock (from Core'dinations - card stock with a different color in it's center core than is on the outside - in this case a maroon with pink center core)
- Embossing stylus or die cut machine that works with stencils.
Thursday, October 7, 2010
Noteworthy?

Materials:
- Card blank from Paper Wishes
- Striped paper is from Debbie Mumm Nursery Rhyme Mat Stack (DCWV for Joannes)
- The birdhouse and bird outline stickers from JeJe products
- Silver "Mirrored Foil" from JeJe
- Dazzles double-stick border stickers
- Frosted Lace & Turquoise Stickles
- Turquoise glitter
- Adhesive (I used ATG) and Pop-dots
- Cut striped background paper 1/2" or more smaller than card front on all sides. Glue to center of card front.
- Using alcohol inks, color the leaves and flowers of the birdhouse sticker rather than just leaving it all silver.
- Place birdhouse sticker on paper or cardstock (dotted turquoise here) with the rounded edge an inch or more from the bottom straight edge. Cut 1/4" wide lines from the edge of the sticker sheet to form straight sides for the birdhouse (see picture). Trim around sides and top close to sticker. Glue to card front approximately 1 1/2 inches above bottom edge of striped background.
- Place bird outline sticker on yellow paper (leave legs free). Trim close to sticker. Cut piece from edge of sticker sheet to form dowel that the bird is sitting on and attach it to birdhouse. Attach bird with pop-dot and sticky-backed feet (that weren't kept free of the paper earlier).
- Cut a narrow strip of white paper and a slightly wider strip of turquoise to form border for below birdhouse. Glue them together and run them through corregator. Adhere in place as shown and trim to width.
- Cut musical notes and words from Mirrored foil with my Silhouette, Cricuit, or similar machine, and add as shown on card.
- Place double-sided border stickers around edge of striped paper. Adhere turquoise glitter to stickers.
- Add color to the wings & back of the bird and the center of some of the musical notes with turquoise Stickles. Add sparkle to the border strip with Frosted Lace Stickles.
Wednesday, October 6, 2010
Using Spellbinders Nestabilities with the Big Shot die cut machine
 |
| Focal Framed using Nestabilities dies |
The basics -- Nestabilities are considered a "wafer-thin" die, so you cut them with all tabs closed, and sandwiched as shown on the picture on the platform.
- Place an acrylic mat on top of tab 2, then your die (cutting side up), then your paper/cardstock to be cut, then another acrylic mat -- and run it through the machine. This cuts your paper or cardstock. Now, DON'T remove the paper from inside the die yet, we want to emboss it!
- Pick up the die with the paper or cardstock still in it, fold one tab back and make your embossing sandwich. Place an acrylic mat on tab 1, then your die with paper/cardstock still in it (cutting side up), then your silicone rubber and impressions pad (that comes with the texturz kit). Run it through your Big Shot and your item is embossed.
Taking the next step -- You can use a magnetic sheet to hold your Spellbinders Nestabilities dies in place so you can cut and emboss two at once to create a frame. Since this is a bit thicker, you may not want to run it through in the same sandwich as before - you don't want to stress your Big Shot. Perhaps it is best to fold back one of the tabs before you cut it. Since magnetic sheets vary in thickness, you will need to experiment a bit to see what works best, adding cardstock on top of the last acrylic pad until it is thick enough to cut on tab 1. For the magnetic sheet that I used, I cut it on tab 1 with 4 thicknesses of cardstock added on top of the final acrylic mat. This shows what it looked like after cutting and embossing it:

I used this to frame the focal in the card above. I used a pen to draw along the raised embossing to help it stand out better. This focal used 4 sizes of the "Petite Scalloped Ovals Large" nestabilities. The smallest and the 3rd smallest were used to cut the frame shown above. The one between those two sizes was used to cut the picture that went behind the frame, and the one just larger than the largest used for the frame was used to cut the dark mat.
Tuesday, October 5, 2010
Ribbon Fish

Here's a really neat trick with RIBBON that I just ran across -- make a fish out of it!

This idea came from Ling's Design Studio: Ribbon Fish Tutorial She used wider grosgrain ribbon and that might have looked better. I used what I had on hand -- satin ribbon in 1/4" and 1/8" widths.
Monday, October 4, 2010
Storing all those hand-made cards you make!
Here's a great tip for storing your cards so you can find them!
- Start with a CD tower with adjustable shelves. (Mine is a tall one from IKEA)
- Label shelves with type of card - I've got: "Anniversary/Wedding/Baby," "Birthday," "Get Well," "Holiday," "Misc," "Sympathy," "Thank You/Thanksgiving," "Thinking of You".
- Adjust shelves to suit. For instance, I only have a small space (about 1 inch) for my "Sympathy" cards, but more like 7 or 8 inches for my "Holiday" cards since I make so many more of those.

If, like me, you have shelves left over. That gives you a place to store card blanks, envelopes, or other card- making essentials.
By the way, Paper Wishes Message Board ran a hints and tips contest and I posted several of these tips there under their "Hints & Tips" forum. Soon they will have them up for a vote -- I'd love to have your support in winning that prize!
Update: Voting is finished and I won with this tip! Thanks to all of you who voted for me!
Sunday, October 3, 2010
Tea Bag Folding - Number 2
In a previous tip, I shared how you can cut your own tea bag folding paper out of small print paper you have on hand. You can also print your own. Paper Wishes sells a CD with tea-bag folding papers on it, and there are websites where you can download papers. However, you're not limited to something like that:
 Here's a picture of a card I just made with the focal done this way. The picture I cropped is from a Paper Wishes CD with tag art on it. It also shows that matting the pieces can help them stand out.
- Crop any picture to a small square (usually 1 1/2 to 2 inches)
- Copy it into a document eight times (or however many you need for your design)
- Print & cut them out
- You're ready to start folding!

Saturday, October 2, 2010
Cards from Scrapbook Pages


This tip is for you cardmakers that also scrapbook.
My current major project is a set of heritage scrapbooks, but I like sending out home-made cards to the important people in my life as well. In order to keep up with cards I wanted to send out, I found I was spending more time than I wanted on pulling together a variety of papers & embellishments to make my cards -- thus taking time away from my main project.
Then it dawned on me -- I already have a nice variety of papers and embellishments pulled together for my scrapbook page. Rather than taking the time to file the leftovers, why not use them to make a card at the same time?!!! Now when I complete a scrapbook page, I look to see what I might use to make a card. It works great!
I now have MORE TIME TO SPEND ON MY PROJECTS because I am spending:
* less time pulling materials together for making my cards, and
* less time putting away odds & ends from my scrapbooking!
AND, I usually have cards ready at my fingertips when needed!
Friday, October 1, 2010
World Cardmaking Day is October 2!
Come Join Paper Wishes for World Card Making Day and you can WIN! Starting October 1 at 8 AM EST and ending October 3 at 8 AM EST you will have a chance to win some great prizes worth more than $50 -
There will be three total winners, so you have three ways to win:
1. Hop to each blog listed below
• Leave a comment at each one
• Become a Follower at each blog
• Write down the Paper Wishes product featured on the blogs
• Send a Private message to Swaps Albums on the Paperwishes Forum: http://forum.paperwishes.com/member.php?u=2271 (If you have questions, email angela@sewmanycards.com for help) telling us all of the products being featured.
2. Hop to each blog listed below
• Leave a comment at each blog
• Become a Follower at each blog
• One random winner will be chosen from the comments
3. Hop to each blog listed below
• Leave a comment at each one
• Become a Follower at each blog
• Make a project using mostly Paper Wishes products
• Send a Private message to Swaps Albums on the Paper Wishes Forum: http://forum.paperwishes.com/member.php?u=2271 (If you have questions, email angela@sewmanycards.com for help) with a link to your project of a picture.
Paper Wishes has many great products for cardmakers. For your Christmas cards this year you might want to try:
Here's the list of blogs for the blog-hop:
Never Try to Teach a Pig to Sing: http://unteachablepig.blogspot.com/
Cher-ing Paper Memories: http://cheringpapermemories.blogspot.com/ - YOU ARE HERE!
Montserrat Native: http://montserratnative.blogspot.com/
Becca's Heart for Creativity : http://www.beccasheartland.blogspot.com/
Crafty Imaginings by Jen: http://craftyimaginingsbyjen.blogspot.com/
Nancy's Creative Space: http://www.nancyscreativespace.blogspot.com/
Precious Thoughts, : http://www.preciousthoughtscards.blogspot.com/
Penny's Page: http://www.pennydouph.blogspot.com/
Crafty Patti' s Card Crafts: http://pattiscards.blogspot.com/
Sew Many Challenges: http://sewmanychallenges.com/
Red Robin Lane: http://redrobinlane-rgcarr.blogspot.com/
There will be three total winners, so you have three ways to win:
1. Hop to each blog listed below
• Leave a comment at each one
• Become a Follower at each blog
• Write down the Paper Wishes product featured on the blogs
• Send a Private message to Swaps Albums on the Paperwishes Forum: http://forum.paperwishes.com/member.php?u=2271 (If you have questions, email angela@sewmanycards.com for help) telling us all of the products being featured.
2. Hop to each blog listed below
• Leave a comment at each blog
• Become a Follower at each blog
• One random winner will be chosen from the comments
3. Hop to each blog listed below
• Leave a comment at each one
• Become a Follower at each blog
• Make a project using mostly Paper Wishes products
• Send a Private message to Swaps Albums on the Paper Wishes Forum: http://forum.paperwishes.com/member.php?u=2271 (If you have questions, email angela@sewmanycards.com for help) with a link to your project of a picture.
Paper Wishes has many great products for cardmakers. For your Christmas cards this year you might want to try:
| Cardmaker’s Christmas Card Quotes |
| Price: $4.99 |

Here's the list of blogs for the blog-hop:
Never Try to Teach a Pig to Sing: http://unteachablepig.blogspot.com/
Cher-ing Paper Memories: http://cheringpapermemories.blogspot.com/ - YOU ARE HERE!
Montserrat Native: http://montserratnative.blogspot.com/
Becca's Heart for Creativity : http://www.beccasheartland.blogspot.com/
Crafty Imaginings by Jen: http://craftyimaginingsbyjen.blogspot.com/
Nancy's Creative Space: http://www.nancyscreativespace.blogspot.com/
Precious Thoughts, : http://www.preciousthoughtscards.blogspot.com/
Penny's Page: http://www.pennydouph.blogspot.com/
Crafty Patti' s Card Crafts: http://pattiscards.blogspot.com/
Sew Many Challenges: http://sewmanychallenges.com/
Red Robin Lane: http://redrobinlane-rgcarr.blogspot.com/
Subscribe to:
Posts (Atom)