Please let me hear from you!

This blog is for sharing a love of paper crafting. You can also check out my Pintrest pages. If you find the ideas here to be helpful, I'd love to hear from you. It is what helps make the time I put into this blog feel worthwhile, and always brightens my day. I love hearing your ideas too!

(To leave a comment, scroll to the bottom of the post. You will see how many comments there are for that particular post. Click on the number of comments and the comment window will open. Also, if you want to add a link to something, follow the instructions at the bottom of this post.)

NOTE: If you click a link from the menu (below left) and are told the page does not exist, chances are good that it's a prepared post that will post at some point in the future, so be sure to check back!

You can also click this Pinterest Button to pin pictures in the blog posts.


Tuesday, October 6, 2015

Cat Card - Inside Out


This card is a first for me - the first time I liked the inside better than the outside of a card!  The picture above shows the inside of the card and is made just using a variety of stickers and other elements from my stash - no idea where they came from originally.   

You can see the outside of the card below.  The focal is a pretty stamp called "Miss Kitty Small" from Sweet Stamps.  I heat embossed it with white and then colored it with Smooch inks.  Most times I like the look of Smooch inks, but I just don't like the way this cat turned out.  Oh well - hopefully my cat-loving daughter liked it anyway!


The background paper is from a DCWV Matstack.  The white mat was die cut with Spellbinder's Decorative Labels Eight.  Both the focal and the sentiment where white heat embossed on white glossy cardstock that had been colored with alcohol inks.  The focal was cut with a JustRite Die from their Nested Oval Medallions set.    The Sentiment was cut from Paper Artist 6 Layered Labels and 2 Swirls die and stamped with a stamp from the matching Greetings and Labels stamp set. 

Monday, October 5, 2015

Thank You in Pink


This card was made using leftovers from the kit that was used for yesterday's card - with the addition of a few Dazzles (Jewel Flowers, Jewel Butterflies).


The patterned paper is an older HOTP design.   Dies used for creating the frame on the front and on the inside of the card are from Spellbinders Tile Works.  The sentiment was stamped and heat embossed with a stamp from JustRite's Grand Sentiments.  To highlight the embossing on the inside frame, I used the die as a stencil with an embossing pen - then heat embossed with white embossing powder.

Sunday, October 4, 2015

My Card Kit


Oh wow, the camera really changed the look of that greeting.  In real life it is plain black heat embossed on vellum (Just Rite's Grand Sentiments stamp), despite the fact that the picture makes it look silver! :)  This was the kit that I put together and it was so much fun to see how different PJMeeMaw's card turned out even though she used the same materials!  The focal is from a foil papier tole set from Hot Off the Press called "Birds and Blossoms".  It is SOOOO pretty in real life!  I didn't use all of the flowers to stack on the focal, but saved them to use on the inside of the card:


The papers are from an old set by Hot Off the Press

Saturday, October 3, 2015

Card Making Kit Fun!


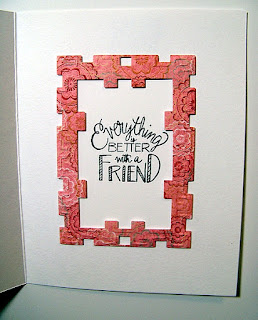
Isn't this a cute stamped image?  I'm not sure who makes it since I got it in a card making kit from PJMeeMaw on the Paper Wishes Message Board.  I colored it with gel pens and a Dove Blender pen, and really like the way it turned out.  I cut it out and embossed it using a die set I got recently - Spellbinders Tile Works.  I wasn't sure how much I'd like that set, but I REALLY like how it turned out on this card!  I highlighted a bit of the embossing with one of my gel pens and it really frames it nicely.  I added it to the front of the card with foam tape for a bit of dimension.  I think I'll probably add a greeting to the front of the card, but we were not supposed to add anything that wasn't already in the kit, (though fortunately, we didn't have to use everything in the kit) so I'm posting it without. :)  

There were several other pretty papers and decorative elements, but I chose to go fairly simple.  I used dies from the same Spellbinder's set to cut out the center of the patterned paper before gluing the card topper on.  And then decided to make it into  frame for the stamped sentiment inside.  The frame is embossed, though you can't really tell that in the picture, and adhered with foam tape.


Friday, October 2, 2015

Christmas with Joy


I have GOT to make a box for taking pictures of my cards.  I get tired of my cards looking so much less pretty in the picture than they do in real life!  Anyway, I figure it's time to start making Christmas cards or I'll never have enough ready!  The background of this card is a printed vellum.  The challenge with using vellum, of course, is attaching it so that the adhesive is not visible.  While there are adhesives that hide themselves pretty well, the best way is to hide the adhesive under other elements. 

In this case, I created a frame out of green suede paper and glued the edges of the vellum behind that.  I also glued the vellum behind the hanging ornament.  And yes, that ornament IS "hanging from the branch" from a chain-like piece of Border Dazzles (though it is, unfortunately, not as visible in the picture as I would like! 

The ornament itself was stamped with a JustRite stamp (from their Holiday Cheer Christmas Ornaments set) and cut with a die from Spellbinder's 2010 Heirloom Ornaments die set.  I finished the look by adding some Jewel Dazzles accents.  To create the large oval one, I simply layered 2 slightly offset to fill the oval space and then centered one on top of that to give a more symmetrical look.

Thursday, October 1, 2015

A VERY Different Look


This card started as another project from Girlfriend's Getaway - using blue and yellow "Color Burst" - but turned out VERY different from theirs.  

In case you haven't seen it, Color Burst is a powder that comes in a little tube.  A little goes a long way.  We sprinkled a little of it on a piece of white card stock and then sprayed it with water and let it dry.  No two ever turn out exactly alike.  After their card stock dried, they matted it with this gorgeous holographic paper before adding dragonflies and words from the "Dragonfly Dazzles" set and some Jewel Dazzles for even more bling.  Once again, I couldn't bear to waste all that beautiful holographic paper that was hidden behind the card stock, so I set mine aside to finish later.

When I went to finish it, I decided to cut a frame with one of my dies (Spellbinders 5X7 Heirloom Legacy) - saving the center oval for another project, of course!  To get the look I wanted, I also cut  my prepared card stock into an oval using the same die so it didn't show behind the beautiful filagree of this die cut.

My idea had been to use alcohol inks to color Dazzles in blue to match the frame, but when I tried it, the color was very muted compared to the frame.  So, I decided to use a fine glitter in the same color.  I also decided to use Hummingbird Dazzles instead of the Dragonfly ones.  

I took a small piece of double stick material - just large enough to hold the hummingbird - and attached it to a piece of card stock.  After removing the top paper and adding the hummingbird sticker, I rubbed the glitter into the remaining spaces.  The glitter appears to be an almost exact match for the holographic paper!  I added a flower from the same set.  This time I used different colors of paper to back the sticker to give a paper piecing effect.  Finally, I added some Greetings Dazzles to complete the card.