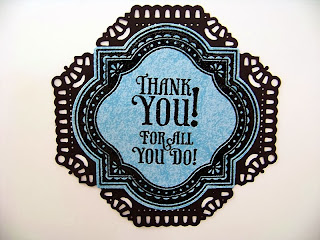
Today I thought I'd showcase a few of the "insides" from some of those "Thanksgiving Cards" that I've shown recently. The truth is that often I don't do much on the insides of my cards - maybe a bit of a border with papers from the front. Seldom do I do much more than that. But with the stamps from JustRite and Spellbinder's dies, I can quickly and easily make the insides look as nice as the outsides! All the focals in this post were made with the help of "For All You Do Vintage Labels Three" from JustRite (and their matching Vintage Labels Three dies) - for both the frames and the sentiments.
For this first card, I stamped with Versamark ink onto my blue paper and then heat embossed it with fine black embossing powder. I cut it out and then used a die from Spellbinder's Decorative Labels Twenty-Seven to cut the black mat on which it sits. Very quick, but quite elegant.
This one was created in two layers. The top layer was stamped with VersaMark ink onto turquoise paper, then heat embossed with fine black powder before cutting with the matching die (just as the previous one was). The mat layer was stamped with turquoise ink onto white cardstock, then heat embossed with clear embossing powder.
This one was stamped in brown ink directly onto the inside of the card - then heat embossed with clear embossing powder.
This time I used gold embossing powder on brown glimmer paper. After cutting and embossing it with my Spellbinder's Scalloped Rectangle die, I took an embossing pen, ran it around the edge, and embossed that with the gold powder too. The mat was cut from a glittered card stock using a Fleur de Lis Rectangles die from Spellbinders.
The inside of this last card may look better than the outside! The frame was stamped with purple ink and embossed with clear powder. Then the sentiment was stamped with VersaMark and embossed with fine black powder. After cutting it out with the matching die, this piece was mounted on a black piece that was cut and embossed using a die from Spellbinder's Gold Labels Four. The bottom layer is cut from a purple glimmer paper using a die from the 5X7 Enchanted Labels 28 set.
That's it! Quick and easy "insides" for my cards.


No comments:
Post a Comment