Please let me hear from you!

This blog is for sharing a love of paper crafting. You can also check out my Pintrest pages. If you find the ideas here to be helpful, I'd love to hear from you. It is what helps make the time I put into this blog feel worthwhile, and always brightens my day. I love hearing your ideas too!

(To leave a comment, scroll to the bottom of the post. You will see how many comments there are for that particular post. Click on the number of comments and the comment window will open. Also, if you want to add a link to something, follow the instructions at the bottom of this post.)

NOTE: If you click a link from the menu (below left) and are told the page does not exist, chances are good that it's a prepared post that will post at some point in the future, so be sure to check back!

You can also click this Pinterest Button to pin pictures in the blog posts.


Tuesday, October 15, 2024

Tunnel Scapes and Fair Winds

Today I'm playing with cutting dies from two Spellbinders collections.  The first is Tunnel Scapes. The second is Fair Winds. I made the card above using a couple sets from the Tunnel Scapes collection - see here for more information on how I made that card.  Pieces for the above came from two of the Tunnel Scapes sets (Cloud Scapes and Fly Away) shown below.  Today I'm not making cards - simply trying out the dies and making several pieces ahead for when I might want to use them.   I find that often if I have something ready made, I'll use it - but if not, I'll find something else rather than pulling out my dies.

Cloud Scapes:

Cloud Scapes consists of cloud tunnel pieces, extra cloud pieces, moon, stars, and sun.

Fly Away:


As you can see, Fly Away consists of pieces to make two things - a kite, and an airliner (seen from below).

Underwater Tunnel:

Here are the layers as usually used.


And here are the "innards" which can also be used as a backdrop for underwater scenes.

I experimented with different Metallic Sharpies colors for the anchors - starting with silver, the color most examples used.  I found, however, that I kind of like using bronze for the main part & silver for the little added piece. On one, I also added a bit of "patina" using a greenish metallic Bic marker and immediately trying to wipe it off to soften the effect.  I think it looks pretty interesting IRL.

The rocks are designed so they can be layered to create a different look, though I left these unlayered until I know how I'll be using them.  These are colored with Distress Inks.

The seaweed and corals are also colored with distress inks.

Underwater Marine Life:

We'll start with the sea turtles.  I used Distress and Distress Oxide inks except for the black which was a fine-line marker.  After trial and error, I discovered I like the look better if I wrinkled the neck (folding and smushing it a bit) before coloring it - added a bit more realistic look.

Once again, the fish are colored with Distress and Distress Oxide inks - with sharpie or paper for the black.

Perched Birds:

First the branches they can perch on (along with extra leaves).

And then the birds.  All colored with Distress and Distress Oxide inks (except for black which is marker).

That's all of the die sets in the Tunnel Scapes collection!

Next up is the Fair Winds Collection.  

Fair Winds Collection: There are 3 sets of die cuts in this collection - actually 4 given the Fair Winds Sentiments Stamp and Die set - but I'll focus on the other 3 sets.
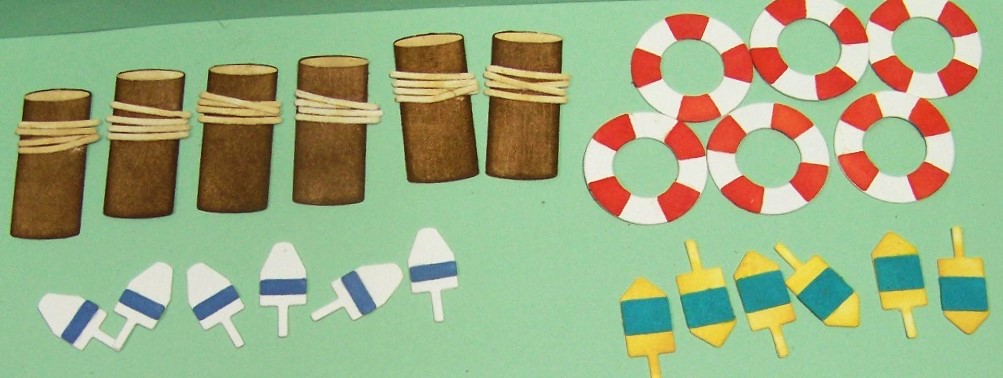
Oh, Buoy!:

Here are 4 of the 5 objects that it makes - the last is the seagull (see below).  These pieces were all colored using Distress and Distress Oxide inks.

The gulls went together quickly and easily - again colored with Distress & Distress Oxide inks.

Set Sail:

In addition to the sail boats that you see above, the set comes with waves and clouds.  

The clouds can be layered or not as you choose.  

Surprisingly, the cloud shapes can also be colored green to serve as trees or bushes along the horizon when building a scene.

Guiding Light:

First up are the rocks that help create the scene for the lighthouse. Once again colored with distress inks.

There were also some small flying gulls, but somehow I didn't get pics of them.

That's it for both of the Spellbinders collections that I recently purchased.

Saturday, October 12, 2024

Flamingo Birthday & More


Flamingo Card: A flamingo lover's birthday is coming up, so this card seemed quite appropriate.  I inked the outer portion of the card front with Distress Inks (Tumbled Glass and Pine Needles).  Then I added a bunch of die cuts and a sentiment.  Most die cuts are from Spellbinders May 2024 Large die of the Month called Grand Tropical Flamingos, but a few of the leaves are from the same month's Small die of the Month called Tropical Friends.  The sentiment is from Sassy's LLC & matted on a punched scalloped peach mat and a die cut black mat (Spellbinders Splendid Circles die set).

Inside:


On the inside, I used another of Sassy's sentiments, just matted on a punched scalloped black mat.  I again inked the outer edges of the card & added another flamingo (this time on a wobble spring).

Card #2:

My next card mostly makes use of two Spellbinders die sets from the Tunnel Scapes collection - Cloud Tunnel and Fly Away die sets.  I also made use of the cloud part of the Background Scapes stencil that was a part of the stencil that came with the Window with a View collection.  Because I was going to hand deliver this one, I was able to add a lot of dimension to it.  Dimensional foam between each layer and some under the sentiments and plane as well.  Round sentiment is from Sassy's LLC, strip sentiment is from the Typewriter Adventure Sentiments stamp set that goes with the Tunnel Scapes collection.

Friday, October 11, 2024

KCC 16 for Autumn

Wanting some Thanksgiving cards, I decided to do a KCC (Kendra's Card Challenge) card set in Autumn colors using papers from HOTP called Autumn Blessings.   Here's a quick look at all 15 of them.

And now a closer look at each:

Card #1:

For card number one, I started by embossing the card front with an embossing folder called Kitchen Weave from Cuttlebug.  I matted the pieces with brown glimmer paper.  The focal consists of two cut outs from the set - the smaller one added with foam tape.

Card #2:

The second card also had the brown glimmer paper mats.  I added an embossed tan background that had also been embossed with the Kitchen Weave folder - this time inked with brown.  The small center square was cut from an orange piece of card stock in my stash.  The focal is a small sentiment cut out from the paper set.

Card #3:


This time I matted the border with a punched border on brown glimmer paper.  Once again I added a block of orange card stock from my stash.  I added a turkey made from Elizabeth Craft Turkey die and a die cut matted greeting.

Card #4:

This card is pretty simple - just the matted papers and a large matted sentiment.  Instead of adding the side pieces in the center the way the sketch showed, I moved them down to help balance the greeting (Kat Scrappiness - Happy Thanksgiving).

Card #5:

Another simple composition - just the matted cut pieces and a couple of cut outs.  That seemed a little TOO plain, so I inked the edges of the card.

Card #6:

This time I chose to double mat the pieces.  Instead of adding the suggested matted circle, I added a matted piece for the turkey to stand on (another turkey created with the Elizabeth Crafts Turkey die set).  A cut out sentiment piece in the upper left and small punched circles in the upper right complete this card. 

Card #7:

The focal turkey was created using Karen Burniston's Feathered Animals die.  The sentiment is a cut out that was matted & then added with foam tape.  The fall leaves at the bottom and near the sentiment are a bit unusual (die cut from the Elizabeth Crafts Turkey die).  I added them to the bottom of the card and it didn't look very good, but once they were glued in place I couldn't remove them.  On the advice of a friend, I added more leaves below the sentiment and it helped tie things together better.

Card #8:

This time, I simply matted patterned papers and a stamped greeting (one of my Mom's stamps - I inked the edges).  An added ribbon bow was the only other touch.

Card #9:

After matting the pieces, I found a stamped/die cut sentiment my Mom made and matted it before threading ribbon though it.  Next, I die cut a white piece using Spellbinders Labels One.  Then I die cut a mat using Luscious Labels One.  I added another turkey - Karen Burniston's Feathered Animals again.

Card #10:

Background paper is matted with dark paper and embossed with a Darice embossing folder called Damask.  It again uses a turkey from Karen Burniston's Feathered Animals. The sentiment banner is one stamped and die cut using a set of my mother's.  

Card #11:

This one used lots of little pieces.  Along with mats, I added a bit of ink behind the turkey and on the sentiment (another stamped and died from my mother's set).  The turkey is again a Karen Burniston Feathered Animals.

Card #12:

One of the 4 pieces of patterned paper had these branches and a bird.  So, I added another inked sentiment banner (again my mom's stamps & dies) that I matted with turquoise glitzy paper before adding it with foam tape.  It still didn't work, so I found a robin sticker in my stash - adhering it to card stock and fussy cutting that before adding it with foam tape.  It still didn't feel complete, but finally I thought to add 3 small punched circles of the glitzy turquoise and that pulled it together better.

Card #13:


I turned this one on its side and used turquoise glitzy paper from my stash to mat everything.  The sentiment is from Sassy's LLC.  I used a scalloped punch, my nested circle dies, a Double Stitched Circle die from Kat Scrappiness, and a Nested Flower die from Nellie Snellen to mat the sentiment.

Card #14:

This time I went with a matted cut out sentiment from the paper set, but felt I really needed a bit of a border so found a scrap of another patterned paper and added it for a border.  All mats were a dark brown glimmer paper.

Card #15:

This final card for the set is a REAL simple card.  I once again turned the sketch on it's side.  This time I simply added a matted sentiment (Sassy's LLC, punched mat, Splendid Circles die from Spellbinders for the 2nd mat) and a piece of knotted ribbon.

Wednesday, October 9, 2024

Karen Burniston Characters


Today I have a bunch of die cut critters made from some Karen Burniston dies.  They are SO cute and easy to put together!  While they can easily be cut from different colors, I cut them all from white card stock and colored them with Distress Inks and Distress Oxide Inks.  Her dies have some stencil holes for adding finishing touches like eyes, mouths, and feet.  So quick and easy to make and did I say CUTE! :)

In the picture at the top of the page, are her Feathered Animals - owls, ostriches and turkeys.  As you can see, I added glasses and eyebrows to the first owl.  I decided not to add them to the others, but instead wait until I know how they'll be used and what I might want in the way of accessories for them.  I also have some little top hats I could add to the turkeys if I want to do so.

Next up are the Woodland Animals.

 
First are the raccoons - which I think may be the cutest of the bunch. I really love how easy they are to put together. 

 
Then there are the foxes.  It's hard to realize they are the same base die as the raccoons - just decorated differently.
 

The squirrels are the last of the Woodland Animals.

Next up are ones from the set called simply Monkey and Lion.

 
The lion came with a crown and heart - but again, I only added them to one, waiting until I use them to decide what I want.  I colored the crown with metallic Sharpie, but that might be one piece I would die cut from metallic tag board.  

The monkey comes with a couple of bananas and a vine it can hang from.  As you can see, it can be put together in two different ways.  Such fun!

Finally, are the cat and dog.


These look much better when they have their little added accessories - collar, kerchief, food bowl, etc.  I DID cut those out, but am not coloring them and adding them until I know what color I want for the particular project on which they get used.

That's all for now.  But can I just say, I LOVE these critters!!!!  They are so cute, and so easy to put together!

Monday, October 7, 2024

WCMD Marathon - Part 2


Here's Part 2 of my card making marathon (see part 1 here). This time I'm featuring the cards I made on Oct 6 - only 7 cards this time, but one (the one you see above) took a bit of time to figure out and make.

So, here are the 7 cards I made - in order of how I made them.

Card #1: 

 
I started with the one I figured would be the most complicated.  It was, but really not too bad.  A link had been posted to the video of how it was made (https://www.youtube.com/watch?v=CLkr-n0ZUME).  The patterned papers I used were from a set I was given called Wild and Free collection from Graphic45.  The only thing that wasn't was the sentiment - stamped with a stamp from Crafter's Companion Compendium set of greetings - the set called Birthday-Female. The base card and mats were card stock from my stash.  The picture above shows the card when folded up.  The next picture shows it open for display.

 
There are two things I'll mention about the structure.  First, I would use lighter card stock for the base next time.  Because I have so many layers, the card is really firm and thick.  Secondly, in her video she says she makes her diamonds 1/8" bigger so she doesn't have to be as precises when putting this card together.  I made mine the way she suggested and had to trim my diamonds because they really didn't fit if you wanted to fold the card.  SO, next time I would NOT add the 1/8" like she did!

Here you see the back of the card where I have stamped a greeting (same stamp set) and will write my message to the recipient.

Card #2:

This card, and the 3 that follow are made using a One Sheet Wonder pattern for a 6 x 6 piece of patterned paper.  The OSW pattern started by cutting the paper into quarters.  Each card used one of these resulting 3 x 3" papers - plain or cut further.  I used paper my niece shared with me - Halloween themed in fun colors - not sure who made it.  

For this card, the 3 x 3 was again cut into quarters - then matted individually - then matted collectively.  This piece served as a large mat for my focal sentiment.  All patterned paper used on these 4 cards was from the same set, but the plain pink and the black were from my stash.   

The background started with a piece of black paper that had been embossed using a Darice folder called Damask.  A strip of patterned paper down the center completed the background. The focal sentiment, and the strip sentiment below it, were both from Sassy's LLC.  For the focal, I lightly inked the edges of the sentiment, then matted it on a punched scalloped pink circle, then on a black die cut piece (Flower multi-frame set by Nellie Snellen).  The strip sentiment was double matted & then added with foam tape.

Card #3:

This next card left the 3x3 piece intact.  The background was a piece of matted pink patterned paper with a strip of matted orange and pink patterned paper down the center.  The focal was a sticker from the set which I narrowly matted with black and added with foam tape.  The sentiment was another from Sassy's LLC and was again matted and added with foam tape.

Card #4:

The background this time uses the same two patterned papers as the previous, but the strip is narrower and the patterns are reversed.  For this card, the 3 x 3 piece was cut into 1" wide strips and matted before being added on top of the background.  The sentiment was a sticker that I attached to black card stock and then fussy cut around it to form a narrow border.  This was then added to the card front using dimensionals.  The card still felt fairly plain, so I added some "gem" diamonds from my stash to bling it up a bit.

Card #5:

This last card was the most fun.  The background was very plain - just black card stock. The 3 x 3 piece was cut on the diagonal, matted individually, and then matted on a pink rectangle.  The focal was another sticker.  This time  when I added it to the black, I just cut a rectangle around it.  Next, I narrowly matted this with pink card stock.  The whole was then added to the card front using a wobble spring.  The double-matted strip sentiment is another from Sassy's LLC.

Card #6:

By now I was winding down.  My mojo and energy were waning after two marathon card making days!  The last challenge was to C.A.S.E. up to three cards.  I only managed to do two before I gave out and called it a day.  Both were pretty straight forward, using 2 3/8" wide strips cut from patterned paper.  I cut both this and the one used on the next card from one 6 x 6 set of papers that my Mom shared with me.  It was double sided, so the two look quite different.  I used a lilac card stock as card base for this one, narrowly matted my strip with blue and then glued it in place.  The sentiment was a stamp from JustRite's Chicken Soup Labels Four set.  After stamping and embossing on light blue card stock, I cut it out using a die from Spellbinders Labels Four cutting die set.  I inked the edges before adding to the card front with dimensionals.

Card #7:

This last card is a cut away.  The patterned paper strip is a little shorter and matted with white.  The card itself is a dark blue card stock, but the inside is also matted with white, so only narrow borders show.  The sentiment is another stamp from JustRite - this time their Always and Forever Medallion Labels stamp set. I die cut this using JustRite's Nested Medallion Labels cutting dies.  I wanted a narrower border than their next size up die, so used the die I cut with and traced around the outer edges before fussy cutting my mat from the same card stock as that used for the card base.
 
Th-th-th-th-ats all folks! :)