Today I needed some more masculine cards, so I chose 4 pages from Hunkydory's Little Book of High Street to work with. You can see the four I chose in the picture below.
And here are the cards I made from them. I have both a portrait and a landscape style of regular cards, a slimline, and a center step:
And then a closer look at each one:
Card #1:
I used a piece of black paper that was embossed with a metal-like pattern to mat the yellow I used for the card background. Then the LB (little book) page got fussy cut into little pieces that were then matted on black paper. The "inside of the shop" is one piece - glued directly to the card front. The 2nd piece is the outside - attached with thin foam squares. The 3rd piece is the awning - attached with thicker foam squares at the bottom and directly attached at the top.
Inside:
Inside are scraps from the background & a stamped message (my mom's stamps).
Dimension:
It's not a great photo, but I'm trying to show the dimension caused by the foam squares.
Card #2:
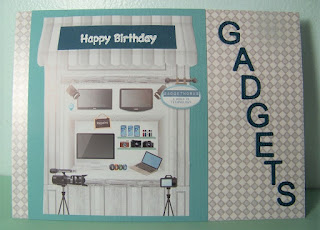
I must admit that these store fronts have challenged me. I don't want all my cards the same, but it seems so straightforward to put it on a card that is just a bit bigger than the card front and call it good. If I'm not careful, all my storefront cards will look like that! So, this one is put on a landscape card. I put a strip of turquoise to serve as a mat (the background is AS (Adorable Scoreable card stock) from the coordinating card stock pack), and cut a strip of darker teal to cover the sign on the awning. As you can see, I stamped & heat embossed the words "Happy Birthday" onto this.
I liked the look of matting it and offsetting it (after trimming & fussy cutting the piece), but then I had what felt like too much white space on the right-hand side, so I added the word "GADGETS" on the side.
Inside:
Inside I again offset the border & stamp (from Birthday Cheer by HOTP). This time so that I'll have room to write a personal message before I send this card out.
Card #3:
As you can see, this is a center step card. The background paper is AS from the coordinating High Street set of card stock. The focal was cut down from the Little Book page. The greeting is a freebie download from Debbi Moore. The piano border & notes are Scrapbooking Dazzles (HOTP).
Inside:
More of the same - plus the trumpet dazzle was backed with gold metallic paper. The stamped sentiment was one of my Mom's stamps.
Card #4:
This last one is a slimline card. AS from the coordinating set of card stock forms borders top & bottom - they were inked with brown ink & then brown ribbon runs along the top & bottom edge of the focal. Focal was trimmed on the sides to fit. The sentiment is a die cut (Stacked Happy Anniversary from Creative Expresions) as are the music symbols (Music Panels from Paper Discovery).
Inside:
Inside is more of the same - plus a stamped message using another of my Mom's stamps.
.JPG)

.JPG)


.JPG)
.JPG)
.JPG)
.JPG)
No comments:
Post a Comment