Please let me hear from you!

This blog is for sharing a love of paper crafting. I love paper crafting -
and Stampin' Up! products in particular -
so much so, that I became an independent Stampin' Up!®™ demonstrator earlier this year!
Full disclosure: I get a small commission on purchases made using Stampin' Up! links from this website - but this in no way affects your price. It just serves to help support my blogs. Thank you in advance for that support!

As of January 21, 2026, most of my Stampin' Up! makes are moving to
https://cheringloveofpaper.blogspot.com/.
Most of my makes will be using Stampin' Up! products and be on that blog,
but any makes from other materials will still be posted here.
Enjoy browsing my blogs, and I'd love to hear from you.
It is what helps make the time I put into these blogs feel worthwhile, and always brightens my day.

NOTE: All Stampin' Up! Images © 1990–2026 Stampin’ Up!®

Tuesday, October 15, 2024

Tunnel Scapes and Fair Winds

Today I'm playing with cutting dies from two Spellbinders collections.  The first is Tunnel Scapes. The second is Fair Winds. I made the card above using a couple sets from the Tunnel Scapes collection - see here for more information on how I made that card.  Pieces for the above came from two of the Tunnel Scapes sets (Cloud Scapes and Fly Away) shown below.  Today I'm not making cards - simply trying out the dies and making several pieces ahead for when I might want to use them.   I find that often if I have something ready made, I'll use it - but if not, I'll find something else rather than pulling out my dies.

Cloud Scapes:

Cloud Scapes consists of cloud tunnel pieces, extra cloud pieces, moon, stars, and sun.

Fly Away:


As you can see, Fly Away consists of pieces to make two things - a kite, and an airliner (seen from below).

Underwater Tunnel:

Here are the layers as usually used.


And here are the "innards" which can also be used as a backdrop for underwater scenes.

I experimented with different Metallic Sharpies colors for the anchors - starting with silver, the color most examples used.  I found, however, that I kind of like using bronze for the main part & silver for the little added piece. On one, I also added a bit of "patina" using a greenish metallic Bic marker and immediately trying to wipe it off to soften the effect.  I think it looks pretty interesting IRL.

The rocks are designed so they can be layered to create a different look, though I left these unlayered until I know how I'll be using them.  These are colored with Distress Inks.

The seaweed and corals are also colored with distress inks.

Underwater Marine Life:

We'll start with the sea turtles.  I used Distress and Distress Oxide inks except for the black which was a fine-line marker.  After trial and error, I discovered I like the look better if I wrinkled the neck (folding and smushing it a bit) before coloring it - added a bit more realistic look.

Once again, the fish are colored with Distress and Distress Oxide inks - with sharpie or paper for the black.

Perched Birds:

First the branches they can perch on (along with extra leaves).

And then the birds.  All colored with Distress and Distress Oxide inks (except for black which is marker).

That's all of the die sets in the Tunnel Scapes collection!

Next up is the Fair Winds Collection.  

Fair Winds Collection: There are 3 sets of die cuts in this collection - actually 4 given the Fair Winds Sentiments Stamp and Die set - but I'll focus on the other 3 sets.

Oh, Buoy!:
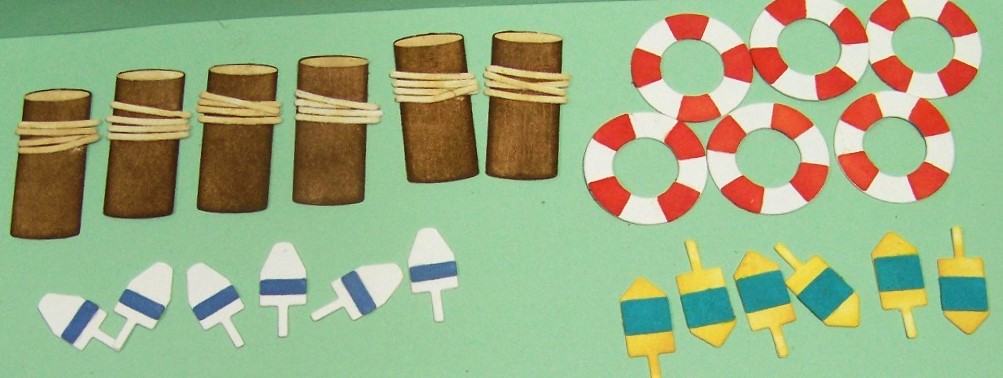
Here are 4 of the 5 objects that it makes - the last is the seagull (see below).  These pieces were all colored using Distress and Distress Oxide inks.

The gulls went together quickly and easily - again colored with Distress & Distress Oxide inks.

Set Sail:

In addition to the sail boats that you see above, the set comes with waves and clouds.  

The clouds can be layered or not as you choose.  

Surprisingly, the cloud shapes can also be colored green to serve as trees or bushes along the horizon when building a scene.

Guiding Light:

First up are the rocks that help create the scene for the lighthouse. Once again colored with distress inks.

There were also some small flying gulls, but somehow I didn't get pics of them.

That's it for both of the Spellbinders collections that I recently purchased.

Saturday, October 12, 2024

Flamingo Birthday & More


Flamingo Card: A flamingo lover's birthday is coming up, so this card seemed quite appropriate.  I inked the outer portion of the card front with Distress Inks (Tumbled Glass and Pine Needles).  Then I added a bunch of die cuts and a sentiment.  Most die cuts are from Spellbinders May 2024 Large die of the Month called Grand Tropical Flamingos, but a few of the leaves are from the same month's Small die of the Month called Tropical Friends.  The sentiment is from Sassy's LLC & matted on a punched scalloped peach mat and a die cut black mat (Spellbinders Splendid Circles die set).

Inside:


On the inside, I used another of Sassy's sentiments, just matted on a punched scalloped black mat.  I again inked the outer edges of the card & added another flamingo (this time on a wobble spring).

Card #2:

My next card mostly makes use of two Spellbinders die sets from the Tunnel Scapes collection - Cloud Tunnel and Fly Away die sets.  I also made use of the cloud part of the Background Scapes stencil that was a part of the stencil that came with the Window with a View collection.  Because I was going to hand deliver this one, I was able to add a lot of dimension to it.  Dimensional foam between each layer and some under the sentiments and plane as well.  Round sentiment is from Sassy's LLC, strip sentiment is from the Typewriter Adventure Sentiments stamp set that goes with the Tunnel Scapes collection.

Friday, October 11, 2024

KCC 16 for Autumn

Wanting some Thanksgiving cards, I decided to do a KCC (Kendra's Card Challenge) card set in Autumn colors using papers from HOTP called Autumn Blessings.   Here's a quick look at all 15 of them.

And now a closer look at each:

Wednesday, October 9, 2024

Karen Burniston Characters


Today I have a bunch of die cut critters made from some Karen Burniston dies.  They are SO cute and easy to put together!  While they can easily be cut from different colors, I cut them all from white card stock and colored them with Distress Inks and Distress Oxide Inks.  Her dies have some stencil holes for adding finishing touches like eyes, mouths, and feet.  So quick and easy to make and did I say CUTE! :)

In the picture at the top of the page, are her Feathered Animals - owls, ostriches and turkeys.  As you can see, I added glasses and eyebrows to the first owl.  I decided not to add them to the others, but instead wait until I know how they'll be used and what I might want in the way of accessories for them.  I also have some little top hats I could add to the turkeys if I want to do so.

Next up are the Woodland Animals.

 
First are the raccoons - which I think may be the cutest of the bunch. I really love how easy they are to put together. 

 
Then there are the foxes.  It's hard to realize they are the same base die as the raccoons - just decorated differently.
 

The squirrels are the last of the Woodland Animals.

Next up are ones from the set called simply Monkey and Lion.

 
The lion came with a crown and heart - but again, I only added them to one, waiting until I use them to decide what I want.  I colored the crown with metallic Sharpie, but that might be one piece I would die cut from metallic tag board.  

The monkey comes with a couple of bananas and a vine it can hang from.  As you can see, it can be put together in two different ways.  Such fun!

Finally, are the cat and dog.


These look much better when they have their little added accessories - collar, kerchief, food bowl, etc.  I DID cut those out, but am not coloring them and adding them until I know what color I want for the particular project on which they get used.

That's all for now.  But can I just say, I LOVE these critters!!!!  They are so cute, and so easy to put together!