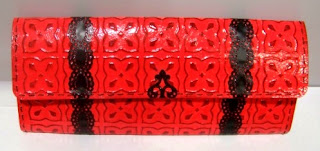
For Christmas this year, I wanted to give a gift of cash, and went looking for some sort of paper purse I could make to put it in. I found a tutorial for a Faux Leather Wallet from Splitcoaststampers. Just making the faux leather is a WONDERFUL technique and I can imagine many uses for it besides a wallet.
I made my first wallet, following the tutorial pretty closely except for color and embellishments. It turned out like this:
I liked it really well - except that I had trouble with my sewing machine not wanting to sew smoothly, leaving a lot of knots and mess on the underside (a not particularly unusual problem unfortunately - I need to get it serviced!).
Anyway, the stitching was such a mess on the inside that I just couldn't give it as a gift, so I decided to make another - which is what you see at the top of this post.
This time I modified the project because I wanted it to be wide enough to hold paper money without folding it - but a wider wallet also required a wider embossing machine. And since I couldn't figure out how to use my Sizzix Texturz Plate in the Grand Caliber, I had to use a different embossing tool as well. I also decided to do without the liner and just stitch it by hand to ensure I didn't end up with a mess again. Here's how I made it:
Materials and Tools:
- 1 piece red cardstock 7 1/2" x 8 1/2"
- 2 pieces red cardstock 2 1/2" x 3"
- Aged Mahogany Distress Ink Pad
- Embossing Ink (I used VersaMark)
- Clear Embossing Powder
- Needle & brown thread
- Small Magnet Discs
- Scrapbooking Dazzles (Swirls, Flourishes & Borders)
- M-Bossabilities folder (I couldn't figure out how to
- Grand Caliber machine
- Corner Rounder Punch
- Heat Embossing Gun
- ATG
- Crystal Lacquer
- Emboss the large piece of cardstock. With my M-Bossabilities folder and Grand Caliber, I was able to emboss the whole piece in two passes. Simply center along one edge, run it through; line it up with previous embossing to emboss the rest of it by running it through again.
- Round two corners using a corner rounder punch - choosing two corners that are 7 1/2" apart (rather than 8 1/2" apart). These form the wallet cover edge (see picture).
- Using the ink pad, lightly go over the embossed paper to color the raised areas. (My ink pad was rather dry. If yours is real juicy, you might want to put some of the ink on a make-up sponge and apply it that way.) Repeat on the reverse side.
- Choose the side you will use for the outside. Working one portion at a time, cover a section of the chosen side of the card stock with embossing ink, then with clear embossing powder. Heat emboss and repeat until entire side of card stock is covered with a lovely glossy finish.
- Taking the smaller two pieces of paper, score at 1/2" intervals perpendicular to the longest side - 5 score lines created. Fold them back and forth to create an accordian-type fold. Open them back up again and lightly treat them with the ink pad as you did before in step 3 - on both sides. Re-fold and crease your score lines with a bone folder.
- Working with the outsides of these small folded card stock pieces, apply glue from the ATG to each outside surface (two surfaces per piece).
- Now, these small pieces need to be attached to form the sides of the wallet. With your large piece of card stock lying flat with the wrong side (inside) up, line up one accordian folded card stock piece along one of the 8 1/2" long edges, such that the fold of the small piece is along the outer edge of the larger, and the narrow end of the accordian folded piece is aligned with one of the un-rounded corners. Repeat for the other edge. Now, working one side at a time, carefully fold the un-rounded edge up so the other adhesive edge of your accordian folded card stock pieces can align along the outer edge of the wallet, making sure that the edges align properly. (Depending on the embossing folder you used, you might be able to use the pattern to help ensure you get it lined up straight.)

- Now all you need to do is fold the top down and fasten your mini-magnets to hold it closed. You need a really strong adhesive to hold the magnets. I used Crystal Lacquer as my glue and it worked great!

- The wallet now looked like this:
I guess that's it for posts in 2012! Starting tomorrow, have a very Happy New Year!


.jpg)
.jpg)


.jpg)
.jpg)
.jpg)
.jpg)
.jpg)


.jpg)
.jpg)


.jpg)
.jpg)
+focal.jpg)


