
I recently purchased some Elizabeth Craft dies that are so much fun! They make all sorts of little characters, accessories, and even buildings! Most of the time the pieces are small enough that I can make them using scraps, so I can make a good dent in that stash, too!
Whenever I purchase new dies, the first thing I do is use them to die cut a sample that I put in a book that has samples of my dies arranged by category along with where they are stored. In the next picture, you'll see a sample page on which I have samples of accessory dies that are designed to work with the various die cut characters that I just purchased. For some reason, I started with the accessories first!

As you can see, the Christmas baker does not have a head - the outfit is designed to work with one of the other characters. It was specifically made to work with Mrs. Claus, and I don't have that die set. However, it looks like it will work just fine with other people samples I have - the farmer, prince, princess or fairy (without her wings). I really like that there are a variety of arms so I can have her doing different things and using all the various pieces that come with the Let's Bake set.
The Igloo will be great for the penguin - and the polar bear if I get that one. The Party Accessories set will help any of these characters dress up for a party, and the Fire Accessories set can handle a fire. Then there are the accessories that come with specific characters but can be used with the other - like the Santa hat from Owl & the scarf from Penguin (and more that I didn't get added to this page before the picture).
I've been on a marathon of using these dies to make up samples of the characters and accessories to go in my sample book so I can get everything put away and focus on using one at a time to make cards. Some of them I inked - mostly using distress ink. Some I left as it was cut. Here are the rest of the Elizabeth Craft samples that I have made for my book:
Cat:
.JPG)
First up is the cat I showed a few days ago. I had been so excited to start playing with my new dies that I had temporarily forgotten about the need for a sample book. Since I hadn't yet used this one for a card - and since I wasn't real happy with it anyway (I need to give it more of a neck!), I decided it would be my sample.
Scarecrow:

Next I made the Scarecrow. I forgot to take a picture before I glued it to the sample page, but you can pretty much see it here. The birds are a fun addition that can be used with a wide variety of cards & scrapbook pages. I made this one more or less as shown on the sample - though with different colors, using scraps I had on hand. I DO think it would work to cut the arms apart so they could be put at different angles, so I might try that sometime.
Fairy 1/Princess/Prince:

The Fairy 1 could easily be made without the wings - in which case she would make a really cute little girl. The Princess and Prince both went together easily as well. All of the hair styles could be mixed & matched, just like the accessories and clothes, so they can really be made up in a wide variety of ways.
Dog:

The dog can be made in various colors, either sitting or standing, with or without spots and collar, two different types of ears, the tail can be positioned in different ways, the head cocked at different angles, etc. This allows for quite a variety of dogs to be made from this same set. As I was cutting out the collar and dog tag, I ended up with a partial medal cut out of the red. I was getting ready to just throw it away when I realized it would make a great tongue for the dog - so I added it as you see on the 2nd dog.
Owl:

This owl goes together so easily, with dies for each piece. The Santa hat could fit on lots of these different characters.
Penguin:

This penguin went together so quickly and easily. One of the things I like about these dies is that they are made to score where elements of the face go - so it is easy to get the eyes in the right place (for example).
Turkey:

As you can see, the turkey can be made either facing head on, or facing toward the side. They are easy to put together, and I could easily see grabbing that hat and putting it on the scarecrow!
Honey Bear:
.JPG)
This is such a cute bear - and as you can see it can be made standing or sitting. I LOVE the little bees that come with it! They are SO easy to make and so cute.
Koala:
.JPG)
You can see a couple of different orientations for this bear. Again, he's really easy to put together. I love that it comes with it's on bit of eucalyptus tree!
Panda Bear:
.JPG)
Complete with his own little bamboo shoot, this panda is really cute. I DID have a couple of problems putting him together, but that was totally my fault. First problem was that I was trying to be efficient and cut the panda and tiger at the same time. This should have worked great, except that I grabbed the tiger's mouth and tried to put it on the panda. By the time I realized what I had done, it was pretty well glued in place. I tried to cut it down to a more proper size for Mr. Panda, but ended up making a bit of a mess. The other thing was that I cut the large ovals for his feet from black and his paws from white. This meant I had to glue each little pad of his foot in place. I'm sure the INTENT was to cut the large ovals for his feet from WHITE - then when the other dies were used to cut the feet from black, it would just easily glue in place with the white pads showing through the holes - much easier, though this way worked okay.
Lion/Tiger:
.JPG)
Lion and tiger are made from the same set of dies. The bodies are basically identical. There are separate pieces for the lion's mane, and the tiger's stripes. There are also separate pieces for the different tails and the tiger has a tongue sticking out. I DO find that often, it works best to ink the edges of the pieces so that they stand out against each other. I also like to plan ahead, so that if I need enough pieces so that I would need to use a die twice, I just grab two pieces of card stock (or whatever I'm cutting from), layer them on top of each other, and cut both at once! It works great.
Elephant:
.JPG)
Honestyl, it's hard to imagine using the hearts with the elephant. I think I'll probably use them more with other focals - like for a wedding or anniversary card.
Raccoon:
.JPG)
I made a mistake on this one - the tail should have been cut out of black and the stripes for it out of gray. Oh well, live and learn. I think he's still a cute little guy.
Fox:
.JPG)
I didn't have enough of any of my small scraps of red-brown to make this fox - so I used two different ones - not the best, but okay for a sample.
Beaver:
.JPG)
This beaver would look GREAT if I had used my embossing mat with him. It looks a bit better in real life, but still can't see the embossing on his tail & the logs as much as I'd like
Frog:
.JPG)
I think I'd like to play around a bit with the orientation of lily pad & "pond", but these guys are pretty cute anyway. I DID get the eyes backwards on the 2nd frog (the larger circles should be black and the tiny ones white like in the first frog).
Bunny:
.JPG)
Barn & Barnyard Critters:
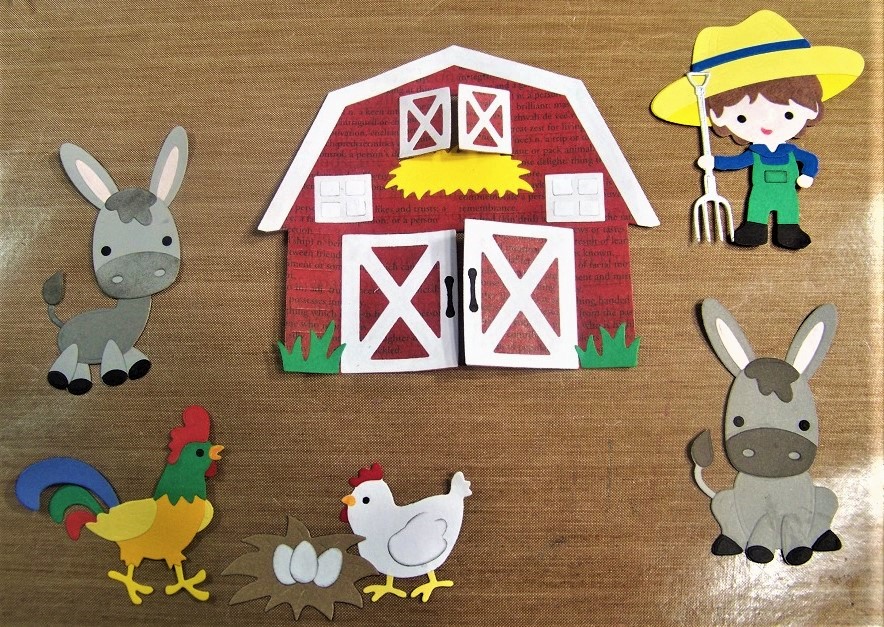
Once again, I didn't get individual pictures. Pictured are elements from 4 different die sets.
- Barn is quite cool as you can see. I love that the barn doors and hay loft windows both open up. I can easily imagine having a sentiment or character hidden behind so you see them when you open the doors/windows.
- Farmer is cute, though seems more top-heavy than the other people, but the head appears to be the same size, so it would be interesting to mix and match some of these pieces with other people pieces.
- Donkey can be made up in two different ways - sitting face on, or standing.
- Hen and Rooster is another cute set, Try making a hen out of browns rather than white for another look. Obviously the eggs and nest could be used with them in some scene.
No comments:
Post a Comment