Please let me hear from you!

This blog is for sharing a love of paper crafting. I love paper crafting -
and Stampin' Up! products in particular -
so much so, that I became an independent Stampin' Up!®™ demonstrator earlier this year!
Full disclosure: I get a small commission on purchases made using Stampin' Up! links from this website - but this in no way affects your price. It just serves to help support my blogs. Thank you in advance for that support!

As of January 21, 2026, most of my Stampin' Up! makes are moving to
https://cheringloveofpaper.blogspot.com/.
Most of my makes will be using Stampin' Up! products and be on that blog,
but any makes from other materials will still be posted here.
Enjoy browsing my blogs, and I'd love to hear from you.
It is what helps make the time I put into these blogs feel worthwhile, and always brightens my day.

NOTE: All Stampin' Up! Images © 1990–2026 Stampin’ Up!®

Friday, September 6, 2024

HD Perfect Days - Afternoon Tea

Today I have cards made from another Hunkydory set.  This set - Afternoon Tea - comes from the kit called Perfect Days.

Set as it comes:

The 5 cards that I made from it and some misc from my stash:

There's a 6 x 6 card, a 5 x 7 card, a slimline card, and two A2 cards.  And now a closer look at each card.

Card #1:


This one is pretty straight forward.  I started by cutting the piece of lavender checked scrap for a background.  Next I added the die cuts (some on foam tape), splitting the border behind the sentiment so it stretched all the way across.  The sentiment itself is on foam tape, and I added a ribbon bow from my stash.  I finished it by adding gold Thin Line Border Dazzles from HOTP.

Card #2:

 
Next up is the slimline card.  This one was created using a panel cut from the coordinating AS (Adoreable Scoreable printed card stock) in the set.  I cut a piece of leftover AS to extend the bottom of the panel before adding it to my card.  I covered the join with a piece of border and put another piece of it toward the top of the card.  I added a layered piece on the focal with foam tape - and then added the sentiment using the same.  I again added gold Border Dazzles - this time wider strips just on either side of the card.

Card #3:
 
Next up is another piece of AS for the background - with focal, extra pieces, corners, and sentiment added die cut pieces (some on foam tape).  This time I did something extra special on the inside:

 
I used one of the smaller die cut pieces to add a pop-up feature on the inside of the card.  I also added just a strip of the AS that was used on the card front.
 
Card #4:
 
This card started with a small piece of AS left over from making cards.  I matted it with gold tag board, wrapped a ribbon around it, and glued it to a mat of patterned paper from my stash.  I added some extra pieces to the foal with foam tape, added a bow to the top left corner of the focal, and the added a die cut sentiment on top of the bow.
 
Card #5:
 
By the time I got to the last card of this set, I had already used most of my supplies.  I added a checked lavender piece from my stash, added my die cut focal (with extra piece on foam tape), added the sentiment from the set (upper right corner) and then finished with a greeting from HD's Little Book of Essential Greetings (lower left corner).

That's it.  5 cards from this set.

Sunday, September 1, 2024

Piano!

Today I have proof that making mindless embellishments can spark my creativity when mojo seems to be missing.  I've realized that I tend to use my die cuts more if I make them ahead, so when mojo disappears, I get out my cutting dies and get to work.  Today I found myself using a set of musical dies from Paper Discovery called Lost in Music - Musical Panels.  I have often used the music notes on a card that says something like "just a note", so having a bunch of them on hand is helpful.  And, while I have used quite a few of those notes since I got the dies, I've never actually used the piano keyboard.  So, I decided to cut out the piano keyboard and put it together before cutting out a bunch of the music notes for my stash.


The piano turned out pretty good, but before I put it in my stash, I die cut the music notes to go with it.

After cutting out the music notes, I found myself staring at the "leftovers".  I had cut the panel of notes twice side by side out of black card stock.  As I looked at those scraps I realized what a pretty background it would make!  I decided to trim it up and see what I could do with it - and that is where this card came from.

The background panel and keyboard both were approximately 6" wide.  I thought about using them on a 4" x 6" card, but felt that too much of the background panel would be hidden if I only had 4" to play with.  So, I decided to use a 5 x 7 card base.  I thought about cutting it down to 5" x 6", but didn't like the resulting proportions, so left it at 5 x 7 figuring I'd create some sort of border on either side.  

I knew I wanted to wrap a red ribbon between the keyboard & the rest of the background before gluing it all down, but it was a  bit tricky since the background panel wasn't 5" tall.  I ended up gluing the keyboard to a portion of the background first - making sure the combo came out to exactly 5" tall and the sides were even.  This was made much easier by using my new glue press.  That tool enables such a fine line of glue that I could put glue on the lower part of the background panel and line up the piano keyboard on top with both on top of the card for sizing purposes - all without the panel sticking to the card front!!!  Once the two pieces were glued together, it was a simple thing to wrap the ribbon where I wanted it.  I taped the ribbon to the back of the panel to hold it taut before gluing the whole thing in place.  (Once again that glue press came in handy to make sure all little pieces were glued down with out making a gluey mess that would be seen through the die cut holes in the background.)

I went looking for red to match my ribbon to create a border on the sides.  That was harder than it should have been!  I ended up using some sticky-backed vinyl from my stash - cut to fit as you see on either side of the focal - leaving a narrow white border between it and the keyboard/panel.

For a finishing touch, I tried lots of things over the background panel, but they just didn't look right and took away from the beauty of the panel.  So, I settled on a Hunkydory printed greeting tag.  After adding that, I added a little ribbon bow and my card front was done.

Inside:

I had originally created the banner, using red Dazzles stickers adhered to a white mat, for the front of this card, but it just didn't look good against the background.  I could have used a black strip for backdrop like I did here, but would have covered up a bunch of that pretty background.  I decided that rather than let all that fussy cutting of the mat go to waste, I'd use it on the inside on a black border strip.  I will probably go back and scatter a few musical notes on the inside of the card after I decide who will receive this card and how much room I need for stamped sentiment and/or handwritten note.  For now, my mojo's back and it feels good!  (Though unfortunately, my time for crafting is up for now!)

Saturday, August 31, 2024

More Holiday House

Holiday House #1: Here's a Christmas house - made using dies from Elizabeth Craft Designs Holiday House.  It took me most of the day to make it (which I suspect is why I like to have things made ahead rather than doing it as I make a card/scrapbook page).  The original die was designed to make the center section.  I chose to cut extras of the middle piece around the door to add on either side of the house to make it bigger. 

I inked various parts of the house to create some texture.  Then I colored the door frame, heart, and lights with red.  I colored the light strings and window frames with silver Sharpie, backing the windows with pieces colored with light yellow to effect light coming through them.  I covered the door frame, heart, and eaves with a clear glitter sheet and fussy cut around it.  I thought the Dazzles leaves worked great to form some small bushes & a Christmas tree in the window. Wreath is suede paper - as is the greenery in the window boxes.  Little red Dazzles complete those.  

Holiday House #2:  

This one was much more basic, as you can see.  I used the clear sticker on eaves, windows, and heart.  It's surprising, but all purple (except the roof/gingerbread) was colored with the same marker - just depended whether or not it was going over top of the clear glitter sticker.    Looking at these, I realize that both need door handles.  I probably won't come back to show the updated photo, but I will go and fix that.

2024 August Swaps

Swap card (above): "Tropical" is the theme for this month's swap card.  I decided to use Spellbinders Coastal Escape View die set from their Windows with a View collection.  These are such pretty dies with such a variety and were used to cut all the die cuts on the card front and the inside.  The white shell was a sticker from my stash, the sentiment was Hunkydory.  The background was from a wallpaper sample book.  I thought it gave the look of the inside of a ship's cabin looking out at the sea. I used Distress and Distress Oxide inks to color the die cuts and the background.  I also used a coordinating stencil called Background Scapes to try to create the look of waves in the water - though I must admit it DOES make better clouds than waves. :)

Inside:

It's a bit hard to tell from the picture, but the inside "portal" was cut from copper mirri.  The background was done the same as for the card front, and the coral, sea weed, and fish were from the same die cut set.  The inside sentiment was from one of my Crafter's Companion Compendium stamp sets - the page called Celebrate.

Materials Swap - Book related:

Here's the kit I created:

This was a challenging one for me!  It was supposed to be book related and it took me longer than I thought it should have to come up with a good idea for that.  Since characters from a book were an option, I decided to go with a nativity scene.  I sent a die cut nativity scene (Holy Night from Divinity Designs) and die cut greeting (Moonstone's A Christmas Miracle).  To that I added a card blank, white card stock, silver card stock, dark blue patterned paper, and a silver-edged white ribbon.

And here's what I made with it:

It's a bit hard to see in the picture because of reflected light off the silver.  I started by matting the blue with silver and gluing it to the card front so there was a bit of white around it.  Then I cut a hole in the center and glued the cut-out piece to the inside of the card.  I bordered the hole with silver and white frmaes, then cut the nativity piece apart, leaving the stable scene intact.  Next, I used a circle die to round the bottom to fit inside the hole.  I finished by adding the remaining figures as you see, a ribbon bow, and the sentiment (which says "A Christmas Miracle").

Inside:

I cut a silver circular frame that was larger than the hole so there would be no chance of seeing it from the outside.  I then used ink to cover the white between the blue circle and the silver frame.  After gluing the nativity scene in place, the only other thing was to add a strip of the blue at the bottom for a border.

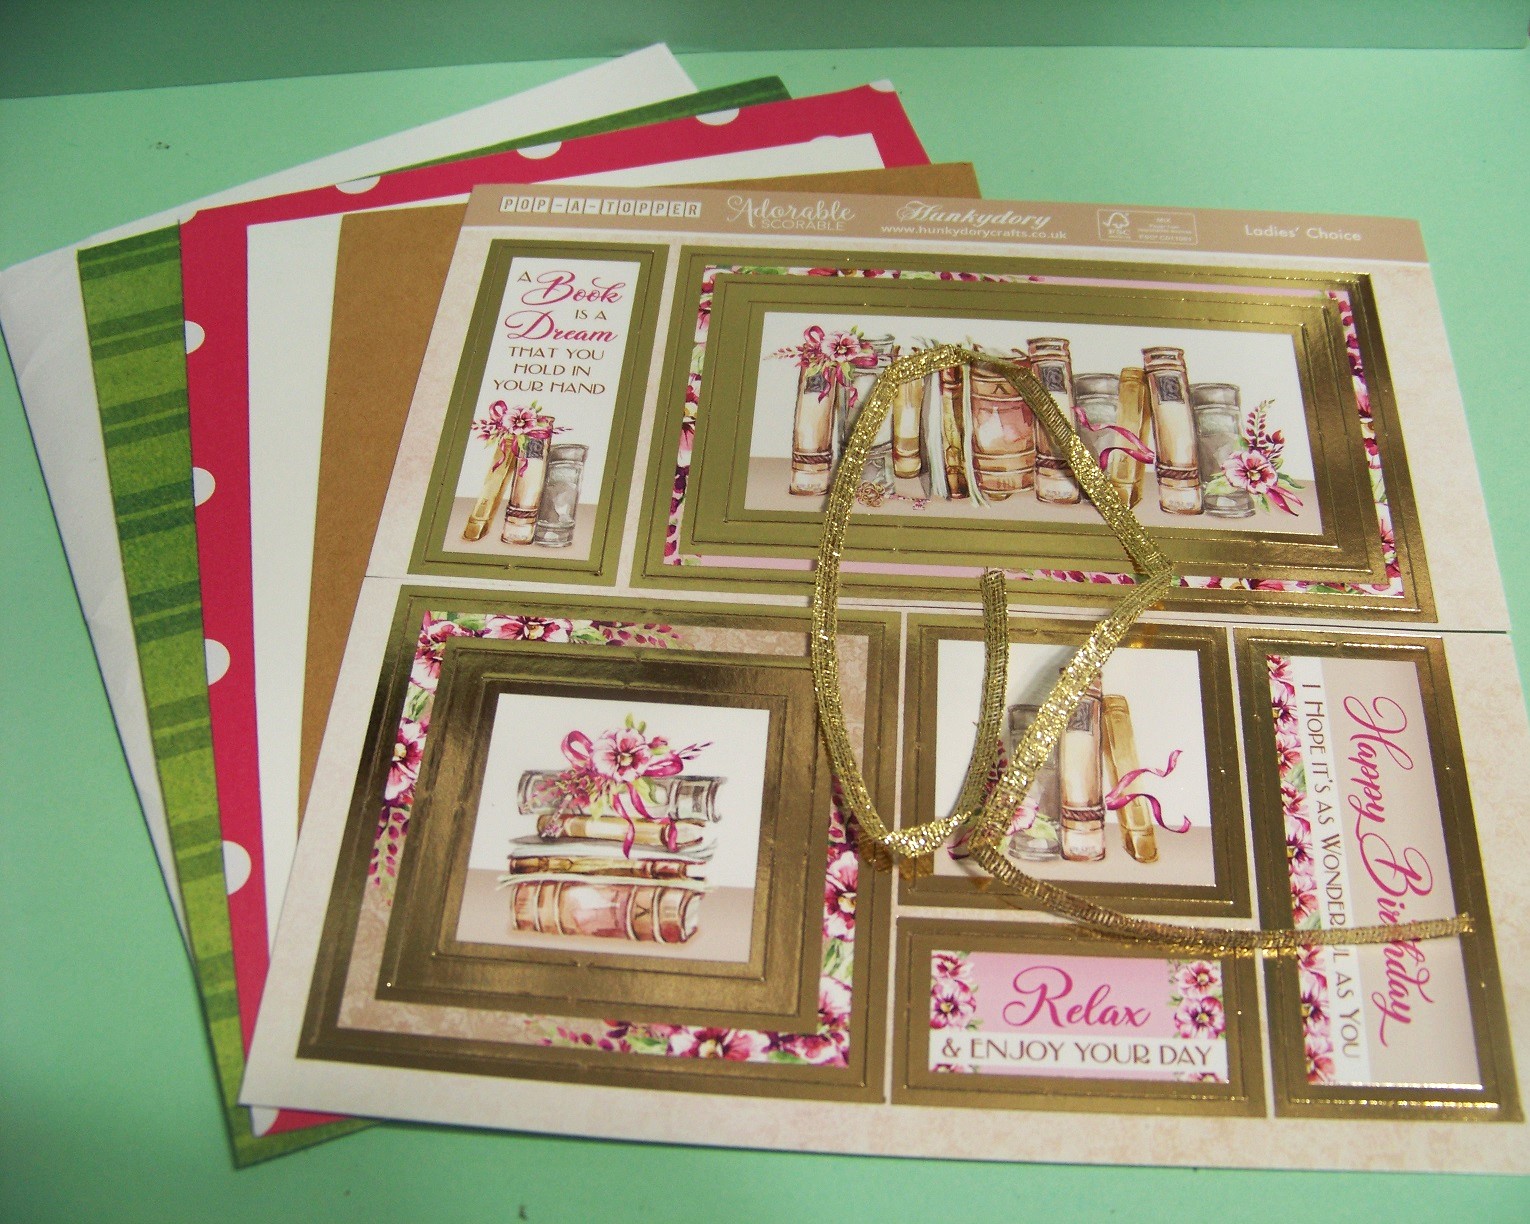
Here's the kit my partner created:


It's a sheet from the HD Pop a Topper set called Ladies Choice and a few papers from her stash that coordinate with it. And here's what I made:

 
I had quite a challenge figuring out how I wanted to lay out this card.   I finally decided on the above with the sentiment on foam tape.

Inside:

As you can see, I went with more of the same for the inside.

Digi-Swap:


This card started with the three patterns and focal that I printed from a digital download.  I started by fussy cutting the bird focal and gluing it to a white mat.  I then added it to a blue dotted mat.  My background was the blue check - with a smaller yellow serving as a larger mat for the focal & sentiment.  I added a sneaky little kitty face & paws (Stampendous Pop-Up Kitties) - kitty on wobble spring, paws on foam tape.  The greeting is fuzzy alphabet stickers.

Inside:

As you can see, I used scraps to create a border on the inside.  The embellishment is from Sassy's LLC and says "A little birdy told me you weren't feeling well . . . so I ate it."