Please let me hear from you!

This blog is for sharing a love of paper crafting. I love paper crafting -
and Stampin' Up! products in particular -
so much so, that I became an independent Stampin' Up!®™ demonstrator earlier this year!
Full disclosure: I get a small commission on purchases made using Stampin' Up! links from this website - but this in no way affects your price. It just serves to help support my blogs. Thank you in advance for that support!

As of January 21, 2026, most of my Stampin' Up! makes are moving to
https://cheringloveofpaper.blogspot.com/.
Most of my makes will be using Stampin' Up! products and be on that blog,
but any makes from other materials will still be posted here.
Enjoy browsing my blogs, and I'd love to hear from you.
It is what helps make the time I put into these blogs feel worthwhile, and always brightens my day.

NOTE: All Stampin' Up! Images © 1990–2026 Stampin’ Up!®

Monday, December 23, 2019

Thank You Card Extravaganza


Today I've got a bunch of Thank You cards that I've been working on.  Because I need several cards quickly, I've decided to go through my Hunkydory stash for focals & sentiments.  For several of them, I'm not certain what specific Hunkydory product they came from, but where I'm sure, I'll mention it.  This first card is one I'm not sure about, but they are very cute.  The patterned paper used in the background is an old pattern from HOTP, with edges inked.  A purple card stock & gold metallic poster board finish it.


The large frame is made from  gold poster board - die cut with a Spellbinder's die (Radiant Rectangles). The background card stock is also from Hunkydory.  The focal is a shaker card made with a Hunkydory multi-framed image with added acetate.  The inside is more of the same materials.


Next up are several cards from the same set.  For this first one I used a greeting from a Hunkydory Essential Little Book of Greetings.


This next one is a shaker card:


And this is a two-piece stepper card:


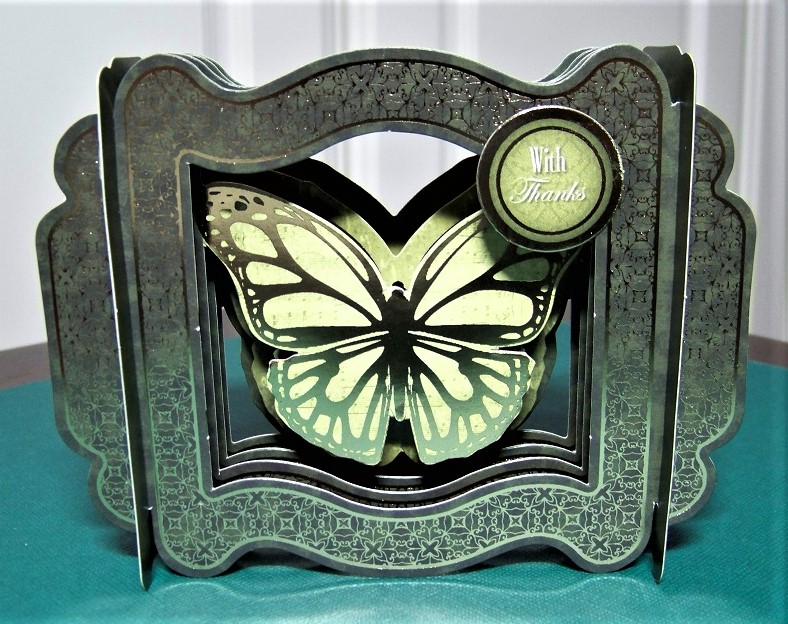
Then there's a concept card from "Flight of the Butterflies Jeweled Editions":

This next card is from the "Paws for Thought" set (one of my very favorites!)


This one is also from "Paws for Thought" - put together with paper & poster board cut with various dies (Marianne Cut & Emboss, Paper Artist "8 Squares & Scallops").  The card is finished with some self adhesive jewels.

Sunday, December 22, 2019

Another Christmas Wonder


Somehow, this Christmas Wonder card didn't get posted with the other two.  This one is a two-piece center step card and very pretty in real life.  The color of the ribbon in the photo isn't true - probably because it's a glitter velvet ribbon & the shine of it messes with the camera settings.  These types of cards are so quick and easy when made in two pieces.  No pulling out the ruler and craft knife!

The inside is really simple - the corner treatment of the paper is perfect.  It's so pretty, but still leaves room for a message.


Saturday, December 21, 2019

Christmas Wonder


Today I needed a couple more quick Christmas cards, so used some materials from HOTP "Christmas Wonder" set - papers from their paper set, and Papier Tole that goes with it.  Other materials used: gold poster board, black ribbon from my stash, gold braid, and stamps & ink.


The stamp used here is from JustRite - "Christmas Gifts Vintage Labels Two".  

Here's the second card made from the same supplies:


And the inside:


The stamps used here are from the set "Mix and Match Christmas Blesings" (JustRite).

Wednesday, December 18, 2019

Using Up the Bits


Lately I've been trying to learn, after I'm finished making cards, to use up all the little leftover bits and pieces by turning them into tags.  I can't bear to through pretty stuff away, yet my "scraps" bins are getting WAY too full. I find I haven't been using them very much, so as I make more cards, they just get heaped higher and higher!

However, when I went to start making tags with the leftovers from my Meowy Christmas card, I realized that though I didn't have very much of the patterned papers left over, it would STILL take me forever to use it up on little tags.  SO, I decided I needed to make a couple more cards first.  It was a bit of a challenge to figure out how to do that with the little bits I had left.  I added some other cut elements from the Pepple's paper pack and some coordinating scraps in plain & glittered card stock and glimmer paper.  I also used a Hunkydory Tag (2016 Essential Little Book of Christmas Greetings), and some of the twine I had out for use on the tags.  I embossed the red glimmer paper using Cuttlebug's Holly Ribbon 5X7 embossing folder, and "addressed" the post card.  When I determine who this card goes to, I'll put their name on the "naughty/nice" list & fill out the information there. :)

For the inside, I had to get creative again to figure out how to make something interesting with the little bit of remaining scrap I had.  Here's what I ended up with:


That took care of most of the turquoise paper, but I still had more of the mini Christmas elements paper.  Going through my brown scraps, I found the die cut (Spellbinders' Resplendent Rectangles) I hadn't used and decided to use the same die set to cut the patterned paper to fit the center.  I "attached" it with twine to a strip of brown card stock, hoping to make it look like a hanging sign.  I stamped a greeting on a strip of white card stock & created the greeting tag - which I added with foam tape.  A fussy cut stocking from scraps of the patterned paper completed the outside:


For the inside, I used another cut out element from the paper pad - with brown card stock scraps.  I wrote the message with a fine point brown marker, trying to make it look like a child's writing.  Then I added a few "candies" which I cut from scraps of the patterned paper.


Now the scraps were more manageable, but I DID still have enough to make 5 tags:


The center back row is one that has fluffy stuff snow on it, but you can't see that in the picture.  The greetings on the tags in the back row & the larger snow flakes on the one on the right (back row) are all chipboard elements that came in a card making magazine - couldn't tell you which one.  I added some mini-punched snowflakes to the one on the front left.  Stamped sentiments on both of the front tags were from a HOTP bulk set.