One of the reasons I created this blog is that it allows ME to look back and see how I did something if I want to repeat it. Somehow, however, I didn't get a post made when I last worked with unmounted rubber stamps. So, I have to work a bit more to remember what I did.
Supplies Needed:
- Unmounted Rubber Stamps (take them off the blocks if they're already mounted!)
- Archival Ink (I used StazOn)
- Fun foam sheets (often can get these at a dollar store)
- Double-sided adhesive sheets (I used Elizabeth Crafts 6" wide roll)
- Aleene's Tack It Over & Over liquid adhesive
- foam paint brush to apply liquid adhesive
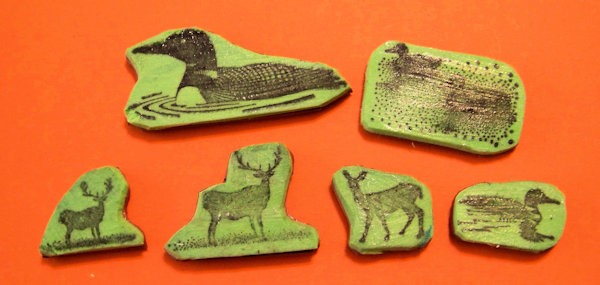
- Start by stamping with the rubber stamp onto the fun foam with archival ink. This will be the image you see through the acrylic block to help you line up your stamp.
- Cover the other side of the fun foam with double-sided adhesive, leaving the liner on the exposed side.
- Rough cut the images from the fun foam.
- Remove the backing paper & apply to the back of the rubber stamp, lining up the rubber stamp with the stamped image (hold up to a light source to help you do this).
- Now, fussy cut, to ensure the cut edges are close enough to the image to not add stray marks when you stamp.
- Paint the stamped image side of the fun foam with a very thin layer of Tack It Over and Over glue and let dry thoroughly. When dry, this will adhere to your acrylic block and allow you to stamp easily.
No comments:
Post a Comment