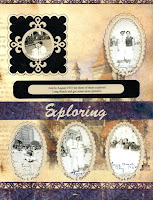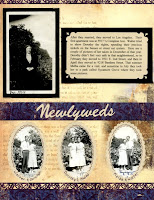

This pair of scrapbook pages was made using paper from a "Once Upon a Time" set of papers that I was given. I don't have much to scrap that relates to princes and princesses and castles (maybe one or two pages of a star-eyed little girl dressed up like a princess), so even though the pages are pretty, I wasn't sure what I could do with them.
One of the principles for using Challenging papers is to look at the colors - not just the theme of the paper. In this case, the colors looked very vintage to me and I decided they would make the perfect backdrop for these heritage album pages. I positioned the photos such that the more obvious castle turrets aren't very visible (you can see a little on the 2nd page) and become more like buildings seen while the newlyweds explored the city around them.
Here's what I did:
- 12 x 12 pages were cut to 8 1/2 x 11 - with selvage edge on different sides so the pages are not identical.
- Center page borders were cut from leftovers of the 12 x 12 pages.
- The titles were cut from cream-colored card stock with my Silhouette and glued to the borders.
- The ovals were cut from the background paper with a Spellbinders Nestability die and from the cream-colored card stock in a smaller size (which was then glued BEHIND the background paper). The tricky part was figuring out how to cut the 8 1/2 x 11 background paper in my Big Shot! I did it by cutting the paper in half, cutting my holes, and then taping the paper back together - then gluing the border (described above) over top of the join!
- The circle within the square was made by mounting black cardstock behind a square hole cut with a square Nestability die. Then another Spellbinders die was used to cut the cream-colored decorative circle. Since I don't have the circular nestabilities yet, I had to cut the center out of the decorative circle by hand so the photo could show through.
- All photos were mounted BEHIND the page using photo corners with the sticky side UP.
No comments:
Post a Comment