Today's cards once again come from Hunkydory's "Flight of the Butterflies - Jeweled Edition" luxury cardmaking kit. This time I'm using the pink sets - Pink Sapphire Delight and the "Butterfly Echo" concept card from the sheet Pretty in Pink (and anything remaining from other pink concept cards or pink from mixed color sheets). This time I made nine cards from the provided materials & a bit of my own stash (including elements from the Hunkydory Essential Book of Pearl Sentiments from 2016).
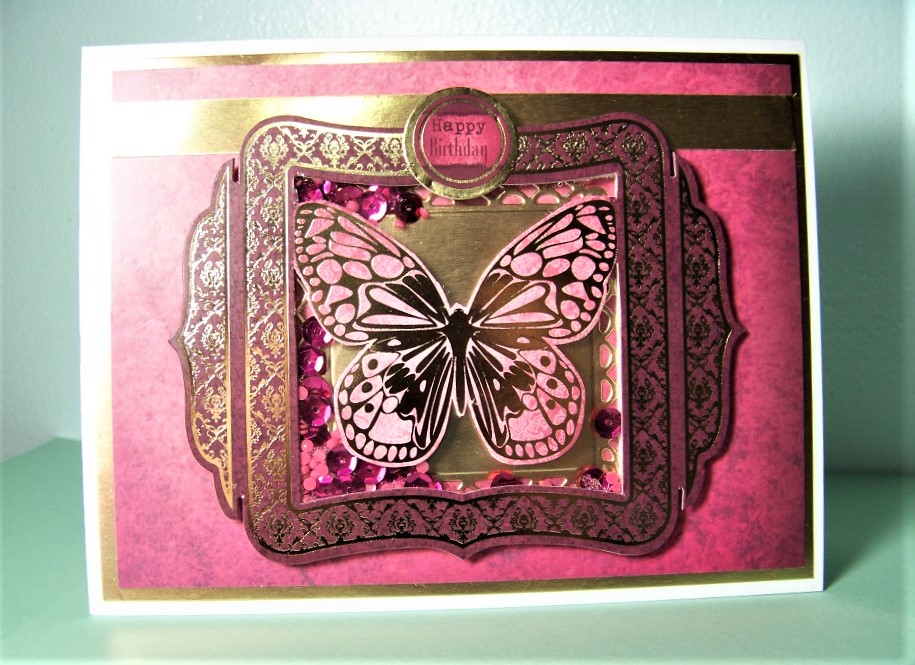
Card #1: First up is this butterfly shaker card (see above) made from one of the concept card pieces - fussy cut around butterfly, added acetate & then foam tape to create space for shaker elements (sequins & "diamonds" leftover from a diamond painting. These are placed over top of a die cut piece (die from Spellbinders Captivating Squares) cut from gold poster board. The background is Adorable Scoreable (AS) from the set & is matted on gold poster board. A gold poster board mat was also added. A sentiment from the set completed the card front.
Inside:

Inside are more elements from the set: A frame for a focal used on a different card, letters spelling "HOPE", a strip of AS for a border. In addition, I stamped a greeting using stamps from two different sets ("You" came from Hampton Arts' Clear Layer Words, the rest was from JustRite's Grateful Heart Vintage Labels Two).
Card #2:

The 2nd card is a tri-fold. The front was quite simply done - cut a piece of AS and draw around the edge with a black Sharpie pen. Added a die cut sentiment from the set.
Inside Panel #1:

The inside panel was embossed with a Teresa Collins A4 sized embossing folder (Decor Circles) and then shaded with two colors of ink (Worn Lipstick Distress Ink, and Onyx Versa Fine). To this I added a couple die cut elements from the kit.

The very inside has a border cut from scraps from the die cut page, along with one of the die cuts.
Card #3:

For this third card I simply took a framed butterfly piece from the concept card (did not punch out the pink surrounding the butterfly as they intended), matted it on a piece of gold poster board (die cut with a Decorative Labels 8 Spellbinders' die), added a sentiment from the HD Essential Sentiments book & a little butterfly from my stash.
Inside:

Inside I simply attached a gold poster board die cut border (Spellbinders Edgeabilities - Classic Ric Rac & Classic Triple Scallop) and a little butterfly from my stash.
Card #4:

This card also started from a piece of AS. I wanted to frame it with a decorative gold edge using gold poster board, but didn't have the right size die. SO, I took a smaller piece (die cut with Romantic Rectangles Two die from Spellbinders) and cut it apart to get the look you see in the above picture. To this I added a narrow strip of gold poster board for a border, a sentiment from the Essential book that was matted on a gold piece of poster board (die cut with a die from Spellbinders' Luscious Labels One), and added a little butterfly die cut from the kit.
Inside:

For the inside, I made a border by matting a scrap of AS on a scrap of gold poster board, then cut each end at an angle. To this I added another die cut matted on a piece of gold poster board cut with another die from the Luscious Labels One set (Spellbinders).
Card #5:

This card once again uses one of the panels from the concept card. I started with a strip of AS & a border from gold poster board. In addition to the butterfly panel, I added a greeting from the set & a butterfly from my stash.
Inside:

Inside I created a border using the same materials as the background on the card front along with a butterfly sticker from my stash.
Card #6:

The sixth card makes use of more of those little alphabet tiles from the set - this time the ones that spell the word "believe". The background of this card was embossed with a Cuttlebug folder called Rosa by Anna Griffin. I added distress ink to the raised areas. The focal is a combination of several things. I started with a frame from the concept card set. I backed this with a frame from the other set, and backed that with a scrap of AS. On top of all this I added a butterfly from a HOTP set called Butterfly Garden Card Kit. The border at the bottom was made using a scrap of purple Shine Design paper from HOTP (the card has more purple in it than it looks in the picture!), a narrow strip of gold poster board, and the alphabet tiles.
Inside:

Inside I started with a couple of scraps - gold poster board, AS. Over this I ran a border strip from the set. A couple of die cuts from the set complete the inside:
Card #7:

I think this card is one of my favorites. It starts with a cream colored card, embossed with a Darice embossing folder called Damask. To this, I added a strip from the border of one of the AS sheets. The focal and alphabet tiles (spelling "Dream") are from the set (I chose not to separate the narrow frame from the image for the focal). The greeting in the upper left is from the essential book.
Inside:

Inside is more of that beautiful AS border, along with a couple of die cuts from the set.
Card #8:

Card number 8 again starts with a piece of AS for the background attached to a cream colored card base. This time, instead of matting it with gold poster board, I simply took a gold Sharpie and drew around the edges. As you can see, the focal is in several layers. The back layer is gold poster board die cut with a Decorative Labels Eight die (Spellbinders). On top of that is a piece of cream colored glimmer paper that was die cut with a Labels Eight die (Spellbinders). Next comes the die cuts - butterfly & "LOVE" tiles from the set; You from a HOTP set called 9 Little Words (die cut from gold poster board); and the sentiment in the upper left from the essential book.
Inside:

The inside repeats these elements with other die cuts.

I thought I was finished with the set at card number eight. However, I couldn't stand to see that beautiful scrap of AS go to waste so decided to turn it into a tag.
To do this I cut a piece of card stock with a HOTP die from their 10 Tags and Trims set. I cut the scrap of AS with just the tip of that die so it would align with the card stock tag. I then took a couple of colors of Distress Ink (Picked Raspberry & Dusty Concord) to color the top part of the tag - as well as to ink all the edges. Some ribbon from my stash & a little butterfly die cut completed the tag.
When I had the tag completed, I realized that it went very nicely with the piece of gold poster board I had sitting on my table (die cut with Romantic Rectangles Two die set from Spellbinders), and would make a great card focal. I decided to make a tall card with this in the center. I embossed top and bottom of the card with my Swiss Dots embossing folder (Cuttlebug) and inked the raised areas with gold ink. I took a square of pink card stock from my scrap box, put it on point, and trimmed to fit as a mat for the focal. I had the sentiment already stamped in my stash (die cut with JustRite's Vintage Labels Three dies; stamped with stamps from JustRite's Sympathy Vintage Labels), so just added some Distress ink (Antique Linen to change the background color and Picked Raspberry around the edges.) to help it fit in with the rest.
Inside:

For the inside I simply took more of the pink card stock, ran it through the same embossing folder (Swiss Dots), and again hit the raised area with gold ink. I then cut strips from this to create borders top and bottom.
No comments:
Post a Comment