Please let me hear from you!

This blog is for sharing a love of paper crafting. I love paper crafting -
and Stampin' Up! products in particular -
so much so, that I became an independent Stampin' Up!®™ demonstrator earlier this year!
Full disclosure: I get a small commission on purchases made using Stampin' Up! links from this website - but this in no way affects your price. It just serves to help support my blogs. Thank you in advance for that support!

As of January 21, 2026, most of my Stampin' Up! makes are moving to
https://cheringloveofpaper.blogspot.com/.
Most of my makes will be using Stampin' Up! products and be on that blog,
but any makes from other materials will still be posted here.
Enjoy browsing my blogs, and I'd love to hear from you.
It is what helps make the time I put into these blogs feel worthwhile, and always brightens my day.

NOTE: All Stampin' Up! Images © 1990–2026 Stampin’ Up!®

Monday, October 30, 2023

HD Warmest Wishes Window to the Heart - Tree Concept Cards & More


This Hunkydory set from 2014 came with a set of 4 tree concept cards in different colors.  My mother & I decided to split them, so I got two of the concept cards & she got two of them.  After the basic concept cards were made, we did some trading of the remaining pieces.  These two pictures show materials for all 4 cards. 


In addition to the concept cards, I got 5 more made from the materials & stuff in my stash:
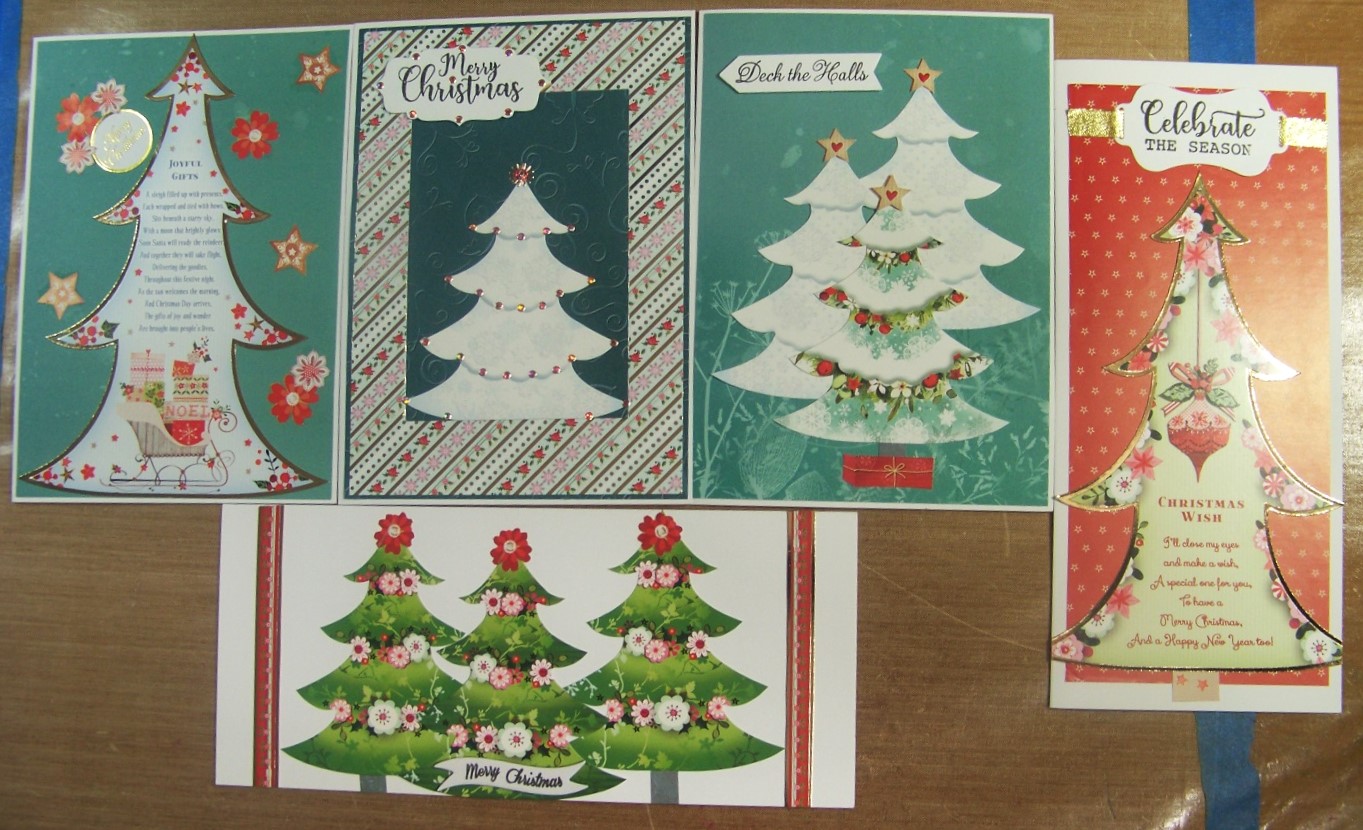

Here's a closer look at each, starting with the concept cards.  

Card #1: 

I had thought that maybe by showing a close up of one, you might be better able to see them, but I'm not sure that it worked.  Basically, the tree aperture border pops out toward you, while the decorated poem pops back away from you & it all stands up for display.  

Card #2:

Here's the 2nd one.  I'm not sure if you can see it any better.  

Card #3:

This card and the next card are both made using the piece that was removed from the tree apertures above.  They're really long and skinny.  I chose to put this one on a 5 x 7 sized card with a slightly smaller background paper (from my Mom's stash) & decorate with some of the cutouts that came with the set.

Inside:

I simply used a strip of the background paper, another cut out, and a stamped message from Crafter's Companion Compendium (CCC) - the sheet of stamps called Believe in the Magic.

Card #4:

I used the second "removed" piece on a slimline card with a red background paper.  As you can see, I used gold ribbon to "attach" the stamped/die cut sentiment onto the page (Mom's stamps & dies).  It DID require that I trim the bottom of the tree a bit to fit on the card, but I think I like it better than the 5x7.  Another thing I did on this one was to take a small scrap of paper and add it for a "tree trunk".

Inside:

I just stamped a sentiment on the inside of this one (CCC's Believe in the Magic).  But, I might go back and see if I can find some strips of the red leftover from the front to make borders on the inside.

Card #5:

Now I got to start playing with all the left over trees.  Here I have a frame, cut from a foiled AS (adoreable scoreable printed card stock from Hunkydory) sheet.  I've backed this with a piece of green paper, and then added the tree die cut and a stamped/die cut greeting (Mom's stamps/dies).  I finished it off with a bunch of little pink Jewel Dazzles & a Pink Flower Jewel Dazzle (both from HOTP).

Inside:

Again, I just have a stamped message (again from CCC's Believe in the Magic), but will probably try to find scraps from making the front to add a bit of color to the inside.  (I left the materials at Mom's so have to wait until I get back over there to finish it!)

Card #6:

This time I combined 3 of the little tree die cuts on one card.  The green background paper (from Mom's stash) sets them off nicely.  Again, I added a "tree trunk & tree holder" from paper scraps.  I also added cutout stars to the top of each tree.  I finished the card front by adding another stamped/die cut greeting (Mom's stamps & dies).

Inside:

Inside, I have scraps from the front & some red scraps that create a border top & bottom to frame the sentiment (another from CCC's Believe in the Magic).

Card #7:

This 7th and last card, actually uses 4 of the die cut trees - 3 on the front and one on the inside.  I added some cut out flowers from the set to the tops of the trees on the front - along with strips of AS along the sides for borders.  Another of Mom's stamped/die cut greetings completes the card front.

Inside:

Inside I have another AS strip border, and the last die cut tree from the set.  Another stamped message using CCC's Believe in the Magic completes the inside.

Sunday, October 29, 2023

Swap & More

Today I have two cards - a swap card for a friend - and a birthday card for the same friend.  

Swap Card: You can see the front of the swap card in the picture above.  The card is based on a sketch that she posted.  In addition to the various papers, I have a focal sticker from my stash.  I outlined the 3 tags with gold & a couple of the frames as well.  I added 3 Jewel Dazzles, and some leaf confetti bits from my stash.

Inside:

Inside, I created a border using scraps of the paper, some more stickers, and more of the leaf confetti.

Card #2:

The birthday card is focused on one of my Elizabeth Craft die sets - the Scarecrow.  The focal itself was pieced from multiple papers - some inked or colored for additional effect.  I added the pitchfork (from her Farmer set) - cut from silver poster board with part colored brown with a permanent marker.  After making a pumpkin using an embossing folder/die combo I have - and finding it was WAY too big for this scene, I free-hand cut and colored (Distress Oxide inks) this smaller version.  The greeting was die cut using a Happy Birthday die cut from Creative expressions.  I traced around the outside of the die on the back of a black glitter card stock and fussy cut it to create the mat.  The background is in 2 parts.  First is the "hay" printed paper from HOTP.  Then is a piece of white paper that I inked with some Distress Oxide inks.  You'll note that it has torn edges which I think works better against the hay.  Also note that the center is lighter than the outside edges which helps accentuate the focal. 

Monday, October 23, 2023

Digi Thank You

This card was made using printed digi paper.  I printed it in two sizes - a smaller print for the background, and a larger print that I fussy cut for the focal.  As you can see, I paired this with tan-gray and turquoise mats.  The larger sentiment is on foam tape - both are stamped & die cut using some of my Mom's sentiment stamps & dies.  I fussy cut the turquoise mats to go with them.

Inside:


I used scraps of the digi paper and the matting papers to create a border.  The flower was actually cut from the inside of the smaller digi paper that forms the background for the card front.  The border strip was from the larger print.  The stamped messages are both from my Crafter's Companion Compendium - the stamp sheet called Thank You.

Friday, October 20, 2023

HD Winter Wishes - Robin Friends

Today I have 7 cards made from the Robin Friends set from Hunkydory's Winter Wishes kit - and a bit of stuff from my stash.  Here's what the set looked like originally:

As you can see, it consisted of a sheet of die cuts, and two sheets of AS (adoreable scoreable printed card stock).  

And here's a quick look at the 7 cards I made:

There are two slimline cards, an interlocking gatefold, a "see-through" card (circle cut out from the card front so you see through to the inside), and 3 other cards.  Now for a closer look at each:

Card #1:

This first one was pretty straight forward.  I cut the main panel from one of the sheets of AS.  Then I inked the edges and added the sentiment.  I decided I wanted a border at the top, but I didn't want the robin's head to be covered, so partially cut around him with a craft knife so he could sit in front of the border.  Then I simply glued the entire panel to the front of my card.

Inside:

I struggled a bit with what to do with the inside of this card until I went looking through my stash and found this cut out (from packaging material from something I got in a card making magazine).  So, I cut a piece of scrap from the sheet of die cuts to form a border & then added this found sentiment.

Card #2:

This was actually the last card that I made.  I found myself left with a scrap of snowfall AS.  I paired it with scraps of navy card stock, a free printable from Debbi Moore, and a cut out from a HD paper pad I mostly used up a long time ago.

Inside:

I used more of the navy & another couple of scraps from the sheet of die cuts to create borders top and bottom.  Then I stamped a sentiment - from CCC's (Crafter's Companion Compendium) sheet of stamps called Believe in the Magic.

Card #3:

This card started with pieces cut from one of the AS sheets.  Because I wanted borders top and bottom, I cut out some of the white snowy section so it would fit my card.  After taping the pieces back together, I found myself with a rather visible line where I made the cut.  Soooo, I added some silver thin-line dazzles over that line & a matching line on the other border.  It's hard to tell that it wasn't printed that way!  I added a die cut tag from the set for my focal - "attaching" it with a red jewel dazzle & adding an outline sticker silver bow.  The bottom looked a bit too plain, so I added a piece of border from the die cut sheet.

Inside:

Inside I added leftover pieces of the white snowy AS to form borders and spruced them up with border Dazzles from HOTP.  The bottom border looked really plain, so I cut a picture from the packaging that came with this set & added it as you can see.  Another sentiment stamped from the Believe in the Magic sheet, and this card was done.

Card #4:

Again I chopped out part of the snowy white portion of the AS - this time chopping more (that went into the inside of the card above).  After taping it back together, I matted it with red glimmer paper forming a thin border that matched what was already on the printed AS.  Again I added thin line dazzles to cover the cut line.  One of the die cuts fit perfectly between the borders, so I added it with foam tape to serve as my focal.  Then I kicked it up a notch by adding one of the frames from the die cut sheet - again using foam tape.  Finally, I found a sentiment in one of my HD sentiment books and added it (partially with foam tape & partially glued directly to the frame) - then finished it with 3 white Jewel Dazzles in the lower right corner.

Inside: 

I used more of the red glimmer paper for a border, but didn't have a long enough scrap from the die cut sheet to do what I wanted to form a border.  Then I thought of the ribbon I had that was white with silver edges - perfect!  I finished it with a stamped sentiment from a no name set of large Christmas sentiment stamps.

Card #5:

I often like to make interlocking gate fold cards when I have a focal with matching larger frame like I have here.  In this case, I embossed the fronts using a 3D poinsettia folder that my Mom had.  Then I simply glued the frame and sentiment to the left side and the focal to the right side - easy peasy.

Inside:

I had intended to simply stamp a sentiment on the inside and call it good (sentiment from CCC sheet called Warm Wishes), but ended up getting a streak of ink down one side where I had inked the edge of my stamping platform without realizing it.  I went looking for something to cover that mistake, and found these beautiful silver Dazzles borders - worked great!

Card #6:

This card uses some of the white snowy AS combined with some of the blue snowy AS (in other words, parts of both AS sheets).  I actually inset a circle of the blue & surrounded it with the border Dazzles before realizing that this focal freebie from Debbi Moore would fit perfectly!  The greeting is also Dazzles stickers.

Inside:

Another freebie pic - this time a square one - decorates the inside (again with border Dazzles stickers).  The stamped message is again from the CCC Believe in the Magic sheet of stamps.

Card #7:

This last card is another cut panel from one of the AS sheets with edges inked.  I cut a circular hole & surrounded it with the die cut border - the focal is actually on the inside, but you can see it through the hole.  Then I added a die cut sentiment (both from the die cut sheet).

Inside:

The focal is the last die cut from the die cut sheet.  After adding it, I added another stamped message - again from the Believe in the Magic stamp set.