Please let me hear from you!

This blog is for sharing a love of paper crafting. I love paper crafting -
and Stampin' Up! products in particular -
so much so, that I became an independent Stampin' Up!®™ demonstrator earlier this year!
Full disclosure: I get a small commission on purchases made using Stampin' Up! links from this website - but this in no way affects your price. It just serves to help support my blogs. Thank you in advance for that support!

As of January 21, 2026, most of my Stampin' Up! makes are moving to
https://cheringloveofpaper.blogspot.com/.
Most of my makes will be using Stampin' Up! products and be on that blog,
but any makes from other materials will still be posted here.
Enjoy browsing my blogs, and I'd love to hear from you.
It is what helps make the time I put into these blogs feel worthwhile, and always brightens my day.

NOTE: All Stampin' Up! Images © 1990–2026 Stampin’ Up!®

Wednesday, November 28, 2018

Pay It Forward Challenge

A friend on the Paper Wishers Message Board sent me this small card kit - card, 3 pieces of coordinating paper (2 were 5" x 6.5" and one was more like 4" x 5" - from HOTP "Home Grown" paper set), 4 small brads (2 each of tractor & star), a piece of grosgrain ribbon (16-18" long), a couple of stamped images, and a stamped greeting - greetings and images were stamped on larger pieces of paper/card stock so that I could cut them as I chose.

This was a real challenge because I didn't want it to look too busy, but also wasn't wanting to add to the materials in the kit (except for adhesive & coloring!).  I decided to cut the sentiment apart (and add the 3 dots for elipses) so that I could have part of the greeting on the front of the card and the remainder inside.  By cutting down the focal image, I was able to get white strips that I could piece together to form the white mat.  To help it and the greeting stand out further, I used the red ribbon that was included in the kit. 

Then it was time to do the inside:

Focal was colored with Inktense pencils & a water brush.  Scraps from the other papers helped to form a bit of a frame & a separating strip between the message and the stamped image.

Monday, November 19, 2018

Ambition


To illustrate this one, after protecting the page with clear gesso, I used a stamp from a set called "Sew Pretty" that came with a Cardmaking and Papercrafting magazine.  I used StazOn ink, but had some problem with the stamping and needed to go over many of the lines using a Pitt pen.  I waited to do that, however, until after I colored the "thread" with a bit of marker & water brush.  I used my Scroll and Brush markers to do all the coloring & lettering.  I actually created the lettering on my computer, then used a thin light pad (like a light box) to trace the letters with the markers.  I used just one edge of the "scroll" side of the marker to draw the finer lines of the lettering.  The black lettering was all done with Pitt pens. 

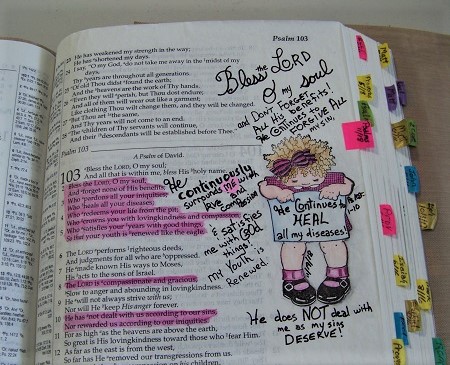
Promises of Healing


After protecting the page with clear gesso, I stamped the girl ("Janie's Girls" stamp set from HOTP) with black StazOn.  I colored her with Inktense pencils and a water brush - and highlighted the relevant texts with the same.  Except, I colored her skin with a watercolor pencil as I don't have a good flesh tone in my Inktense set.  The lettering was done with Pitt pens.  I actually made a mistake when doing the lettering, so "fixed" it by adding a pink heart sticker & writing the word on top of it.

Saturday, November 17, 2018

HD Twilight Forest - Howling Moon

My husband likes wolves & with his birthday coming up, I thought this HD set would be perfect.  However, the first day I pulled it out, I just sat staring at it trying to figure out what to do with it.  Yesterday, however, it all came together & I got 6 cards from the set.  

This first card started with a frame and small focal from the set.  I used a bit of coordinating card stock to back the frame.  After using an embossing folder on the card front, I added the focal & a sentiment from the kit.  Here's the inside: 


For the inside, I cut borders from one of the pieces of coordinating card stock, and added another sentiment from the set.

For many of these cards, I'm not sure what sentiment I'll use, but it's nice to have them mostly done.  The background for this card is pieced from the coordinating card stock - then simply has another image from the set added to the card front.  Here's the inside of this one:


For the inside, I used scraps from the card stock & another image from the set.


This next card started with a background piece from the coordinating card stock & a piece of glitter/velvet ribbon running across it as a border.  The lacy frame was created using Dazzles stickers (HOTP).  The focal was created using a Dazzles frame over an embossed blue glimmer paper.  A small image from the set finishes the focal.


For the fourth card, I backed a piece of coordinating card stock with HD black miri.  The focal has a matching frame that was raised with foam tape.


Card number four starts with a piece cut from the coordinating card stock - backed with black paper.  The sentiment was stamped on a scrap of card stock & heat embossed in white - matted on white glimmer paper.


For the inside, another piece of card stock backed with black forms the backdrop for a greeting from the set.


The sixth and final card used the final piece of the card stock for the card front. I used the same sparkle/velvet ribbon for a border & added the last sentiment from the set.


The inside is just a bit of white card stock & the last image from the set.