Please let me hear from you!

This blog is for sharing a love of paper crafting. I love paper crafting -
and Stampin' Up! products in particular -
so much so, that I became an independent Stampin' Up!®™ demonstrator earlier this year!
Full disclosure: I get a small commission on purchases made using Stampin' Up! links from this website - but this in no way affects your price. It just serves to help support my blogs. Thank you in advance for that support!

As of January 21, 2026, most of my Stampin' Up! makes are moving to
https://cheringloveofpaper.blogspot.com/.
Most of my makes will be using Stampin' Up! products and be on that blog,
but any makes from other materials will still be posted here.
Enjoy browsing my blogs, and I'd love to hear from you.
It is what helps make the time I put into these blogs feel worthwhile, and always brightens my day.

NOTE: All Stampin' Up! Images © 1990–2026 Stampin’ Up!®

Tuesday, November 19, 2013

Time to Give Thanks


As promised, here are some more cards using stamps from the JustRite set called "Antique Autumn Tags One" that are designed to be cut out with their "Antique Tags One" dies. As before, they serve as a part of a focal that was created by layering cuts from other die sets. 

Though it looks elaborate, this first card was really quick and easy because everything except the layered stamped focal was already printed on the scrapbook paper I chose for the background.  It is called "Grateful Multi-Stripe" made by KI Memories.  You can't really tell it in the picture, but the oval mat piece is a copper metallic paper that is really glimmers and shines when you see it in person.  The die used to cut it is a part of Spellbinders Resplendent Rectangles set.  The gold piece on top of that was cut and embossed  using a die from their Gold Labels Four set.  The tag focal was stamped in brown ink and colored with metallic chalks.


This card again uses papers from the DCWV "Harvest Gathering" 4.5 x 6.5 Matstack.  The background is a piece that has been inked around the edges.  The focal is once again layered die cuts using Spellbinder's dies.  The largest one (brown) is from the 5X7 Elegant Labels Four set, and the yellow and rust-colored ones are all cut with dies from their Gold Labels Four set. The focal was stamped in brown ink and colored with chalks. 

Monday, November 18, 2013

Gratitude


As Thanksgiving draws near, I once again find myself wanting to stop and take time to acknowledge the special people in my life.  So, as is my custom, I've been making Thanksgiving Cards.  This year I've purchased some special stamps from JustRite that are designed to be used with cutting dies.  This is really speeding up my card-making process since I can use dies to cut out my focal pieces.  Today's post showcases 3 different cards made using the same two stamps - both from the JustRite set called "Antique Autumn Tags One" and cut out with a die from JustRite's "Antique Tags One" die set.  Over the next several days, I'll be showcasing several more cards made using other stamps in that set.  The patterned papers I'm using come from a DCWV 4.5 x 6.5 Matstack called "Harvest Gathering".  I love this size of matstack for card making! The plain colored papers were glimmer paper from my stash. These cards were all made quick and easy by layering die cuts.  And in each case, the focal is given a bit of dimension with foam tape.

The first card (teal one above) was made using the following additional dies: Spellbinders 5X7 Elegant Labels Four (cut the dark teal background), Spellbinders Adorning Squares (one of the larger dies for the black mat, and a medium one for the white mat). The white "ribbon" under the narrow black one is really just a narrow strip of the same paper used for the white mat for my focal.  The focal itself was stamped with black ink and then colored with gel pens.  The center of each flower is a Liquid Pearls dot. The background teal piece was altered a bit by snipping out little pieces with my scissors after cutting it with the Elegant Labels Four die.


These next two cards are done in more traditional Thanksgiving colors. The patterned papers are from the matstack.  For the striped card, I used the following additional dies:  Spellbinders Labels 27 (orange dot) and Decorative Labels 27 (white frame for rust-colored dot, and yellow flowered pattern); Spellbinders Ornate Squares (brown frame).  The focal was stamped in brown ink, and then colored with chalk before adding additional touches with gel pen and gold liquid pearls.


The color on this one isn't true.  The brown is not nearly as black looking as the picture - more like the brown in the previous picture.  Once again in addition to the nested medallion die I used Spellbinders Ornate Squares (brown lacy layer) and Spellbinders Decorative Labels 27 (rust-colored dot and yellow dot pieces).  The focal was again stamped in brown ink and colored with chalk before being accented - this time with a glitter-gel pen.

Tuesday, October 22, 2013

Faux Metal - and Paper Napkins (Serviettes)


I love the look of metal pieces on a card, but if the pieces are real metal, mailing the card can be challenging.  Sometimes I use metallic cardstock, but that can be pretty expensive and I seldom have the color I want right when I want it!  It's a little tough to tell in the picture, but the edges of my focal element all look like they're framed in a shiny metal frame.  It's really pretty in person, and matches the leaf design and sentiment perfectly since they all use the same product.  Here's what you would need to make this card:
  • Brown Cardstock
  • Pretty Paper Napkin in autumn colors
  • Leafy Template - I used "Mini Maple Leaves" from The Crafter's Workshop
  • Cutting Dies & Die Cutting Machine - I used "Fleur De Lis Rectangles" and "Fancy Tags One" from Spellbinders, and their Grand Caliber machine.
  • Metallic Embossing Powder - I used a fine Copper embossing powder from Clearsnap
  • Embossing Ink - I used VersaMark
  • Embossing Pen - I used Zig's Emboss Writer
  • Adhesives - I used a glue stick, my ATG with double-sided tape, and some foam tape to add dimension

I started with the frames for the focal.  I cut out the pieces from brown cardstock using my cutting dies, then applied the VersaMark ink directly to the edges, making sure to cover all the intricate edges well.  Then I applied the metallic embossing powder to these edges and heat embossed them. The way the embossing powder melts, it ends up looking much more like a metal frame than if you just cut it out of metallic cardstock.

Next I cut a piece of brown cardstock to fit inside the larger frame.  Then I inked up the leafy template with some of the VersaMark Ink and pressed it onto a piece of cardstock.  I removed the template and sprinkled over the resulting design with the metallic embossing powder.  After heat embossing it, I ran my embossing pen over the edges and veins of the leaves.  This gives a combination glittery shine and watermark effect. 

Similarly for the sentiment, I stamped the sentiment with VersaMark ink and then embossed it with the metallic powder.  Next, I used the Fancy Tags Die as a stencil to draw around the inside oval and then cut it out with scissors before adding to my "metallic" tag.  I added it with a bit of foam tape for dimension, tucking some contrasting ribbon behind it, and adding a bow.  

Now that my focal was finished, I could see which of my pretty paper napkins would set it off nicely.  The trick to using printed paper napkins on cards, is to make SURE you peel off the inner white layer before gluing it to the card, and then rubbing gently (don't tear it!) but firmly when you glue it to your card.  If you don't peel off the inner white layer, the glue will loosen the layers, and over time you'll find the white layer sticking while the printed layer comes loose!  If you're careful, you can cut your napkin to the shape you want and apply a glue stick directly to the back of the napkin.  However, in this case it was much easier to apply the glue to the card, add my napkin, rub to adhere firmly in place, then trim around the card to remove the excess napkin.

So there I have one more card to give to someone to let them know how thankful I am to have them in my life.  Thanksgiving is just around the corner, so I hope I have time to make several more!

Tuesday, August 20, 2013

Fun Technique for Leaves & Flowers


It's been awhile since I posted on my blog - been super busy.  I'm going to try to get back to posting more regularly, but it probably won't often be more than once a week because of schedule changes in my personal life.  Anyway, I wanted to share this card with you today.  It is really shiny & shimmery in person -- always hard to capture that on camera.  Today I'll be focusing on how I added dimension to the flower & leaves. 

First, here's my list of materials and tools:
  • white glimmer paper
  • green glimmer paper
  • pink patterned paper (from Hot Off the Press)
  • pink foil paper (not sure where I got that)
  • stamps from JustRite ("Be Strong" and "Antique Valentine Tags One")
  • white brad
  • pink & green pads (I used green "Page Craft" and pink shimmer "Brilliance" inks)
  • adhesive
  • M-Bossability embossing folder ("Imperial")
  • Spellbinders dies ("Petite Scalloped Oval Large", "Resplendent Rectangles", and "Rose Creations")
  • Grand Caliber (could also use Big Shot or other die cut machine if it's large enough)
  • Paper Crimper or Corrugator

Instructions:
Background & Frame:
  • Cut the patterned paper 1/8" smaller than your card in each direction so it will leave only about 1/16" of the card for a border around it.  
  • Using the pink ink, inked the edges of this and let it dry.  Then cut out and embossed the center of it using the largest Resplendent die, setting the cut-out aside for use in another project.  This creates the piercing around the inner edges of the patterned paper.  
  • Cut and emboss the frame out of pink foil using all three of the largest dies in the Resplendent set.  
  • Using the largest Resplendent die, cut a piece of white glimmer paper that had been embossed with the M-bossabilities folder.
  •  Before attaching anything to the card itself, tape the pieces together from the back.  Center the foil piece inside the patterned paper and tape it together, then tape the white piece in place.  Now you can attach the whole to your card front with everything staying where you want it.
Sentiment:
  • Stamp frame in pink on white card stock, then stamp sentiment in green in the middle.
  • Cut out with the 2nd smallest of the scalloped oval dies
  • Using the next larger scalloped oval die, cut and emboss a piece of the pink foil for the mat
  • Glue the sentiment to the mat and then mount it to the card using foam tape for extra dimension. 
FLOWERS:  
  • Cut each piece of the Rose Creations set (except for the leaves) out of the hot pink vellum. 
  • Add dimension as shown below:
This was my "test" petal.  I've seen some really nice kits with different sized embossing-type tools that work great for flowers, but I don't happen to have one of those.  I first tried using the largest side of my standard embossing tool.  I placed the flower on the back side of a small mouse pad and rubbed in circular motions on the inside part of the leaf.  You can see the result on the petal in the lower right corner.  It turned the petal whitish and left all sorts of marks - not a bad look if you want it, but it wasn't what I was going for.  I really wanted a larger tool!  I decided to use the rounded end of my gel pen cover!  It worked great.  I used it on the rest of the petals.  It added a nice textured rounding to the leaves without discoloring them.  For my real flower, I used this "tool" on all of them - just pressing in a circular motion with the end of the covered pen.  For the smallest petals, I just placed the pen in the center of each petal and pressed while twisting it just a bit.  I was quite happy with the result.

LEAVES:
  • Cut two large and one medium leaf from green glimmer paper.  
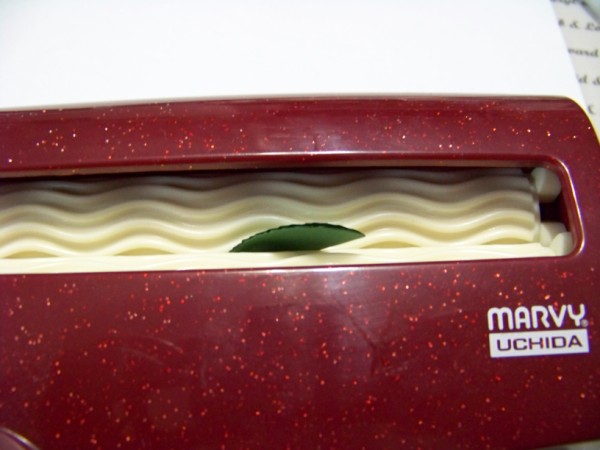
  • The idea for how to add dimension to the leaves using a paper corrugator came from a Spellbinder's video, and it works great!  Simply folded the leaf in half lengthwise:
  • Then run it through a paper corrugator! (They used a straight one, I only have the wavy one, so used that -- worked great)  Just place your folded leaf into your corrugator, tip side first, at a 45 to 60 degree angle with folded side down. Then run it through. 


  • It comes out looking like this:
  • And when you open it up you have this:

Isn't it cool?  LOVE IT!!!!  So quick and easy!  Your other option is to simply use your stylus and a mouse pad to emboss your own lines.  The smallest leaf shown above is approx 1/2" by 3/4" and perhaps looks better with the stylus-embossed lines, because the corrugator's lines are a bit far apart for a leaf that small.  Here is a picture comparing the two techniques on the smallest leaves:


The one on the left is hand-embossed with a stylus. The one on the right is just run through the crimper. I like the spacing of the hand embossed, but the crimper actually gives a bit more depth.  What do you think?

Have fun playing!