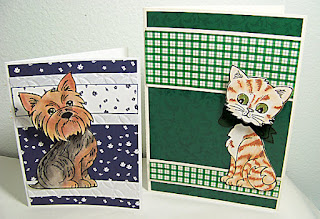
Today I have 2 cards that were made basically the same way. I made them yesterday as a part of a challenge on the Paper Wishes Message Board for National Card Making Day. The challenge was a "Virtual Round Robin". Every hour or so we were told something that we needed to add to our card. After each addition, we took a picture and posted it. Here's my process for the 2 cards I created:
1) Use a flowered patterned paper for your background paper. I chose more subtle flower patterns because I needed to make a birthday card for my brother and hoped that at least one of these would work for that. Here are my two cards after step one:
2) Our next step was to add a coordinating pattern - along with some plain paper or card stock. Here's what I had at the end of step two:
3) Next we were to add an animal focal - a dog or cat was highly suggested. This changed my design. As you can see from the above pictures, I had figured I'd be making a horizontal card, but I knew I wanted to use this dog and cat (Stampendous stamps & dies - see previous post for how I made the cat, and the dog) and they really didn't work well with my horizontal layout. I had thought to put them on a piece of white card stock (like I would have stamped on if I weren't using dies & cutting them out), but I really liked the look of them against the backgrounds I had. However, they really needed something to sit on to anchor them. Unfortunately, I couldn't sit them on the coordinating paper I had already added because the card would open the wrong way! SOOOO, I added a similar smaller strip on the other side of the card and let them sit on that - attaching their heads with wobble springs.
4) Our fourth directive was to make the card a get well card!!!! So much for my birthday card idea! Except by now I really wanted the blue card for my brother's birthday card since they have for many years had dogs that look a little like the one I added for the focal! So - I made it into a get well card (as you can see in the picture below), but planned ahead so I could change it later! :)
5) I was feeling pretty good about my cards at this point, but the next directive was to add some "bling". Wow! How was I going to add that and still have something I liked? I decided to use some Dazzles Stickers - Jewel Dazzle type finish. This was pretty easy for the green card - added some green Jewel Dazzles by the sentiment and in the bottom left corner. For the blue, I tried blue dazzles, but they really weren't the right color. Silver ones didn't go as well with the dog as I would have liked. Then I saw my copper ones - PERFECT!!! I liked my cards even better than before!
6) The final instruction was to add some Dazzles to the inside of the card - along with stuff that coordinated with the card front if we wished. This was my result:
7) At this point, the cards were supposed to be done, but I still needed to transform the blue one into a birthday card! First, I swapped out the sentiment on the front:
8) Lastly, I stamped a birthday sentiment to the inside (HOTP stamp from "Birthday Cheer"). There! Now I can write a message and get it in the mail to my brother.


1 comment:
Both are terrific cards, Cheryl! And the doggie card is wonderful as a get well card or as a brother birthday one. The rounds of card-making were interesting and looks like you didn't have any struggles whatsoever!!! :)
Post a Comment