Please let me hear from you!

This blog is for sharing a love of paper crafting. I love paper crafting -
and Stampin' Up! products in particular -
so much so, that I became an independent Stampin' Up!®™ demonstrator earlier this year!
Full disclosure: I get a small commission on purchases made using Stampin' Up! links from this website - but this in no way affects your price. It just serves to help support my blogs. Thank you in advance for that support!

As of January 21, 2026, most of my Stampin' Up! makes are moving to
https://cheringloveofpaper.blogspot.com/.
Most of my makes will be using Stampin' Up! products and be on that blog,
but any makes from other materials will still be posted here.
Enjoy browsing my blogs, and I'd love to hear from you.
It is what helps make the time I put into these blogs feel worthwhile, and always brightens my day.

NOTE: All Stampin' Up! Images © 1990–2026 Stampin’ Up!®

Wednesday, July 1, 2020

HD Perfect Planet - On Safari Part 2


Today I've got a couple more cards from the Hunkydory Perfect Planet set called "On Safari".  The first card made from this set was posted with my Father's Day cards here.  You can't tell very well, but the frame (die cut using Spellbinder's 5X7 Card Makers dies and gold poster board) and greetings (from the HD set) are on foam tape for added dimension.  The zebras are actually one of the "decoupage" pieces glued on top of the single zebra that had been on this printed adorable scoreable (AS) card stock.

Inside:
Inside I have more of the AS, a tag from the set with added ribbon from my stash, and a border die cut from the set.

Card #2:

This one is a tall narrow card - sized to fit in a business sized envelope.  I didn't like the pastel colors in the border , so cut out the border so the black background shows through.  The zebra striped border is a strip cut from self-adhesive fun fur I got at the dollar store.  The tag is from the set - with added ribbon from my stash.

Tag:

I had a little of the AS left, so decided to make a tag with leftovers from these cards.  The sentiment is from Hunkydory's Little Book of Essential Greetings from 2016.

Tuesday, June 30, 2020

Twin Unicorns


My twin grand-nieces have a birthday coming up  - and they like unicorns.  So I made a unicorn card for each of them thanks to the folks at CraftsUPrint.  Above is what it looks like when opened & standing up.  Below is the card front when it's closed:


It is a 3-layer shadow box (as you can see from the next picture - covered with the outer card piece - see card front above).


Here's another print it yourself card - made as directed with a few changes:


The unicorn & flowers on the card front are all multi-layered with foam tape.


The middle part of the card front has a flap that opens.


Then both sides open to reveal the inside.

Friday, June 19, 2020

Wonderland ACK Part 3


Today I was back to working on the HOTP Artful Card Kit (ACK) called Wonderland.  I got three more cards made, bringing my total from this kit to 8 cards so far with several more to go.  

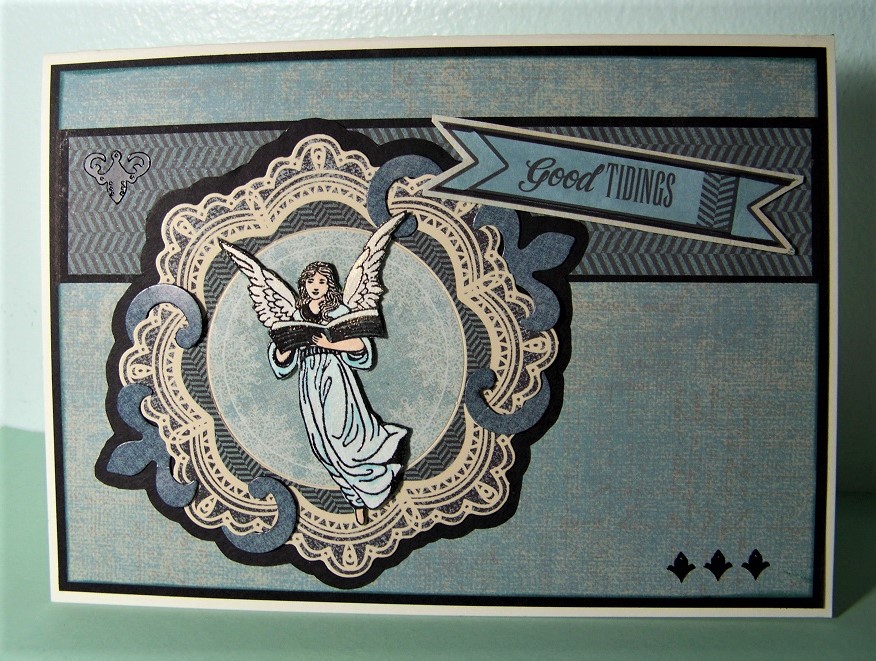
Card #1: This first card is my favorite from what I made today. I liked the way I put 3 die cuts together to form one piece - then matted the whole on black - forming a nice backdrop for my focal.  The focal is the Rejoice Angel Small Stamp from HOTP.  I stamped it on card stock & heat embossed with clear powder.  Then I colored it using a waterbrush with markers (flesh, robe, and book) & Opal Polish from Cosmic Shimmer (gold on wings, hair, and highlights on the book & clothes).  In real life it's got a nice golden sparkle when seen in the light.  The angel & greeting are added with foam tape.  The papers are all from the ACK - including the chevron border paper (except for the black which is from my stash).  The greeting is actually two cut outs from the kit that are layered & added with foam tape.  I added a few Dazzles stickers from a Scrapbooking kit to finish the card front.

Inside:

Inside I used a scrap of black, and a scrap of patterned paper from the kit to form a bit of a border.  Then I added a cut out sentiment - quick & easy!

Card #2:

This next card makes use of a beautiful 3D embossing folder that I got with my Gemini machine.  It is called Ornate Lace, and you can see the beautiful pattern it makes.  I used paper from the kit & then colored the raised areas with Pine Needles Distress Ink.  I mounted this on black & then on a craft colored card.  I cut a strip of craft card stock, ran it through a Cuttlebug Embossing folder (Swiss Dots) and inked with the Pine Needles ink and then with black ink.  This forms a narrow border which anchors my focal & sentiment (both from the ACK).  I finished by adding several embellishments - snowflakes from the kit & gold Fleur De Lis scraps that had been die cut "innies" from the borders I die cut for a previous card (Spellbinder's Edgeability dies).

Inside:

Inside I matted another piece of craft card stock for a place to write my message, added a border strip of leftover papers, and added another die cut from the kit (and another Fleur De Lis scrap to "attach" it to the border).

Card #3:

The third card has a mix of papers, die cuts, and cut outs from the kit.  To this I've added black paper from my stash & some silver 3D Dazzles from HOTP.  The black Christmas tree is free-form cut & then has Dazzles added for decorations.

Inside:

Inside is more of the same - along with a cut out sentiment from the kit.

Tuesday, June 16, 2020

Father's Day 2020


Today I have a couple of cards I made for Father's Day.   

Card #1: This first card was adapted from a free download from CraftsUPrint. It was designed as a paper tole or decopage style card with multiple layers separated by foam tape (see next picture).  Originally it had a flowered pattern on the left-hand side border which felt too feminine for what I wanted, so I used a strip of of an old HOTP pattern from my stash.  Then, the boxes along the left had the slippers at the top - just seemed a bit strange to me, so I moved them to the bottom & added several layers of matting to the top one to give me a greeting large enough to cover the original slippers.  

Layers:

There are multiple layers of the dog & man.  There is also a layers of the boxes on the left side - all added with foam tape - and an additional layer of slippers.

Inside:

I saved one layer of the man & dog to go on the inside of my card.  I cut some papers from my stash to give me a background & border that matched the card front, but realized I needed something to anchor the focal.  I happened to have a Christmas Artful Card Kit called Wonderland sitting out on my desks and the colors were right.  SO, I took one of the labels from that kit, cut it in half, drew a black margin where I cut it (using a Sharpie) and had a great little rug for my chair to sit on!!!  The upper block is actually a computer created message to my Dad, (but it was a private message, so I removed the words for posting).

Card #2:

This card started with materials from Hunkydory's Perfect Planet card kit - the set called "On Safari".  My card base is a craft color - which I embossed with a 3D embossing folder from Spellbinders called Cane Weave.  I then inked the raised areas (with Vintage Photo Distress Ink) so the pattern stood out well.  The focal is multiple layers with foam tape (see next picture).  I have two sentiments - the one on the left is from a Hunkydory Little Book of Essential Greetings, and the one on the right is cut, embossed, and stenciled with a Spellbinder's die (Romantic Rectangles Two).  I added gold ink around the edges & hand wrote the greeting since I didn't have a stamp the right size.  Because I wanted to make an easel card, I scored down the center of the card width-wise before gluing just the bottom half of the focal to the card front.

Layers:

As Easel:

The inside of the card has a cream colored paper that is matted a couple of times.  This will be for me to write my message.  But the easel stop & border are more elements from the kit - raised on foam tape so they'll hold the easel properly.