Please let me hear from you!

This blog is for sharing a love of paper crafting. I love paper crafting -
and Stampin' Up! products in particular -
so much so, that I became an independent Stampin' Up!®™ demonstrator earlier this year!
Full disclosure: I get a small commission on purchases made using Stampin' Up! links from this website - but this in no way affects your price. It just serves to help support my blogs. Thank you in advance for that support!

As of January 21, 2026, most of my Stampin' Up! makes are moving to
https://cheringloveofpaper.blogspot.com/.
Most of my makes will be using Stampin' Up! products and be on that blog,
but any makes from other materials will still be posted here.
Enjoy browsing my blogs, and I'd love to hear from you.
It is what helps make the time I put into these blogs feel worthwhile, and always brightens my day.

NOTE: All Stampin' Up! Images © 1990–2026 Stampin’ Up!®

Tuesday, July 25, 2017

One Sheet Wonder


Over on the Paper Wishes Message Board, they are doing a challenge using the "One Sheet Wonder" idea - where you take 1 sheet of patterned paper, cut it up in various ways, and use the pieces to make a bunch of cards.  I've seen a lot of examples of this on the web, and told myself I'd have to try it sometime - but never got around to doing so until now. 

I basically made my own template. Since I wanted to finish the insides of my cards as well as the outside, I ended up with the 7 cards you see in the picture above (could have had more like 14 cards if I didn't decorate the insides). 

Here's my template:


And this is how I decided how I wanted to cut it.  I started with a double-sided sheet of 12" x 12" paper from the "Artful Watercolor" set of papers from HOTP.  I wanted to make cards that were 4 1/4" x 5 1/2", so thought I'd start with rectangles that were 3 3/4" x 5" - a size that would allow for a mat around them & still fit on the card front:
  • I first cut two strips from the paper that were 5" x 12".  This left a third strip that was 2" by 12".
  • Next, I cut my 5" strips into three 3 3/4" sections - that gave me three pieces that were 5" x 3 3/4" from each 5" strip - with an additional piece that was 3/4" x 5". So in total from my two 5" strips I now had 6 pieces that were 3 3/4" x 5" and 2 pieces that were 3/4" x 5".
  • I took my 6 matching pieces and set the others aside for now.  I saved one whole (#6 above) and cut the other 5 as you see in the picture.  One was cut from upper left to lower right corner giving me two triangles (#1 & #2 above).  The next was cut in half both ways (#3's).  The next was cut on one side using a template as a guide for an interesting shape (#4).  The next was cut in 3 pieces horizontally (#5), and the final one was cut in thirds vertically (#7).  
  • I then turned my attention to my leftover pieces.  I left the 3/4" x 5" ones as they were (#3 & #7 on far right of picture).  From the 2" strip I cut two pieces that were 5 1/4" long (#1 & 2 on bottom of picture) which left me with a final piece that was 1 1/2" x 2" (#6 in bottom right corner).
Now, the colored numbers correspond to the pieces used to make my different cards.  Looking at the cards in the order they are in the picture at the top of this blog entry:
  • Back Left - This card was made using the pieces labeled #5 in the template - two on the outside, one on the inside.
  • Back Middle - This card used the pieces labeled #7 in the template - the narrow 3/4" one went on the inside.
  • Back Right - I used pieces labeled #3 for this one - 4 matching rectangles on the front & the narrow 3/4" one on the inside
  • Middle Left - uses pieces labeled #1 - rectangular one on the inside
  • Middle Middle - used # 6's - the large rectangle on the front & the smaller one on the inside
  • Middle Right - uses pieces labeled #2 - rectangular one on the inside
  • Front - uses pieces labeled #4 - large piece on the front, small one on the inside.
This worked pretty well, but I learned something to consider for next time.  While the 5" x 3 3/4" worked great by itself, when I cut it in pieces, there was not as much room for matting as I would have liked.  I think next time I'd want to take that into account and make the pieces smaller depending on how many "cuts" there are if they are all going to go on the front of a card.  This will probably have the added benefit of giving me enough for another card.  I think next time I would make ONE strip that is 5" and use that for the diagonal cuts (#1&2), the whole (#6), and the fancy cut (#4).   Then I would have to re-think the others - the one cut in thirds vertically, the one cut in thirds horizontally, and the one cut in half both ways.  Each of these should be cut from a piece that is smaller than 5" x 3 3/4".  

In the next few days, I'll take a closer look at each of the 7 cards made from this template.
Monday, July 24, 2017

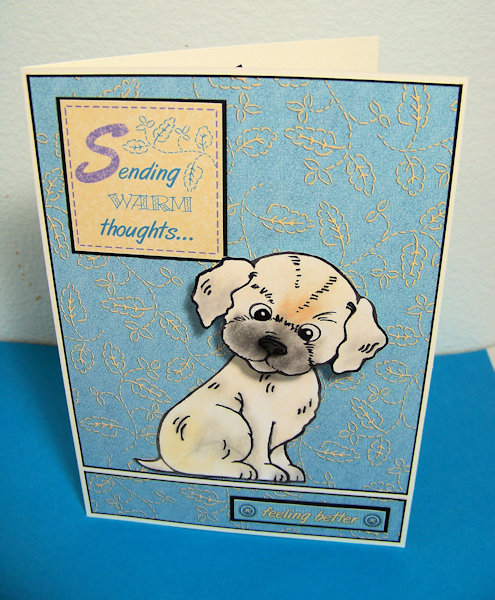
Puppy Get Well


Today's card is another one made from coordinating papers & artwork from the "Cardmaking Value Pack #2" (HOTP).  Once again, it looks nothing like their samples - though it uses their printed sentiments & patterned paper.  This one is a "get well" card for a friend who loves dogs. 


CARD FRONT:

  • Background: I started by cutting a piece of patterned paper just a bit smaller than the cream-colored card base.  Then I cut about an inch off the bottom, trimming it a bit to fit as you see here.  I created the look of a black mat by drawing around the edge with a black Sharpie.
  • Focal: I made the puppy pieces some time ago using the "Pop-Up Puppies" Stamp & Die sets from Stampendous.  You can see more about how I did it here.  For this card, I placed the body where I wanted it, then added the head with an "Action Wobble Spring" from Hampton Art. 
  • Sentiments: The sentiment pieces were artwork from the kit - I just matted them on black paper and added them as you see here.


INSIDE:

  • Background: I left most of the cream from the card blank showing - just added another piece of the patterned paper near the bottom (outlined the same way as I did for the card front).  
  • Dog Bone: This was another piece I had created earlier using the Pop-Up Puppies stamp & die sets.  All I had to do today was glue it in place.
  • Sentiment: This time I used their printed sentiment with lots of layers.  I first layered it on a piece of patterned paper, then black for a mat, then another piece of patterned paper where I ran a Sharpie around the edge.  (The bottom mat is actually pieced together from two narrow strips since I was almost out of this paper by now.)

Sunday, July 23, 2017

Thank You Teacup


Back in March I purchased the "Cardmaking Value Pack #2" from HOTP.  I wasn't sure how much I'd like it because I always want to do my own thing and wasn't sure if there would be that much flexibility, but this value pack turned out to be a real bargain.  It basically had the printed papers & artwork and idea sheets from TEN "Card Makers Personal Shoppers"!  While it didn't contain any of the additional items that usually come with the personal shopper - like card bases & envelopes, buttons, ribbons, brads, chipboard shapes, specialty papers, dazzles, etc. - the coordinating papers & artwork give a great start to a quick and easy card.  The wide assortment of papers are designed with coordinating papers & embellishments, but done in such a way that you don't HAVE to create the same cards they designed with them. 

This card is an example of my using the papers for my own thing.  In fact, the paper I used as the main background paper for the card front was hardly even used in their examples (just used for a bit of trim)!  

I made this card for a friend who has a teacup collection.  It's a thank you card celebrating her hosting of a get-together for our dance group.


CARD FRONT:
  • Background: I cut a piece of the background paper a bit smaller than the card base.  Using a ruler I drew around the outside with a Sharpie (this saves me from matting it on black, but gives a similar look). 
  • Focal: Using my prepared teacup (see next bullet) as a guide to the size I wanted, I cut a piece from the coordinating border print paper and drew around the outside with the Sharpie (to fake a black mat).  I didn't feel this stood out from the background as well as I would have liked, so I matted it on white giving it a 1/8" or less border.  I decided I also needed to mat the teacup, so fussy-cut a similar mat for it.  Then I wanted a little more definition on the border area itself, so I cut two thin white strips of paper and glued them above & below.  
  • Focal - Teacup: Using a stamp from the "You're Tea-riffic" small stamp set (from HOTP), I stamped the whole teacup twice - once on the lavender paper, and once on the peach.  While it would probably have worked to leave it at that, I went ahead & stamped the flower portion again on the lavender.  Then I fussy cut them - the whole thing from the lavender, the peach one so I had just the cup (without handle & saucer) & flower, and finally cut the flower portion I had stamped on the lavender.  After adding a bit more color for interest (using Sharpies!) I layered all the pieces. As a last touch for the teacup, I added a small peach paper flower and smaller lavender crystal-like flower from my stash - layering them on the larger stamped flower.
  • Sentiment: The papers came with some printed artwork sentiment pieces.  I used the two lavender ones, and took advantage of the peach one that left room for my own sentiment.  I stamped the word "Dance!" on that using a portion of a stamp from HOT's "Thank You!" Stamp set.  Then I used another stamp from that set to stamp a sentiment above the teacup.  (I am so glad they include some blank elements so you can easily stamp your own thing and still have it coordinate!)
  • Finishing: After layering the elements as you see here, I finished the outside of the card by adding a small piece of ribbon from my stash.

INSIDE:
  • Background: I cut a piece of border paper just smaller than the inside of the card & again made a fake mat by drawing around the edge with a Sharpie. (I elected not to add white to the border this time.)
  • Focal: This tag was included as part of the artwork.  I didn't have to use the Sharpie here as the border was already printed on the tag.  I DID add the message on the tag using another stamp from the "Thank You!" set.  The stamp has the message as one longer line, so I masked it and stamped twice to split the message to two lines as you see here.
  • Finishing: I finished the inside of the card by adding another peach paper flower & lavender crystal-like flower to the top of the tag.

Tuesday, June 27, 2017

Woodland Thank You


Today's card was inspired by this one by Debbie Samples at Paper Wishes.  I wanted to make a card that felt like "woodlands" and had a squirrel in it.  I didn't have the exact same things she used, but you can see the influence of her card on this one.

Supplies Used:
  • Wood Grain Embossing Folder
  • Woodland Dazzles in a gold pearl finish
  • Leafy Vine ribbon
  • Cutting dies from Our Daily Bread (for greeting)
  • Brown textured-look light weight card stock
  • Misc brown & gold papers from my stash
  • Brown StazOn Ink pad
  • 5" x 7" cream-colored card blank scored down the middle prepared for folding
Method:
  1. Line up a metal ruler along one edge of the card and cut along the inside edge of ruler from 1/2" above the bottom of the card front to 1/2" above the middle score line.  Repeat on other side.
  2. Score card from the top of these cut lines to the edges of the card
  3. Make more score lines from the cut lines to the edges of the card that are 1/2" above the bottom of the card front and again 1/2" above that.
  4. Fold outside edges of card on these score lines (top & bottom folds are mountain folds, other fold is valley fold).  Fold the rest of the card along the original score line.  Crease all folds well with a bone folder.
  5. Cut brown card stock to 5 1/2" x 4 1/4" and emboss it in the embossing folder.  
  6. Rub brown StazOn ink pad over the embossed piece to bring out the grain. (My card stock cracked a little when embossed, so I also blended in the cracks with a bit of chalk.)
  7. Cut three strips from the brown card stock that are 1/2" wide.  Glue two on the sides of the center piece of card front (because the embossed piece isn't quite wide enough to cover it). 
  8. Take the 3rd strip and glue it to the bottom edge of the card front.
  9. Glue the embossed piece to the center front of card.
  10. Add sentiments & embellishments.