MENU

Monday, April 29, 2019

Use Up Printed Cards #1


In response to a challenge to use old printed card blanks.  Here's my first one.  It's a little hard to see the stamping in the picture, but it's a thank you card.  

The focal was created using alcohol inks on white card stock - cut with Spellbinder's Ornate Squares die.  It was then stamped (& heat embossed in  a light colored gold) using JustRite's Ornate Happiness Squares & Thank You Labels Twenty stamp sets.  I then inked the edges with distress ink - as I did with the other strips of plain colored papers from my stash.

One of my challenges with this type of card is that I don't have the pattern to add to the inside of the card.  What I decided to do here was to cut a piece from another card (so it will either be cut up for other cards, or be a cutaway card) to put on the inside.


Tuesday, April 23, 2019

A couple more Bible Journaling pages


This first page was done with Inktense pencils.  I found an illustration I thought might work for what I envisioned & traced it (using Inktense pencils) onto my page.  

However, that turned out to be an example of WHAT NOT TO DO!  When I was FINISHED tracing, I went looking for the verse I was highlighting and realized I had traced the illustration onto the WRONG PAGE!!!!  The page I had prepped with gesso and that I intended to put the illustration on was a page back!!!  I erased as well as I could - which basically means it's a lighter color but still visible - before turning to the correct page and tracing it all over again.  I'm not sure what will happen with the other page - especially since it doesn't have gesso on it.  I just don't know what's going to happen when I try to do something on that page. 

So, back to my actual page, I didn't actually have the heart to re-trace that image right away, so set it aside for the next time.  When that time came, I traced with the colors I wanted (Inktense) & then blended with a water brush from there into the illustration to blend it out and color the picture. I added the larger words with stickers, the smaller ones with Pitt pens.  The meaning of this illustration may not be immediately apparent, so if you wish, you can check out my Cher-ing Daily Bread blog to see what it means to me.

Here's the next page I did.  I'm wondering if something like this will work for covering up the mistakes on the earlier page???

For this page I painted a transparent wash over the background (no gesso).  It's a little harder to read the words than I had hoped but not too bad.  The yellow was a yellow acrylic paint, highlighting the verses I was working to illustrate.

The green and black words are stickers, and the tent is something I printed from the internet and just glued in place.  The word Faith was stamped with StazOn onto my page & then colored in with gold lame' Smooch ink.

The meaning of this one may also be less apparent.  You're welcome to check out my discussion of it on my other blog.

Monday, April 22, 2019

Woodland Diorama #1


Today's card is my first using the Diorama card dies from Divinity Designs (fromerly Our Daily Bread Designs).  

Card Base & Background: I made the card base using the dies with a dark green card stock from my stash.  The background paper - also cut from the dies - is a fern leaf design from HOTP.  

Decorating: All of the foliage and animals were stamped & die cut using dies from Heartfelt Creations Woodland Wonders set - and then colored using chalks and/or watercolor pencils.

Greeting: It's a little hard to see in this light, but the greeting is from the Tiny Words & Phrases Dazzles by HOTP.

Here's a look at it head on:

And here's what it looks like when folded & ready to go in a card:

Sunday, April 21, 2019

Double Display Sympathy


Here's another double display card - this time a sympathy card - made using the dies from Divinity Designs. As you can see, this time I added some flowers.

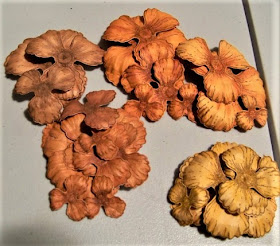
Flowers: The flowers were stamped & die cut (Poppies set from Heartfelt Creations) on various colors of card stock.  Color was added with chalk, then flowers were misted & pressed in the Floral Basics Shaping Mold (Heartfelt Creations).  I dried them with a heat tool to help make sure they held their shape.  Here's a picture of what some of them looked like at this point:


When everything else was completed, I picked & chose from various of the flowers & added them with brads which formed the flower centers.

Card Base & Background: Card base is cream colored (cut & embossed with double display die).  I used the double display insert dies, to add some striped paper from my stash to some of the panels.

Here's a close up of the card when it's folded shut.


Front Focal: Stamped on cream colored card stock with orange distress oxide ink and a homemade stamp (using a download from HOTP & my Teresa Collins Stampmaker), I matted it on a piece of blue card stock that had been die cut with a Spellbinder's die (Petite Classic Oval Large).  To the mat, I added a border sticker, and then added a couple of orange rhinestones from my stash.

Here's a closeup of the inside:

This message was created in a similar way to the front focal, except: The stamps were from a JustRite set called "Cast All Your Cares", and both it & the mat were cut with Spellbinders Labels Sixteen dies.  Jewel Dazzles serve as faux fasteners.

Using these double display dies makes this type of card really quick and easy!!!

Saturday, April 20, 2019

Double Display


I just got a some new dies from Divinity Designs and HAD to try them out.  Here's the first card I made.  It uses the following Divinity Designs dies & stamps: Double Display Card dies, Double Display Layers dies, Holy Night dies, Bethlehem dies (can't tell in the picture, but I cut a hill that the manger scene is sitting on), and Our Saviour's Birth Stamps.  As you can see, I went with a black & white theme.

This next picture shows what it looks like when closed for mailing. I sprayed the mat for the focal with sparkle sheer shimmer spritz (love that stuff!!!!).


Here's a closeup of the inside of the card.  The only thing that isn't white/black is the silver glitter star over the manger (a little hard to see in this picture).


Friday, April 19, 2019

Serenity


As a prep page for doing the "Peace" Bible Journaling Page I showed yesterday, I tried out some of my ideas on a piece of student grade watercolor paper.  I liked it well enough that I went back to it and added some stamped sentiments to finish it.

Background - sort of a watercolor wash made by applying either distress ink or scroll & brush marker (depending on color needed) to my craft sheet & then spraying with water and applying with a foam blending tool.

Scene - Stampscapes stamps stamped in various colors of distress ink.

Sentiments - stamped with black Versafine ink.

Thursday, April 18, 2019

Peace


Today I have a Bible Journaling page - based on Isaiah 26:3.

Background:  After protecting my page with clear gesso, I started with a watercolor wash - at the bottom with blue, moving up the page with green, moving into yellow, and ending with a touch of orange.  For the green & blue I used distress inks - stamped onto my paper crafting mat & sprayed with water before adding with a foam applicator.  I don't have yellow distress ink, so I used a yellow Scroll & Brush marker - scribbling it on the mat & spraying with water before applying in the same way as the distress ink.

Scene: I used distress ink with my Stampscapes stamps to create a scene.

Caption: I found a font I liked and printed out the word "Peace" before tracing it with one of my Scroll & Brush markers.

The meaning of this page may be pretty obvious, but if you'd like to read what it means to me, check out my post on Cher-ing Daily Bread.

Wednesday, April 17, 2019

3D Embossing


I recently picked up a couple of 3-D embossing folders on clearance, and had to try them out.  

The first card is made using Spellbinders 3D European Tapestry.  I cut a piece of card stock to fit the folder, sprayed it lightly with water before embossing it.  After it dried, I used distress oxides to hit the embossing - first all of it with the lighter color, then the most deeply embossed with the darker color.  The sentiment was created using a cutting die (Divinity Designs) - cut from a piece of white card stock that had been colored with the same inks.  I drew around the die on white card stock & fussy cut around it to form a mat for the sentiment.


This second one was made using Spellbinders 3D Roman Romance.  I embossed a piece of white card stock the same way I did the previous one - coloring with two other colors of distress oxide inks.  This particular embossing folder fades out towards the bottom, so I ran a wide ribbon across the bottom & added a couple pink ribbons (colored with the oxide inks to blend better!) & then added a die cut greeting (Spellbinders Joyous Celebrations) - once again cut from white card stock that was colored with the oxide inks.

Tuesday, April 16, 2019

Napkin Xmas #10


These cards are really from two napkins - one larger, one smaller, with similar artwork on both.  This first card is an extra large one - 8 1/2" by 5 1/2".  In addition to the napkin (matted on the red glimmer paper), there is a piece of embossed glimmer paper (Cuttlebug 5" x 7" embossing folder called African Weave).  

The decoration over the embossed paper sort of evolved.  It started with a border strip die cut with a die from Spellbinder's Holly Accents & Motifs. I cut a piece off of the strip to form a border along the bottom.  Then I cut a narrow piece of the card stock thinking to form a tag.  Another piece from the die-cut border strip seemed to make a nice embellishment on one end.  However, I couldn't figure out where to put a tag that looked good.  SO, I kept playing around with it & suddenly realized if I placed it in the border it looked a bit like a candle!  After adding a tag to it (Hunkydory Essential book of Greetings) - along with a ribbon from my stash, I found I liked the look.


This next card was a standard 5"x7" really straight forward: cut napkin to size, run a piece of ribbon across the bottom to create a border, and add a ribbon bow.


Feeling the last card was a bit plain, I wanted to do a bit better with this second 5" x7" card. I started with a green embossed piece (Imperial M-Bossabilities).  I fussy cut around the bird on the napkin piece and removed the printed napkin border.  The remaining piece wasn't large enough, so I added another piece on the right-hand side and covered the join area with a border (piece of red glimmer paper left over from the 1st card with a piece of cream ribbon from my stash).

The greeting is a Spellbinder's Happy Holidays cutting die.  I cut the die from the red glimmer paper.  Next, I drew around the die on cream colored paper & fussy cut it to create a mat.  Next, I created a green mat using "magic matter" to draw around the cream piece and then fussy cut it.


This final card is an A2 size.  I matted a piece of napkin on red glimmer paper and glued it to the card front.  The border was created by cutting a piece of cream colored card stock with a Sue Wilson die called Snowflake Mini Striplet and matting it on the red glimmer paper.  The greeting is stamped with a JustRite stamp (Deck the Halls) on a die cut (from Spellbinders Holly Accents & Motifs) matted on red glimmer paper.

Monday, April 15, 2019

Napkin Xmas #9


Today's card is from a napkin I found quite challenging with this large greeting.  I was not really happy with the first one I did.  I like this one a bit better.  It was fairly straight forward.

Background: I used the card base as the background - embossing it with a Teresa Collins embossing folder called "Decor Circles" (European A4 size).  

Focal & Matting: After trimming the focal greeting, I matted it on green glimmer paper, then offset it with a piece of red metallic tag board.

Borders: The borders are HOTP Dazzles border stickers.

Sunday, April 14, 2019

Napkin Xmas #8


This is number 8 in this current series of cards - each set from a different paper napkin (freezer paper technique).

FIRST CARD: This first one is pretty straight forward.  The napkin was trimmed to fit on the card.  I embossed a piece of gold glimmer paper (Diamond Fleur de Lis MBossabilities by Spellbinders) & then fussy cut the inside to form a frame.  I also fussy cut around the leaves so they would extend over the frame rather than being covered by it.  The sentiment is cut from red paper using a Tim Holtz die.


SECOND CARD: Next up was a little more work.  I started by embossing the card front (3D Cane Weave by Spellbinders).  Next, I cut a frame from green paper using a cutting die for the inside (Spellbinders Marvelous Squares).  I carefully trimmed the napkin so all but the ribbon would fit behind the frame.  A "Christmas" sticker & the die cut word "memories" (Tim Holtz dies) completed this card front.


THIRD CARD:  This one looks much more straight forward than it actually was!  I actually had to piece this as the original gold frame was designed only on the right & bottom sides.  I added Jewel Dazzles (HOTP) which helped hide the joins, and the word "JOY" cut from holographic card stock with some generic alphabet dies.


FOURTH CARD: This final card was the most labor intensive because I fussy cut all around the holly picture on the napkin, leaving it attached to just a strip of the green.  I added the green strip at the top, then trimmed more pieces to allow me to glue the gold top & bottom.  I made a tag (stamp from HOTP Snowman small stamp)  & added it with a piece of ribbon, then added a bunch of Jewel Dazzles to the focal. (Wish I'd used a gold ribbon at the top, but you live & learn, right?)

Saturday, April 13, 2019

Napkin Xmas #7

More napkin cards.  

FIRST CARD: This first one uses a corner of the napkin - framed with washi tape.  Using Dazzles stickers (HOTP), I added a poinsettia sticker & leaves.  The sentiment was created with alphabet dies cut out of holographic card stock (HOTP).


SECOND CARD: This one is basically the same as the previous except it is a landscape version & the sentiment is a Spellbinder's die cut from red metallic tag board.


THIRD CARD: This card isn't actually a napkin card.  It started with stickers I had thought I'd use with the napkin on the previous cards - but decided I didn't like it.  The border is an embossed strip of green glimmer paper (Cuttlebug "Holly Ribbons"), with more Dazzles poinsettias in the lower right corner.  Here's the inside:

In addition to a strip of the glimmer paper & more of the stickers, I added a sentiment using a stamp from HOTP "Christmas Cheer".

Friday, April 12, 2019

Napkin Xmas #6

Using up the 6th napkin, I made 4 cards.  

FIRST CARD (above): 
  • Background - I rounded the corners of a piece of the napkin & then inked the edges before rounding the corners of the card itself & gluing the background in place.
  • Focal - Starting with a mat of turquoise card stock, I added a sticker (first put on white card stock & then fussy cut) to it.  Next came some die cut words for the sentiment.  Then a bunch of mylar snowflakes from my stash.
SECOND CARD:


  • Background  - I inked the edges of the napkin piece & added a scrap stripe from the same napkin.
  • Focal - I started with a die cut (Spellbinders Ornament) which I shaded a bit using the die as a stencil and matted it on turquoise card stock.  Then I stamped the Snowman & sentiment using stamps from the HOTP Snowman small stamp.
THIRD CARD:

  • Background - This one is my least favorite.  I added border strips from the border of the napkin & I'm not sure how well it goes. 
  • Focal - HOTP Snowglobe small stamp - colored with markers scribbled on craft mat and added with water brush.
  • Sentiment - HOTP label die - looks kind of like a cloud!  The sentiment is from the same small stamp set.  
  • Finishing - 3 star stickers finish the lower right hand corner.
 FOURTH CARD:


This napkin was another that had a picture on one corner with more of a background pattern on the remaining 3/4 of the napkin.  Obviously this card is mostly the corner picture of the napkin.  I inked the edges in black.  I die-cut the word joy & colored it turquoise, adding a snowflake for the "dot" of the "j".

Thursday, April 11, 2019

Napkin Xmas #5


More napkin cards.

CARD #1 -  
  • Background: I found some gingham printed paper in my stash to use as a background.  Instead of inking the edges, I decided to use some narrow border Dazzles (HOTP).  I also added a bit of a border Dazzle toward the bottom & stamped "From Santa" above it (from Christmas Labels & Trims - HOTP).
  • Focal: I started with a die from Fleur de Lis Squares (Spellbinders).  After cutting & embossing, I used the die as a stencil & added some color.  I fussy cut some of the elements from the napkin and glued them to the center - then stamped the sentiment (from Christmas Labels & Trims - HOTP).  Before adding it to the card, I traced around the die on black paper & fussy cut it to create a mat.
CARD #2 -  
  • Background: Before gluing the napkin to the card for the background, I colored the edges of the card with Mowed Lawn distress ink using a foam applicator.  I finished the background with a border of black thin line Dazzles (HOTP).
  • Border: another piece of this same napkin - to which I added some Dazzles (HOTP) and some fussy cut gifts. 

CARD #3 - once again, border has fussy cut gifts and greetings sticker - but this time it's made from green glimmer paper.  Background is inked around the edges with distress ink (Mowed Lawn).


CARD #4 - This Christmas tree was in one corner of the napkin.  I simply cut it to size & glued it to the front, added a washi tape border & a Hunkydory greeting from my stash.


Wednesday, April 10, 2019

Napkin Xmas #4


This set of napkin cards was made from napkin "innies" from my stash (see this post).  

This first one (above) also has red glimmer paper, white die cut (Spellbinder's Fluer de Lis Squares - cut in half & separated),a sticker with silver smooch filling in the stars, and Hunkydory leftover (not sure what kit!) & Hunkydory Essential book of Christmas Sentiments 2016

Next up we have more Hunkydory - border & focal from Cuddly Christmas and sentiment from Essential book.  Dazzles (HOTP) add a little more interest to the bottom right corner (layered Jewel Dazzles & small green leaves).


The third card in this set has bits from the Hunkydory "Wildlife of Britain".  There's a bookmark and greeting from that set.  Also, the border is from scraps from that set.  This card also uses washi tape to frame the card.


Tuesday, April 9, 2019

Xmas Napkin #3


One of the napkins in my stash was really only 1/2 of one.  I used it to create this card.  The border was created from scraps of this card & the "innards" scraps of another (see this post) - and some peel off stickers. 


Monday, April 8, 2019

Napkin Xmas #2


This is the 2nd of my xmas napkin stash challenge to myself. These 3 cards are created from the 2nd napkin in my stash (along with a bit of green glimmer paper & some stickers - including Dazzles.) 


Sunday, April 7, 2019

Napkin Xmas #1


I'm on a mission to use up a bunch of the stuff I've had sitting in my stash.  Right now, I'm going through the napkins I had prepared for card making (see this post).  I had quite a few already prepared, but was having trouble getting inspired.  I decided to do something similar to a technique I had seen in a u-tube video that had been mentioned on paperwishers message board.  In the video, Kylie Bertucci talks about cutting up a piece of scrapbook paper to help you get started with making cards from it.  Since I don't tend to make very many A2 cards, I didn't cut things the size she mentioned, but chopping up those napkins really did help - showed me that I didn't need to keep the WHOLE picture when I was dealing with large-sized images in the napkins.  If I had thought about it, I'd have also taken pictures BEFORE I chopped them up - but I didn't.  Anyway, here are the 4 cards I made from this poinsettia/holly napkin.

FIRST (6.5" x 5") - at the top of the page.  For this one, I trimmed the wide borders on the left/bottom & added the trimmings to the right/top.  A few gold stickers finished it - sentiment, border strips & "Jewel Dazzles" (HOTP).

SECOND (7"x 5") - all borders except the one on the left were trimmed off - one of the leftovers was added to the right side, trimming the leaves so they overlapped the border.


THIRD (5" x 7") - This one was created as a portrait-style card.  A piece of red paper was heat embossed with a gold powder (from "Christmas Labels and Trims" - HOTP).  This is outlined with thin gold border stickers.


FOURTH (6.5" x 5") - The last card was made in a similar way to the 2nd one - with the addition of a sticker greeting.