MENU

Monday, October 31, 2011

Acetate Window Card

Today's card was the result of a swap. My swap partner sent me some elements - the snowflake paper, the tag, the button, and "falling snow" tag, and the punched snowflake on the inside of the card.  Here's the inside:
 As you can easily see, I stamped sentiments on the tag on the card front, and on the elements on the inside of the card.  The tricky part of this card is the acetate window, but that is made MUCH easier by the use of my Spellbinders dies and my Big Shot machine.  Here's what I did to make that window:
  • Glue background paper to purple card base.
  • Run card through Big Shot to cut out window (fold of card on side of cutting "sandwich" - plastic plate, then die with cut-side up, then upside-down card front, then plastic plate, then card back.)
  • Cut acetate (in this case I used leftover plastic packaging from something or other) with slightly larger die and glue in place behind the window (I used my ATG)
  • Cut frame for inside of window using two nestability dies - one slightly larger and one slightly smaller than the one used for the acetate - and attach to inside of window, hiding the glued edge of the acetate.
Because I glued something to the front of the acetate window, I added that "magic" bit to the inside to hide the back of it.

This card also shows the lovely feathered edge that torn mulberry paper can give you (the purple strip on the front & mat on the inside of the card).

Sunday, October 30, 2011

Title Tips Part 18 - Getting Creative


Here I cut out 3 sets of letters with my Silhouette.  Two identical ones from the turquoise and tan, and a larger "mat" from black.  My turquoise and tan letters are then cut in half and glued to the mat to create this affect.  I think of the one on the first page as being land and sky, with the one on the second one being water and land.

Saturday, October 29, 2011

Inspired by a Sketch


When inspiration is low, it can really help to find a sketch you like and let it inspire you.  Inspiration for this card came from the sketch shown below - which I got from Card Positioning Systems. As you can see, I turned the sketch on its side to create this birthday card.  The focal was stamped and then cut out with a Spellbinder's die.


I made another card, based on the same sketch.  This one was made in shades of light blue and made use of Dazzles outline stickers for the focal.

Friday, October 28, 2011

Tag Focal

This card went together quickly.  It started with leftover papers from a scrapbook page.  A printed tag was matted to serve as the card focal.  Flowers and fern punch-outs add finishing touches.

Thursday, October 27, 2011

Christmas in October - Torn Paper

This Christmas card makes use of paper tearing techniques to create the Christmas tree.  It was simply torn free-hand from green paper. This tree was decorated with:
  • chain outline stickers for garland
  • white flower soft for snow
  • a Dazzles star for the tree top
  • Dazzles Red Jewel stickers combined with single links from the chain outline stickers create the ornaments on the tree.
The greeting was a purchased die cut from Hot Off the Press.

Wednesday, October 26, 2011

Flower Soft & Stitching

To color this scene (from a Sizzix embossing folder run through my Big Shot) I used a set of acid-free pens by Bic that I got at an office supply store. They were called "Mark-it Permament Markers."  I used glitter glue to adhere Ivory Flower Soft to the snowman. This creates a lovely sparkle, though it can't be seen well in the photo. I used regular Flower Soft glue to adhere more Ivory Flower Soft to the clouds.  And I used glitter glue to color the roofs of the buildings to add a bit more sparkle. Christmas Green Flower Soft decorates the evergreen trees. The snowman's scarf is red embroidery thread. The scene was adhered to a green and red plaid printed blank card base from Hot Off the Press. The sentiment was stamped with a stamp from a Hot Off the Press Christmas set.

Tuesday, October 25, 2011

Using Serendipity Squares Part 2 - Thanksgiving Card

Today's card uses a Serendipity Square I got in a swap from Nancy (thanks Nancy!). She added a bunch of neat items when she made her squares - ribbon, lace, pearls.  These Serendipity squares are just GORGEOUS! You can see a couple more examples if you check back on Tuesdays for the next couple of weeks.  Anyway, these lovely squares sat in my stash for awhile because they are colors I don't use as often.  I decided they were GREAT colors for Thanksgiving cards.  I make a lot of Thanksgiving cards each year because I like to use the holiday to take the time to let folks know how much I appreciate them in my life with cards that speak specifically to what they mean to me.  When I need this many cards, it's nice to be able to put them together pretty quickly. Serendipity Squares to the rescue!

As you can see from the picture, I used my Spellbinders Nestability dies to create a mat for my stamped greeting.  I stamped it in black and in green to create a bit of a shadow and tie the green in more with the rest of the card.  I added a little bow to the Serendipity Square, and a butterfly cut-out I had from somewhere.  A bit of chalk to shade the butterfly and a bit of gold Stickles to add some sparkle to him, and I was done. Check back next week for another card featuring Nancy's serendipity squares!

Monday, October 24, 2011

Use Your Paper Features - More with Color Blocks

This scrapbook page makes good use of the color blocking on the page. The two larger spots become mats for the photos, and the green becomes background for the journaling. A few extra little touches - borders, layered flowers (flower brad & metal flower), title (dimensional stickers), vine ribbon (from Paper Wishes) and a quick page is made.

Sunday, October 23, 2011

Title Tips Part 17 - Silhouette Cutouts with Mixed Colors and Fonts

When cutting out your titles, try mixing it up with different fonts and colors of paper for a nice effect.  Once again, my Silhouette made easy work of this title.

Saturday, October 22, 2011

Origami Diamond Fold Challenge

Today's card was inspired by this challenge posted on the Paper Wishes Message Board - which in turn was inspired by this post, on Wickedly Wonderful Creations blog.  The stamped decorations are done with the Medallions & Corners acrylic stamp set from Hot Off the Press.  The bird was printed from clip art I got somewhere (probably Scrapbook Flair).

This is a fun fold that creates a diamond in the front of your card for the top flap to slip into.  Here is what it looks like when you open it up.

The basic fold for this card is pretty easy.  You start with an 11 x 11 sheet of paper folded in half diagonally.  Line this fold up with the top of your score board and one corner at the 0-mark.  Then score at 3 1/4" (the instructions said 3 1/8" but for some reason 3 1/4" lined up better for me) and 5 1/2".  Flip it over so the opposite corner is at the 0-mark and repeat the scoring.  This gives you 4 perpendicular scored lines (see drawing below). 
Now, turn the card and draw a score line 3 1/2" from the other tip.  While you can do these score lines with just a ruler if you wish, the Martha Stewart Score Board makes this very easy. For the last score line, you can use the envelope attachment to easily see where that 3 1/2" line should be.

 Now that you have your score lines, go ahead and prefold them all, using a bone folder to make a sharp crease.  Now, see where the 3 1/2" lines cross the 5 1/2" lines?  Cut out the little bit between them, then turn your card so the long straight edge is at the bottom, with the OUTSIDE facing up - like this:
This next part is the trickiest - but is harder to explain than to do.  Working from the OUTSIDE of your card, on each end, take the corner and bring it up to meet the top of that 3 1/4" fold line, opening it up as you do so to create a diamond. Crease the folds.

(The video on the blog post I mentioned above shows this pretty clearly.) 

Now your card is pretty much done, but the edges are open all around.  The only edges you want to leave open are the front diamond that you will tuck the top flap into.  The other diamond will be on the inside of the card and doesn't need to be left open.  Soooo.  Glue all around the edges EXCEPT for that diamond that you want to leave open.   Press all glued edges closed and you are ready to decorate your card.

Friday, October 21, 2011

Thanksgiving Purchased Focal


Thanksgiving is just around the corner and I'm starting to panic about getting all my cards ready.  When the crunch is on, there's nothing like a purchased focal to make a quick and easy card.  Shading with chalks can really make a difference in the look of your purchased focal.  In this case, I stamped a sentiment on a piece of paper that had small leaves in the background.  I stamped it in green and again in black to give a bit of a shadow effect and to help pull the green background in more.  I just drew a border on the card, but it might look better if I cut one of sticky-back vinyl on my Silhouette, or used some black outline stickers.  I might go back and add that if I have time.

Thursday, October 20, 2011

Adaptable Theme

This card, featuring another of Nancy's Serendipity Squares, also features a sentiment that can be used for multiple occasions, making it a very versatile card - perfect for that last minute, unexpected need.  Depending on what you say inside this card, it could be for a wedding, a funeral, a birthday, an anniversary, or no occasion at all!

The card itself was pretty easy to make:
  • Start with tan paisley base card.
  • Cut mats with Spellbinder's Nestability dies & Big Shot machine.
  • Punch circle mat with Multi-shaper punch.
  • Add flower, brad, serendipity square, stamped sentiment & ribbon.
Voila'!

Wednesday, October 19, 2011

Card with Multi-Shaper Punched Circle

Here's a thank you card, using another one of Nancy's Serendipity Squares.  Here's what I did for this one:
  • I stamped the sentiment on the Serendipity Square (using StazOn ink because the Serendipity square had been finished with a glossy finish) and then added the little brad & photo holder so it pointed to the sentiment.
  • I cut out a black mat with my Spellbinder's Nestability die & Big Shot machine and glued it to the card front.
  • Then I punched a little 4-inch circle mat using my "Love Story" Multi-shaper punch.  I glued this to my black mat and then glued the Serendipity Square on top.
  • I stamped my sentiment on a light-colored piece of paper.  Then bordered it with black borders trimmed with my fancy-edge paper trimmer.
That's it!  The hardest part was the multi-shaper circle mat, and once you get used to using them, they are REALLY easy.  They just require you to be VERY careful each time you line up your punch.

Tuesday, October 18, 2011

More Mini Note Cards

The mini-note cards I have today make use of leftover card stock to make little cards in a variety of shapes. This first one is so simple - just a cat silhouette cut-out (cut on my Silhouette!), and a couple of stamped images (greeting & swirls).
This one again uses a Serendipity square with a couple of stamped images.
And this one goes a bit more elaborate with a bunch of Dazzles & outline stickers adding pizzaz to the Serendipity Square focal.  All took just minutes to make and make great gift enclosure cards.

Monday, October 17, 2011

Joy Fold Card

Today's card is another "Joy Fold".  I first talked about this fold here.  I have yet to learn how to get good pictures of shiny paper, so this doesn't look as good as it does in real life.

The base card is white on one side and a glossy maroon on the other -- no idea who makes it.  Using an acrylic stamp from Hot Off the Press, I stamped it with VersaMark and then gold embossed it.  I also ran the VersaMark ink pad around the edges of the card front and gold embossed that.

I glued navy card stock to the inside back of the card, so it shows through where the card front is cut away.  I also stamped little butterflies (acrylic stamp from studio g) on the navy with VersaMark and gold embossed them, bending the wings back for a bit of dimension. I glued them only along their bodies.  A gold braided ribbon and a Dazzles sentiment finish off the look.

Here are a couple more pictures showing the inside:

Sunday, October 16, 2011

Title Tips Part 16 - Silhouette Cutouts with Mat

The Silhouette makes matting titles easy, too.  The software makes drawing the mats pretty automatic.  You can even make multiple mats if you like.  As you might guess from the title, I like to use plays on words for my titles.

Saturday, October 15, 2011

Card Making Inspiration for Scrapbooking - Part 3

The inspiration for the windows at the bottom of this page once again came from my card making.  I bought my nested Spellbinders dies because they added such a nice touch to my cards.  But they make very nice frames for my scrapbook pages too!  I can find working with heirloom photos a bit challenging because I don't want to actually glue them to the page.  I use photo corners of some sort to hold them so they can be removed without damage.  This can get boring really fast if I'm not careful.  Spellbinders to the rescue!  I cut windows with my dies and then mount the pictures to the back of the page using REVERSED photo corners (i.e. sticky side UP).

Here is the companion page to the above:
It demonstrates something else gleaned from my card-making.  My teddy bear embellishments are made with techniques learned in making focals for my cards.  In this case, I used a punch for the basic shape.  The light colored bears were cut out of blue paper and then their faces, arms & legs were colored with chalk with some shadowing on the clothes created with a pencil. A bit of light blue stickles helps the shirt stand out nicely.  The dark brown bear was punched from both the brown AND the blue.  I then cut off the head, arms, and legs from the blue to form the clothes which I finished the same way as before.

Friday, October 14, 2011

Picture Perfect

I made this card for a picture challenge on the PW message board.  I thought this picture, taken in the Chinese Gardens in Sydney, was perfect for the focal on a sympathy card, and I loved the combination of it with the taffeta-look of the background paper. I added a little butterfly (outline sticker) because I like them.   A simple ribbon with outline sticker sentiment finishes this card.

Here's a tip for sympathy cards:    I was finding that too often when I needed one, I might like the front of the card, but the inside sentiment didn't suit the person for whom the card was intended.  Since too often sympathy cards are needed without a lot of warning, I wanted a way to have them on hand and still meet the needs of the individual.  So, I decided to do a "mix and match."  I printed up a bunch of different poems and sentiments for use in the inside of my sympathy cards, and I leave the inside of my cards blank.  Then when the necessity arises, I simply choose a card, and then look through the printed sentiments to find the perfect one.

Thursday, October 13, 2011

Easy Anniversary Card

This card was SO easy - yet looks quite elegant!  All I needed was some foil paper, the heart-shaped Nestability dies from Spellbinders and a few stickers.
  • Using my Big Shot & Nestability dies, I cut a heart-shape from the gold foil and a smaller one of the cream.
  • Bell outline stickers on the matted heart-shape creates an easy focal.
  • Sticker sentiment and outline sticker borders finish it off.  
 Can it get any easier?

Wednesday, October 12, 2011

Easy Border Punch Card

This was a really quick and easy card. 
  • I started with the tan paisley base card and trimmed away a half inch or so of the bottom edge of the card front.  
  • I punched this edge with a border punch (Deco Fan by Martha Stewart).  
  • I glued a brown marbled strip of paper for a border to the inside of card so it would show through the punched edge.  
  • Then I took another strip of the brown marble paper and punched an edge that I glued along the top edge of the card.
  • The addition of a Serendipity Square I got from Nancy, a little black bow, and a stamped sentiment finishes off the card.
Can you get any easier than that?

Tuesday, October 11, 2011

Using Serendipity Squares Part 1 - Mini Notecards

 Some time ago I demonstrated how to use up all your little bits of paper and outline sticker leftover bits to create Serendipity Squares. That process can make a LOT of squares at once, and if you're not careful, you'll just change your leftover bits into leftover squares that are then left sitting in your stash.  USE THEM!

Today I show a variety of little notecards (approx 2 1/4 inch square finished size) using some of my Serendipity squares.  They are the perfect size for little gift enclosure cards.  This first one has a small Dazzle sticker mounted in the center, a stamped greeting, and pen-work border.
 This one shows a stamped greeting in the center with an outline sticker border that repeats the theme of the little star on the Serendipity square.
 Here we not only have a stamped greeting in the center of the Serendipity square, but stamped around the 4 edges to form a bit of a border.
And this one was left plain with stamped greeting and pen work borders on the sides.  Quick and easy, but great for adding that little special touch to a gift.

Monday, October 10, 2011

Silver Wedding Window Card

Today's card is another window card.  Making these are SO easy with the proper die & die cut machine!  Here I used a Spellbinder's Nestability die with my Big Shot machine.  I simply glued my background paper to the card, then ran it through my machine to cut the window. For more information on how to do this check my post from a couple of weeks ago

Because the background paper is a non-porous metallic silver, I used StazOn ink to ensure my stamping came out decently.

The black around the edge is a border I cut out of adhesive-backed vinyl with my Silhouette electronic cutting machine.  But I know there are places that sell outline stickers that would work well for this too.

What shows through from the inside is actually the cut-out from the card I showed two weeks ago - finished off with a Dazzle sticker from Paper Wishes, a "Peel-Off" Border sticker and a stamp from an Inkadinkadoo Wedding clear stamp set. You can see it a bit better here:

Sunday, October 9, 2011

Title Tips Part 15 - Silhouette Fancy Font Cutouts

A digital cutter, like my Silhouette can take your titles to a new level.  This title is much more delicate than I could easily cut out by hand, but it was pretty easy to do with my Silhouette.  The Xyron sticker creator makes it easy to adhere it to the page, too.  This page was made over a year ago and won a Paper Wishes contest.  That was a lot of fun - and they give GREAT prizes.

Saturday, October 8, 2011

Cardmaking Inspiration for Scrapbooking - Part 2

The inspiration for this page, once again came from my cardmaking.  I just plain hadn't done much with edger punches until I got into cardmaking.  But they can add such a nice touch to a scrapbook page!  This shell-shaped border was made with the Deco Fan punch by Martha Stewart (part of a "punch around the page" set).

Friday, October 7, 2011

Stacked Dazzles Luv U

Often we think of love-themed cards as being for Anniversary, Wedding, or Valentine's Day.  But, if you are fortunate enough to have love in your life, it's a good idea to express it throughout the year - not just on special occasions.  This card is made with that idea in mind.  While it could easily serve as a Valentine's card, it is not tied to that, and was very easy to make.
  • I started with heart-covered paper that I glued for a background.
  • I cut a strip of glitter-red paper for a border, and used that same paper to back some of the Stacking Dazzles that I used for the focal.  Others were put on white paper.  All were cut near the edge of the sticker. and then placed, one on top of the other, on the card.
  • A little Dazzle heart & border finish off the card.

Thursday, October 6, 2011

Most Used Theme

What card theme do use use the most? 

I use a lot of Christmas Cards and Thanksgiving Cards, but I think the card I use most is some variation of "Thinking of You".  I like to send cards to friends to lift their spirits, and this type of card is perfect for that. 

Too often I also have need of cards for friends and family who are sick.  To me, the standard "Get Well" sentiment is often too demanding and thoughtless.  Of course they want to get well!  They would if they could!  I suppose I feel this more as too many of my friends and family are dealing with serious issues - some terminal.  I'm not saying I never send a standard "Get Well Soon" greeting, but I tend to use that for less serious things like the common cold or recovery from minor surgery.  When it's serious, I'm much more likely to go with the Thinking of You theme.

Thinking of You can be a very versatile sentiment.  It can be serious - sent to a friend has lost a job, to a loved one you haven't seen in awhile, or to a friend who has just lost someone dear to them.  Or it can be more humorous, for instance - "Thinking of you surrounded by boxes" to someone who has just moved into a new home or "Thinking of you in your rocking chair at 2 in the morning" to someone who has just had a new baby. 

It seems to me that this greeting can be used for just about any occasion where you need a quick card, so I make a LOT of them. This post shows one I made with leftovers from a scrapbook page I had finished.  Purchased die-cut tags (I think they came from Paper Wishes) made it quick and easy. I just added a bit of ribbon. The sentiment was adhesive-backed vinyl that had been pre-cut on my Silhouette.  (As I've mentioned before, I like to pre-cut a bunch of sentiments with my Silhouette.  Not only does this usually mean I have what I need for a card I'm making, it also makes much better use of my materials because I fill the adhesive-backed sheet as full of sentiments as I can when I cut it.)

Wednesday, October 5, 2011

Sketch Challenge

Here's a card made for the card sketch challenge on Ellen Hutson's website.  Love that Sizzix embossing folder, and outline stickers make things so easy!

Color Challenge

Here's a card for the color challenge on Ellen Hutson's website.  They're not my favorite colors, but it was an interesting challenge.

Punched Rectangle Frame from Border Punch

This card makes use of a technique I saw on a u-tube video, for creating a rectangular punched edge with a standard border punch. You can watch the video to see the technique, but basically you:
  • Punch on a scrap piece of paper so you can measure the depth of the punch (how far it is from inside punched edge to the edge of your paper).
  • Starting in one corner of your paper or card stock, draw a line that is the depth of your punch in from the edge along both the vertical and horizontal edges.  (For example, if your punch is 3/4" deep, draw your line 3/4" in from the edge of the paper or card stock).
  • Using your drawn line as a guide, flip your punch over so you can see the line through the hole in the bottom of the punch and line it up so your punch is along the vertical edge and your horizontal guide line is right along the edge of the punch area. Punch your first set of motifs.
  • Continue punching along the edge as for any border until you have it the length you want.  NOTE: If your punch punches 3 motif's at a time and you only want one more, you can flip your punch over and line up so that two of the motif's on the punch exactly match what you've already punched.
  • Do the same thing along the horizontal side, once again using your drawn line as a guide for your punch placement.
  • Now, draw a line on the other vertical edge, right along the edge of your last horizontal motif. 
  • Trim this edge to the depth of your punch, and then punch this edge as you did the other.
  • Now, you just have one edge left.  Draw a line from one edge of the two vertical punched edges to the other, and trim this edge to the depth of your punch as before.
  • Punch your last edge in a similar manner to those you've already done.
  • Now, trim the corners to create your frame.  Note that depending on your specific punch, it sometimes looks better to trim them farther from the corners than others.  This is one where it would have looked better if I hadn't trimmed as close to the corners. Experiment!
The focal is a Serendipity Square I got from Nancy in a swap (thanks Nancy!).  I added a little bow and finished the card with a stamped sentiment.

Tuesday, October 4, 2011

Thanksgiving Card with Inchie, in Non-Traditional Colors

This card, recalling Thanksgiving traditions, is done in non-traditional colors for the inchie challenge on Ellen Hutson's website. The inchie features a colored section of the birdhouse stamp and is popped up on foam tape.  The only color on the rest of the stamped picture is a bit of Flower Soft.

Christmas Card with Glitter Ombre techniques

This card was made for a World Cardmaking challenge from Ellen Hutson's website.  It uses a glitter blending technique.  In this case, purple and turquoise glitter are solid at the edges and blend in the middle of the stocking (made with a Double-Stick Dazzle).  Papers are from a Paper Wishes Christmas paper set and are finished off with white gel pen, stamps, and ribbons.

Challenging Papers Part 5 - Castles


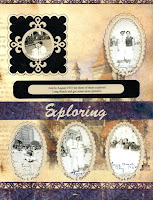
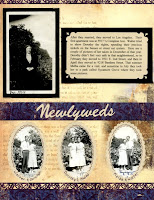
This pair of scrapbook pages was made using paper from a "Once Upon a Time" set of papers that I was given.  I don't have much to scrap that relates to princes and princesses and castles (maybe one or two pages of a star-eyed little girl dressed up like a princess), so even though the pages are pretty, I wasn't sure what I could do with them.

One of the principles for using Challenging papers is to look at the colors - not just the theme of the paper.  In this case, the colors looked very vintage to me and I decided they would make the perfect backdrop for these heritage album pages.  I positioned the photos such that the more obvious castle turrets aren't very visible (you can see a little on the 2nd page) and become more like buildings seen while the newlyweds explored the city around them.

Here's what I did:
  • 12 x 12 pages were cut to 8 1/2 x 11 - with selvage edge on different sides so the pages are not identical.
  • Center page borders were cut from leftovers of the 12 x 12 pages.
  • The titles were cut from cream-colored card stock with my Silhouette and glued to the borders.
  • The ovals were cut from the background paper with a Spellbinders Nestability die and from the cream-colored card stock in a smaller size (which was then glued BEHIND the background paper).  The tricky part was figuring out how to cut the 8 1/2 x 11 background paper in my Big Shot!  I did it by cutting the paper in half, cutting my holes, and then taping the paper back together - then gluing the border (described above) over top of the join!
  • The circle within the square was made by mounting black cardstock behind a square hole cut with a square Nestability die.  Then another Spellbinders die was used to cut the cream-colored decorative circle.  Since I don't have the circular nestabilities yet, I had to cut the center out of the decorative circle by hand so the photo could show through.
  • All photos were mounted BEHIND the page using photo corners with the sticky side UP.