Please let me hear from you!

This blog is for sharing a love of paper crafting. I love paper crafting -
and Stampin' Up! products in particular -
so much so, that I became an independent Stampin' Up!®™ demonstrator earlier this year!
Full disclosure: I get a small commission on purchases made using links from this website - but this in no way affects your price. It just serves to help support this blog. Thank you in advance for that support!

Enjoy browsing my blog, and I'd love to hear from you.
It is what helps make the time I put into this blog feel worthwhile, and always brightens my day.

NOTE: All Stampin' Up! Images © 1990–2025 Stampin’ Up!®

Monday, March 6, 2017

Christmas in February - er, March - Part 10


A couple of weeks ago I started making Christmas cards using a kit from Hunkydory (Cute Christmas).  The kit said it made "at least 20 cards" which would average 1/2 die cut sheet and 1 coordinating card stock sheet per card.  I knew I could do better than that.  When I last posted cards from this kit, I was up to 42 cards.  Here are 4 more bringing the total to 46.
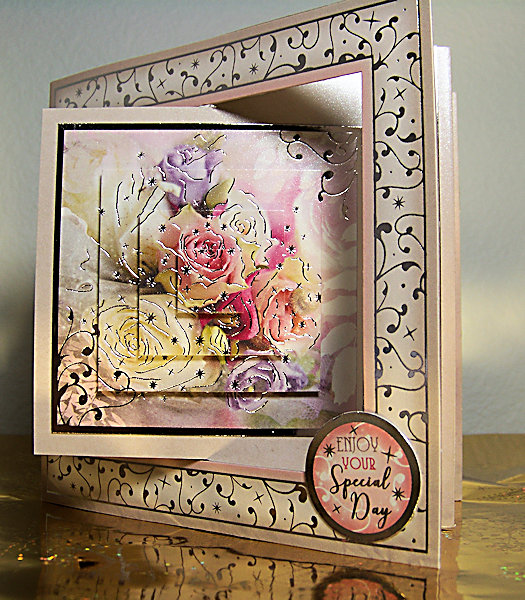
This first card is more of a true rosy pink than the orangish cast you see in the picture. I used the glitzy paper again from DCWV - love that stuff!  I made the card as an interlocking gate fold with the focal's frame and sentiment glued only to the right side of the card and the focal itself glued only to the left side of the card.

When you open it to the inside, you see this:


You can see I used more of the glitzy paper for borders and as a faux ribbon on the tag.  The tag itself was a die cut from the kit.  All are attached to a coordinating piece of card stock that was glued to the inside center panel.

Next up we have this card.  The gorgeous background is coordinating card stock.  The sentiment is from 2016 Christmas Sentiments (Hunkydory).  The focal and frame are die cuts from the kit.  the frame is attached with foam tape for dimension.  I also added Stickles to the focal to make it sparkle more.


For the inside of the card I used more of the coordinating card stock with a tag (die cut from the kit).  I added a bit of ribbon from my stash to finish it off.


The third card in this set makes use of FIVE die cuts from the kit and three sentiment die cuts from the 2016 Christmas Sentiments.


The background is white glimmer paper embossed with an M-Bossabilities folder called Elite, from Spellbinders.  The two sentiments on the front are raised with foam tape.


The inside uses the rest of those corner die cuts.  A small piece of silver metallic ribbon adds the finishing touch to the sentiment tag.

This last card was a bit of a stretch.  I had set a goal to get at least double the amount of cards from each set of die cuts with coordinating card stock, but this set was a bit more challenging.  However, I kept looking at the empty die cut sheet.  With the die cuts removed, there was this really interesting scalloped circle shape with ribbon-like extensions on each of the four sides.  I decided to cut it out and use it on the front of this card.


It's hard to see the subtle blue and pink circles, but you can see them if you look closely.  I glued it to another embossed piece of white glimmer paper that I used for the background.  It was embossed with another M-Bossabilities folder called Venetian.  The small center focal is from the 2016 Christmas Sentiments and is mounted with foam tape.  It is encircled with piece of silver glimmer paper that I die cut with a Spellbinder's die (Holly Motifs).

So, there you have 4 more cards.  46 cards from a set that is to make "at least 20" isn't bad.  And I still have one more die cut sheet with it's card stock to go!!!!

Sunday, March 5, 2017

More Butterflies


Today I'm back to the Flight of the Butterflies Jeweled edition from Hunkydory.  A couple of days ago I showcased a couple of the specialty cards from that kit.  Today are two versions of another of their specialty cards.  This card is sort of a combination gate fold and flip flop card.  Very fun!  As you can see in the picture, the belly band holds it closed.  

Here are a couple of pictures showing various angles after the belly band has been removed:


Somehow I didn't get a picture of the inside of the left side of this card.  There's a little saying there.  At any rate, it's a very nice card.

For this second example, I put a saying on the front, so you can't miss it . . . 


. . . except of course that the picture is poor enough quality that you can't read it well!  I didn't get other pictures of this one, but it's similar to the green one.  There are two more of these that I'll work on some other time.

Saturday, March 4, 2017

More Hunkydory


I've not had a lot of time for paper crafting lately, but needed cards, so turned to another Hunkydory kit.  This one is called Floral Shimmer.  In addition to the normal die cuts and coordinating card stock, this had 4 specialty cards.  Once again, I decided to pretty much use them as designed so I could have something to quickly send to a friend.  

The focal is a pyramid style with foam tape between layers for added dimension.  The sentiment came from the Hunkydory Essential Book of Pearl Sentiments.  I thought went very well.  I attached it to the frame, but left the other part free so the focal could swing as it is designed to do.  Here's a picture that gives you a bit on an idea of what it looks like when you open the card.


On the inside, I used another tag from the Essential Book of Pearl Sentiments, matted it with purple, and added purple & turquoise ribbons.  

There were three more cards - similar but in different colors.  First, a peachy pink:


I think this next picture does a bit better job showing what the opened card looks like:


The butterflies are die cuts I added to the inside.

Next up is a cream colored card:


And finally, this gorgeous lavender birthday card:


Four beautiful cards - just a start on this beautiful kit.

Saturday, February 18, 2017

A Different Hunkydory Card


I sure wish the picture on this one was better!  I needed a sympathy card so took a break from Hunkydory Christmas and tried another Hunkydory set - Flight of the Butterflies, Jeweled Edition.  

While I generally prefer to design my own cards, this set had some pre-designed cards that are particularly nice.  This card is a case in point.  It comes with the card base & everything you need.  There were several embellishments and I chose which ones I wanted on the card.  I also chose to highlight the gold foiling by using gold metallic ribbon to tie the card closed instead of the more tannish-gold ribbon they provided.  Other than that, I pretty much made the card as they intended.

I don't know that I ever would have thought to put a card together like this!  The card base is simply the back of the card with a narrow strip on the left side (as facing us) folded over, and the right side "clasp" that folds over on the right.  There is another strip of card stock that is a narrow strip with a clasp on it.  The row of butterflies on the left is a vellum piece that is attached to the left-side flap, and to the narrow strip of card stock with clasp. Border strips cover the joins and you end up with this beautiful card!  The vellum is translucent but because it is raised up a bit by virtue of the ribbon clasp, you can't see through it to the message inside!  I was VERY happy with this card!

There were four of these in the kit - in different colors.  I didn't take a picture of it, but I sent my Dad a similar card in brownish tones for his birthday, and I still have 2 more to make - one pink, one purple.