MENU

Tuesday, October 6, 2015

Cat Card - Inside Out


This card is a first for me - the first time I liked the inside better than the outside of a card!  The picture above shows the inside of the card and is made just using a variety of stickers and other elements from my stash - no idea where they came from originally.   

You can see the outside of the card below.  The focal is a pretty stamp called "Miss Kitty Small" from Sweet Stamps.  I heat embossed it with white and then colored it with Smooch inks.  Most times I like the look of Smooch inks, but I just don't like the way this cat turned out.  Oh well - hopefully my cat-loving daughter liked it anyway!


The background paper is from a DCWV Matstack.  The white mat was die cut with Spellbinder's Decorative Labels Eight.  Both the focal and the sentiment where white heat embossed on white glossy cardstock that had been colored with alcohol inks.  The focal was cut with a JustRite Die from their Nested Oval Medallions set.    The Sentiment was cut from Paper Artist 6 Layered Labels and 2 Swirls die and stamped with a stamp from the matching Greetings and Labels stamp set. 

Monday, October 5, 2015

Thank You in Pink


This card was made using leftovers from the kit that was used for yesterday's card - with the addition of a few Dazzles (Jewel Flowers, Jewel Butterflies).


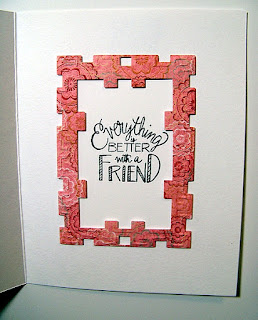
The patterned paper is an older HOTP design.   Dies used for creating the frame on the front and on the inside of the card are from Spellbinders Tile Works.  The sentiment was stamped and heat embossed with a stamp from JustRite's Grand Sentiments.  To highlight the embossing on the inside frame, I used the die as a stencil with an embossing pen - then heat embossed with white embossing powder.

Sunday, October 4, 2015

My Card Kit


Oh wow, the camera really changed the look of that greeting.  In real life it is plain black heat embossed on vellum (Just Rite's Grand Sentiments stamp), despite the fact that the picture makes it look silver! :)  This was the kit that I put together and it was so much fun to see how different PJMeeMaw's card turned out even though she used the same materials!  The focal is from a foil papier tole set from Hot Off the Press called "Birds and Blossoms".  It is SOOOO pretty in real life!  I didn't use all of the flowers to stack on the focal, but saved them to use on the inside of the card:


The papers are from an old set by Hot Off the Press

Saturday, October 3, 2015

Card Making Kit Fun!


Isn't this a cute stamped image?  I'm not sure who makes it since I got it in a card making kit from PJMeeMaw on the Paper Wishes Message Board.  I colored it with gel pens and a Dove Blender pen, and really like the way it turned out.  I cut it out and embossed it using a die set I got recently - Spellbinders Tile Works.  I wasn't sure how much I'd like that set, but I REALLY like how it turned out on this card!  I highlighted a bit of the embossing with one of my gel pens and it really frames it nicely.  I added it to the front of the card with foam tape for a bit of dimension.  I think I'll probably add a greeting to the front of the card, but we were not supposed to add anything that wasn't already in the kit, (though fortunately, we didn't have to use everything in the kit) so I'm posting it without. :)  

There were several other pretty papers and decorative elements, but I chose to go fairly simple.  I used dies from the same Spellbinder's set to cut out the center of the patterned paper before gluing the card topper on.  And then decided to make it into  frame for the stamped sentiment inside.  The frame is embossed, though you can't really tell that in the picture, and adhered with foam tape.


Friday, October 2, 2015

Christmas with Joy


I have GOT to make a box for taking pictures of my cards.  I get tired of my cards looking so much less pretty in the picture than they do in real life!  Anyway, I figure it's time to start making Christmas cards or I'll never have enough ready!  The background of this card is a printed vellum.  The challenge with using vellum, of course, is attaching it so that the adhesive is not visible.  While there are adhesives that hide themselves pretty well, the best way is to hide the adhesive under other elements. 

In this case, I created a frame out of green suede paper and glued the edges of the vellum behind that.  I also glued the vellum behind the hanging ornament.  And yes, that ornament IS "hanging from the branch" from a chain-like piece of Border Dazzles (though it is, unfortunately, not as visible in the picture as I would like! 

The ornament itself was stamped with a JustRite stamp (from their Holiday Cheer Christmas Ornaments set) and cut with a die from Spellbinder's 2010 Heirloom Ornaments die set.  I finished the look by adding some Jewel Dazzles accents.  To create the large oval one, I simply layered 2 slightly offset to fill the oval space and then centered one on top of that to give a more symmetrical look.

Thursday, October 1, 2015

A VERY Different Look


This card started as another project from Girlfriend's Getaway - using blue and yellow "Color Burst" - but turned out VERY different from theirs.  

In case you haven't seen it, Color Burst is a powder that comes in a little tube.  A little goes a long way.  We sprinkled a little of it on a piece of white card stock and then sprayed it with water and let it dry.  No two ever turn out exactly alike.  After their card stock dried, they matted it with this gorgeous holographic paper before adding dragonflies and words from the "Dragonfly Dazzles" set and some Jewel Dazzles for even more bling.  Once again, I couldn't bear to waste all that beautiful holographic paper that was hidden behind the card stock, so I set mine aside to finish later.

When I went to finish it, I decided to cut a frame with one of my dies (Spellbinders 5X7 Heirloom Legacy) - saving the center oval for another project, of course!  To get the look I wanted, I also cut  my prepared card stock into an oval using the same die so it didn't show behind the beautiful filagree of this die cut.

My idea had been to use alcohol inks to color Dazzles in blue to match the frame, but when I tried it, the color was very muted compared to the frame.  So, I decided to use a fine glitter in the same color.  I also decided to use Hummingbird Dazzles instead of the Dragonfly ones.  

I took a small piece of double stick material - just large enough to hold the hummingbird - and attached it to a piece of card stock.  After removing the top paper and adding the hummingbird sticker, I rubbed the glitter into the remaining spaces.  The glitter appears to be an almost exact match for the holographic paper!  I added a flower from the same set.  This time I used different colors of paper to back the sticker to give a paper piecing effect.  Finally, I added some Greetings Dazzles to complete the card. 

Wednesday, September 30, 2015

A Third "Girlfriends Getaway" Project


This was my favorite project from Girlfriends Getaway.  It is so pretty with it's special papers and mica powder focal!.  This center step card is pretty much like their design, but has a couple of important differences that I'll get to in a minute.  I LOVE this card because it is made with such pretty elements.  The focal is made using a stencil on double stick paper with "Metal F/X" from Dream Weavers.  It is so easy and pretty to make!  Behind the focal, we have a turquoise that is a textured iridescent sheet and the narrow dark mat & dark on the sides & below the focal is a purple suede.  These papers are SOOOO beautiful!  

Which leads me to my "important differences".  I did not want to waste such beautiful papers by hiding a bunch of it behind the focal!  So, after cutting the pieces to size, I used a die to cut the centers out of the two special papers so they would mat the focal but I could save the center parts that are hidden so they would not be wasted.  The other main difference is the placement of the bow.  In their project, it was down in the left lower corner, but I had an "oops" in the upper left corner, so chose to put the bow there instead.

Tuesday, September 29, 2015

Another Girlfriend's Getaway Project


A quick easel card, this one started with a new product from Hot Off the Press - "Awesome Blossoms Colorist Book". This was another design from "Girlfriends Getaway", but I made a couple of minor changes from what they had suggested: 
  • I changed the sentiments - different ones and colored purple with an alcohol marker, 
  • the card stands a bit more upright than theirs, and 
  • I forgot to add the Dazzles border along the edges of the black papers.  :)  (Okay, I actually just decided to save them for another project! :) )
The pictures are colored using pink & purple Spectrum Noir alcohol markers and green chalk.  You can't see it very well in the pictures, but the largest flower and the small purple flower near the "Thanks" are glittery because they were covered with a clear glitter sticky sheet.  I forget who makes it - and I sure wish I could have purchased more of it, but they ran out.  It's really cool stuff.
 

This is what the card looks like when closed. 

Monday, September 28, 2015

Art Board design from "Girlfriends Getaway"


I've never made one of these art boards before, and it's not really my "thing", but this was one of the "Girlfriends Getaway" projects hosted by Paper Wishes/Hot Off the Press this past weekend.  

It was made using an 8 X 8 canvas board with brown ink to color the edges. Then we used paper and Paper Tole from the "Artful Watercolors" sets and added elements from the Artful Affirmations Dazzles (all from Hot Off the Press).  The pink tag was printed on white paper and we used Design Tool Kit #7 to cut it's shape.  

The finished product IS pretty and will make a nice picture for my craft room.  It's not easy to see in this picture, but there is a gold sticker message on the "post card" in this picture.  It says, "Do more of what you love!"  What a great message for my craft room! :)  I decided I wanted it to stand out more, so after I took this picture, I gently pulled the sticker off and colored it with a black sharpie before placing it back on the "post card".  The message stands out much more clearly and now all I need to do is to figure out how best to hang it in my craft room!  I expect it will look better against my light green walls, than it does against that yellow card stock! :)

Sunday, September 27, 2015

Die Cut Exchange Surprise!


It all started when I started cutting out and embossing a bunch of these holly borders using Spellbinder's "Holly Accents" for a die cut exchange.  They are such pretty borders.  I especially like using chalks to color them like I did here:


Anyway, because I was cutting quite a few of them for a die exchange, I found myself trying to cut them fairly close together to waste as little card stock as possible.  To do so, I needed to offset the die each time, so I ended up with leftover card stock that looked like this.


If you look closely between the two cutouts, you will discover another interesting border.  I liked them so much I went ahead and cut them loose to be able to used them on another project.  When I had done so, they looked like this:


Saturday, September 26, 2015

Green Suede Thanksgiving


September is already almost gone!  Before I know it, Thanksgiving will be here so I need to get busy if I'm going to have cards made.  Once again, colors are deceiving in this picture.  The lattice was cut from green suede paper using Cheery Lynn's "French Lattice" and is gorgeous in person.  The focal was cut and embossed using a die from Spellbinders "Pumpkin Accents".  I colored it with chalks and added some pen lines.  The greeting is a silver outline sticker that was colored green with alcohol ink.  Both are mounted on a white piece of glimmer paper that was cut and embossed with a die from Spellbinders "Resplendent Rectangles".

Thursday, September 24, 2015

Aqua & Black Thanks


This card turned out VERY differently than I expected when I started.  I had picked out a patterned paper to use with the focal and was all set to do so.  Then I saw the aqua embossed piece of glimmer paper in my stash (embossed using "Imperial" M-Bossability folder from Spellbinders).  It looked great with the patterned paper but, being the miser that I am, didn't want to waste a lot of the embossed glimmer paper, so cut out the center of it.  When I went to place it on the black card I was using for a base, it looked so nice as a frame that I decided against using the patterned paper at all!

I wish I was a better photographer so you could see the dimension in this card better.  The focal is made from multiple layers separated by dimensional tape.  The very back layer is actually two pieces overlapped - cut from the glimmer paper with Spellbinders "Fancy Tags Two" die set.  The next layer is a piece of black paper cut with a Spellbinders "Labels Eleven" die. Next is another "Fancy Tags Two" die cut out of the glimmer paper.  Finally we have the focal itself - glossy card stock colored with alcohol inks, cut with a JustRite "Vintage Labels Three" die, and heat embossed in black using stamps from JustRite "For All You Do Vintage Labels Three" and HOTP "Stamp and Punch" stamps sets.

The final touch (added after I started to post this!) is a bunch of black Jewel Dazzles in different sizes.  Compare the finished product to the one I had before adding the Jewel Dazzles:


Wednesday, September 23, 2015

Heartfelt Thanks

This is another card that doesn't show as well in the picture as it does in real life. (And I REALLY shouldn't have taken the picture against a white background as you can't see where the card ends and the background begins!)  Anyway, here's how I made it:

Focal: Glossy card stock was colored with alcohol inks and then cut with a JustRite "Vintage Labels Two" die. It was stamped with a stamp from JustRite "Grateful Heart Vintage Labels Two" stamp set and the sentiment was stamped using a stamp from JustRite "Fancy Tags" stamp set.  All were heat embossed with black embossing powder.  The focal was then attached to the mat using dimensional tape.

Mat: The mat was cut with a die from Spellbinders "Resplendent Rectangles" set.  It was embellished with silver outline stickers.

Background: The paper for this background once again came from the DCWV "All Dressed Up" matstack.  The paper is really more like card stock and I made use of the stability of it to pop the whole piece up with dimensional tape.  This left a narrow white margin of the base card all the way around the whole.  However, the sides had a wider margin than the top & bottom, so I added Dazzles thin line silver stickers along each side to complete the look.

Tuesday, September 22, 2015

Lights, Camera, Frustration!

I'm often frustrated by the way the camera seems to change the color of things because of the way the light bounces off different materials.  This card is a case in point.  In real life, the ribbon coordinates better than it appears in this picture.  Oh well . . . Here's how I made this one.

Focal: Glossy card stock was colored with alcohol inks and then stamped and heat embossed in silver using stamps from JustRite "Enjoy the Day Vintage Labels Four" and JustRite "Grand Sentiments" stamp sets. It was cut with the matching JustRite "Vintage Labels Four" die.

Mat: This mat was the result of an "accident".  I had intended to cut a piece of black paper using a die from Spellbinders "Fleur De Lis Rectangles" set.  However, as I ran it through my machine, the die slipped and the die ended up partially off the paper.  This reminded me that I don't have to use the entire die cut - I can use just a portion of it.  So, I just trimmed the bad part of the cut off and ended up with a mat that was just big enough for my focal.

Background: The background paper is another from DCWV "All Dressed Up" matstack.  I cut it just enough smaller than my black card base so the card itself would form a mat for it.  Near the bottom, I added a fancy satin ribbon with a bow.

Monday, September 21, 2015

Writing a Blog Helps with Card Making!


This card is an example of how posting my cards to this blog occasionally helps make the card look better!  When I went to post it, the card originally looked like this:


I knew it needed something, but hadn't figured out what.  As I was posting it, I realized the focal needed to be "anchored" by something and got the idea of adding the border you see in the first picture.  I think it makes the card look much more finished.

Here's how I made it:

Background: Patterned Paper from DCWV "All Dressed Up" matstack. To this I added a strip of black paper with a 1/8" inch aqua ribbon about an inch from the bottom of the card.  On the upper left corner I added 3 black "Jewel Dazzles" from HOTP.

Focal: It's hard to see in the picture, but this focal has quite a lot of dimension.  It started with a piece of glossy card stock, inked with alcohol inks, stamped & heat embossed with stamps from JustRite "Vintage Rose Medallions" & JustRite "Always and Forever" stamp sets.  It was cut with the matching JustRite Medallion die and attached to the mat with several layers of dimensional tape.  The "mat" is actually a flower cut with HOTP Paper Artist "Bodacious Blooms" die.  The petals are cut like two pieces, and I've ensured visible dimension by putting pieces of dimensional tape under the center part of each petal.

Sunday, September 20, 2015

Dryer Sheet Magic


I love the look of intricate dies, but HATE digging out all those little pieces from my die & trying to get the die cut loose without tearing!  I've tried using wax paper between the die and my paper, but that never has worked very well for me and just creates an increased mess.  But, I recently came across a hint for this that seems like magic.  It requires about 4 dryer sheets, stacked one on top of the other and then folded in half to create 8 layers.


After cutting your die and making sure all edges cut through, run it through again with the stack of dryer sheets between the cutting plate and the cutting edges of the die.


As if by magic, the die cut and all the little bits will stick to the dryer sheet leaving the die clean of bits (most of the time - you can see that naturally when I decided to take a picture of the process, a couple of bits stayed in ;) ).  Anyway, it is then very easy to peel the die cut off the dryer sheets.  It truly seemed like MAGIC when I tried it.  You can re-use your stack of dryer sheets many times.

It's best to use the fragrance-free type, but perfumed ones will work too.

Saturday, September 19, 2015

Thank You with Purple and Black


Here's another quick Thank You card.

Background Paper: from DCWV "All Dressed Up" Matstack - cut so the black card base serves as a narrow mat all the way around it.  Before gluing it in place, I added two 1/4" satin ribbons.  The added ribbons make it look like the patterned paper was cut in 3 pieces, though it is really only one.

Focal: Glossy Cardstock with Alcohol Inks - stamped and heat embossed in black using JustRite "Ornate Happiness Squares" and "Thank You Labels Twenty" - cut with die from Spellbinders "Ornate Squares". This was then matted on a black piece of paper cut with Spellbinders "Resplendent Rectangles".  I added the matted focal to the card front using dimensional tape for added interest.


Friday, September 18, 2015

Merry Christmas in Aqua and White


This card is a favorite of mine.  The focal and sentiment are cut from glitter card stock and decorated with a "jewel" in the center of the ornament.  I received them in a scrapbook element exchange, and they are very pretty.  The look really good with this white embossed glimmer paper (using Spellbinders M-Bossability's folder called "Imperial")

Thursday, September 17, 2015

Die Cut Patterned Paper


This Christmas card started with a Stampin' Up bird stamp that I really like called "Beautiful Season". After being colored, the stamped image was cut out with a Spellbinder's "Labels Four" die.  The frame was cut from a piece of HOTP Holly paper using Spellbinder's "Elegant Labels Four"

Wednesday, September 16, 2015

A Couple of Quick Christmas Cards


This first card is made with pieces from a HOTP card kit.  The scraps of paper came together nicely to form the backdrop for the printed embellishments from the same kit.


The front panel on this card was scavenged from a card I received, but it could easily be made using a snowflake stamp and glittery embossing powder.  The sentiment was a sticker I had in my stash and the edge of the card was enhanced with outline stickers.

Tuesday, September 15, 2015

Christmas Ornaments Three


This year is fast disappearing and Christmas will be here before we know it, so I thought it might be a good idea to post a bit of "Christmas Inspiration" to encourage us to get starting making our Christmas cards!

These three cards all started with papers and dimensional stickers from a K& Company package.  I love the old-fashioned ornaments & papers and they came together nicely to make these cards.  For this first one, I made it look like the ornament sticker was hanging from the border which I decorated with Dazzles stickers.  I added some other outline sticker sentiments and finished with a bit of Stickles over the holly to sparkle it up and help tie it in with the sparkle in the ornament.


This one was done in a similar way, with outline stickers for the sentiment.


For this final card, the patterned paper and border are both outlined with Dazzles outline stickers.  The ornament sticker has some self-adhesive "crystals" added.

Monday, September 14, 2015

Black and Silver Anniversary


This card started with a pretty patterned paper I got in a purchased set of hand-made papers.  It was a black fibrous paper with silver metallic hearts & dots.  The focal is a three-dimensional metallic Papier Tole piece made from a kit from HOTP.  The bottom edge was cut with an edgeability die & insert.

Sunday, September 13, 2015

Thank You, Thank You, Thank You


Here we have three thank you cards.  This first card features patterned paper that came in my Cardmaking and Paper Crafting subscription. The focal was made with glossy card stock, alcohol inks, cut with JustRite's "Nested Oval Medallion" die & stamped with their "With Sympathy" stamp for the frame and HOTP's "Roses Small Stamp" before being heat embossed with black powder.  The sentiment was cut with a Spellbinder's Die and decorated with Dazzles.


The patterned paper for this card also came with my Cardmaking & Papercraft magazine.   Here it is paired with a coral colored card and some coordinating satin ribbon.  The focal was created by embossing a piece of card stock with a metal stencil & then stenciling it with dimensional paint.  I then fussy cut around it before adding it to the card front with dimensional tape.


This final card uses a couple of purchased die cuts (HOTP) with scraps from one of their patterned papers.  If you look closely at the top of the card you see that the patterned paper has a "v" cut in it.  That was the way the scrap was when I found it and I decided I liked it that way! :)

Saturday, September 12, 2015

Thinking of You Cat

For this card the focal is done the same as many I've made (glossy cardstock, distress inks, black embossing, Spellbinders "Labels Twenty-Nine" die, JustRite's "Good Friends Labels Twenty-Nine", cat stamp from Inkadinkadoo, and sentiment from K & Co).  Rather than coloring in the flowers, I added several small store-bought ones.

Friday, September 11, 2015

Thank You Papier Tole


Today's cards are a couple made with a Papier Tole Kit from HOTP ("Enchanted Garden").  This kit has a metallic sheen that is simply gorgeous.  In addition, I used some "freebie" tags that I downloaded and printed from their "Paper Wishes" site (and stamped with my own sentiments - JustRite's "Fancy Tags" for the first and "Grateful Hearts" for the second).  As you can see, I used some of the "extra art" bees to add to the tags on the first card and added some ribbon to the 2nd card.


Thursday, September 10, 2015

Several "Thinking of You" . . .

Today I have several "Thinking of You" cards.  Most don't need much explanation. as by now you've seen enough of these types of cards from me to know how I do them.  This first one, though, is a rather fun one.  If you look closely, you may be able to see that I did a 3-dimensional "Papier Tole" effect by cutting out flowers from the leftover background paper and layering them with dimensional tape.  In real life, the sentiment appears to go with the card better than it looks in this picture where the light caught it funny.  (JustRite: Die from "Antique Labels One"; Stamps from "Royal Antique Labels One" and "Enjoy the Day Vintage Labels Four")

On this one, I like the addition of the white embossed piece, though I wish I had matted it with a narrow black edge to help tie the black embossing in better.  The stamp I used for the focal (JustRite "Vintage Rose Medallions" & matching die, sentiment from K & Co) has roses which I attempted to color.  It didn't work out well, so I cut little flowers from extra of the background paper (I think this was from HOTP - Rosemary & Thyme pack) and glued them to cover the mess. :)

For this one I needed to tie the focal (JustRite "Thank You Labels Twenty" & Spellbinders matching die) in better, so used some thin outline stickers in gold to form an edge around the patterned paper (came with my Cardmaking and Papercraft subscription).

Wednesday, September 9, 2015

Thinking of . . .

Today I have a couple of cards.  For each of them I had to answer the question, "How do I pull these elements together better?"  For this first one, I had the focal pre-made (JustRite's - die from "Nested Oval Medallion" & stamp from "Vintage Rose Medallions"; sentiment from K& Company), and the paper picked out when I realized that the black embossing really stood out and didn't work as well with the white and pink paper as I had thought.  In this case I added some Dazzles to add black to the corners and upper and lower edges.  This really helped tie things together better.
This second one had a similar problem.  The white on the focal (JustRites "Vintage Labels Three" die, & "For All You Do" and "Grand Sentiments" stamps) stood out against the more cream-colored background (paper came with Cardmaking and Papercraft magazine).  I went through my stash and found these white die cut embellishments for the corners to help pull things together better.

Tuesday, September 8, 2015

Kitty Thank You


I recently celebrated a very special birthday. It was special not because it was a "milestone year" (it wasn't), but because my daughter made sure it was the best birthday ever. :)  Among other things, she gifted me with a massage - wonderful!!!  Naturally I wanted to let her know how much I appreciated all she did for me.

This is the card I made.  It HAD to have a cat theme since she loves cats.  I had made the focal (glossy card stock colored with alcohol ink and embossed with white powder using JustRite Stamps "Thank You Labels Twenty" and "Grand Sentiments" and cut with a die from Spellbinder's "Labels Twenty").  The patterned paper was from a DCWV mat stack.

The "owl and the pussycat" in the background paper were too small to fully carry out the cat theme that I wanted, but I had a challenge figuring out how to add a larger cat.  I have not yet found much in the way of cat stamps that I really like, so couldn't add one that way.  And I don't have any cat dies either.  In going through my stash I came across a piece of patterned paper with cats on it.  YES!!!  I simply cut one out of the paper and completed my card! :)

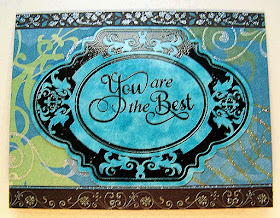
You are the Best!


This card may not be finished as I still feel it's missing something - but it's a quick and easy start at least!

Background paper: from DCWV "All Dressed Up"

Focal: Glossy card stock colored with alcohol inks and cut with a JustRite "Vintage Labels Two" die.  It was then stamped with stamps from JustRite "Grateful Heart Vintage Labels 2" and JustRite "Grand Sentiments" and heat embossed with black embossing powder.